Thursday, June 30, 2011

I was the appreciative recipient recently of some vintage newsletters from the 1980's, sent out by a Wisconson group and titled KNOTS & NOTES, editor Kathryn J. Johns. Each one is only 3-4 letter size pages but it's a nice step back into history that seems like only yesterday.

The first one I picked up was dated March 1985 and on the next to last page, I found a name I recognized: Marilee Rockley! She donated a pattern of a simple butterfly. So I tatted it! However, it's not right...I got the wings upside down! Even so I think it's pretty. It's tatted in Lizbeth size 40 but don't remember the name of the colorway.

I haven't tatted much this week. On Tuesday night I bobbinlaced with my lace friend and when I got home, I started an embroidery project. I worked on that project a little bit last night but I also spent a lot of time going through some magazines I found in a closet. Most of them had pages marked with projects I want to do...some day. One of them had this page of letters from readers. THREE times TATTING is mentioned! They are marked with a red star.

If you click on it, it should enlarge and you might be able to click again and get it bigger and easier to read. Look at how tatters were generously sharing their ideas even back then! Oh, this is a Needlecraft magazine but I don't remember the year, either 1915 or 1916. I'm not sure I understand what the first reader is talking about in the "second thread". It sounds like she is making a ring but if it's a second thread, that would be the ball thread. Perhaps she is saying she weaves the thread through the fingers and holds it in a pinch but I really can't tell. Can you?

I'm going to be hosting a thread giveaway on the 4th. There will be more than one giveaway but they'll all be announced and running at the same time. Since so many people might be traveling for the US Fourth of July holiday weekend, I thought it prudent to start on the 4th and let it run until the following Sunday. So this is a heads up, in case YOU are traveling! One clue...all the thread is tiny thread, probably size 70 or 80.

Monday, June 27, 2011

Gator Time!

Saturday I tatted the alligator bookmark from Dianna Stevens' Animal Bookmarks, A Tatted Zoo. It's part of an exchange I've arranged with someone. I love how it tatted up and it reminded me that I should mention something about this book because I've tatted other bookmarks from it. Dianna's directions are excellent for a beginner. Her diagrams are color coded plus she breaks down the tatting into segments with a diagram for each part plus numbered written steps. The only thing she didn't do was tell you how much thread to use and that's pretty common.

So I'll tell you! LOL! I used size 20 Flora variegated for the green and size 20 Lizbeth Mocha for the brown. I wound the green shuttle full and the brown one about 3/4ths full. I know...that's not real helpful because it varies according to what kind of shuttle you use. I use my trusty Clovers almost always when I'm doing serious tatting and I think they hold close to 10 yards of size 20 when completely full. The green was not quite that full and I suspect the brown was more like 7 yards, maybe 8. Anyway, I ran out of green and needed about 2 yards more. The brown barely made it to the end of the body in the first round and then I had to wind more brown to finish the underside.

I also wound my green on the shuttle with the shuttle winder shown here. It's great to use when you have to fill the shuttle or need to unwind one. Yes, it works both ways! I just wish it was motorized and for the cost, it should have been. I think it winds a bit looser than when I wind by hand so it may have loaded a little less on the shuttle than if I had manually wound it. I don't use it enough to know how to control the winding tension with any precision.

It took me 3 1/2 hours to tat the alligator. Yes, I timed it. I don't always do that but when someone asks about selling tatting, I check the time it takes to make it. It would not be feasible to sell this bookmark for profit, IMO, but it makes a wonderful gift for the right person, and in this case, an exchange of goods. I'm a fairly fast tatter too so I don't think the time is too long. I made ONE change in the pattern. I added an amber glass bead in the eye ring. The thread behaved so nicely that I would not have had to block it except for the head. The long chains needed some coaxing and even after I scanned this, I reshaped the top chain on the snout so that it's more realistic.

I would recommend this book to anyone - for a fun whimsical tat and for beginners.

Do you know what this is?

It's the paper from my blocking board. I showed how I change the paper on my blocking board in this post. At that point, I switched from waxed paper to parchment paper which lasts much longer. (It seems it's been TWO years!) If you enlarge the scan, you can see the zillions of holes! I changed out the small board a few weeks ago but haven't done the big board yet. I had to buy more paper. I use it for cooking more.

I like a blocking board better than ironing although I do press from time to time, especially if I'm using spray starch to stiffen something. The problem with pressing is that it flattens the stitches. That probably only matters if you are in a competition or exhibit, but it's good to keep in mind. When I use a bookmark, the same thing happens from the weight of the book.

Our county fair is not until the 3rd week in July but I have to send in the registration before that so I'll probably take some time out in the next week or so to get together what I want to enter and possibly make something new. I still have my 2 big projects I'm working on as well so whether I post or not, I'm around!

Sunday, June 26, 2011

#13 of 25 Motif Challenge

This edging was easy-peasy too. This is figure 10 of Plate 2 from D.M.C. Tatting.

You might remember back in February that I posted motif #5 which features a series of rings with the thread joined from the base of the ring to a picot at the top to produce a line of head to toe rings which we now accomplish with split rings. I tatted it according to the directions though and crocheted the header. The tatting is done in two rows. The first one is rings with long picots on one side where the second row of tatting is joined and short picots on the other side where the crochet is done. The second row of tatting is all chains. Very simple, but effective.

I was itching to use some of the new thread I bought last weekend so I immediately tatted up a more contemporary version in bookmark form. I used split rings and made the picots the same size on both sides. Then I tatted the chain pattern all around. I'm pretty certain I've seen this pattern somewhere too. More and more I see elements from this publication morphed into lovely patterns we already have.

I can never seem to get the crochet part done to my satisfaction but the directions are to join in the 1st short picot of the ring, *ch 1, sc into the 2nd short picot, ch 7, sc into next short picot, and repeat from * for the length. At the end, ch 4 to turn, dc into the ch between the first two sc, *ch 1, skip 1 st, dc in next , and repeat from * for the length of the piece. I actually used the same count this time, not decreasing anything! I used size 20 on the tatted piece and size 40 on the crochet. Maybe I need to go to something even smaller for the crochet. I was using a size 14 hook too, but it just seems loose and uneven.

Saturday, June 25, 2011

A Note About Designing

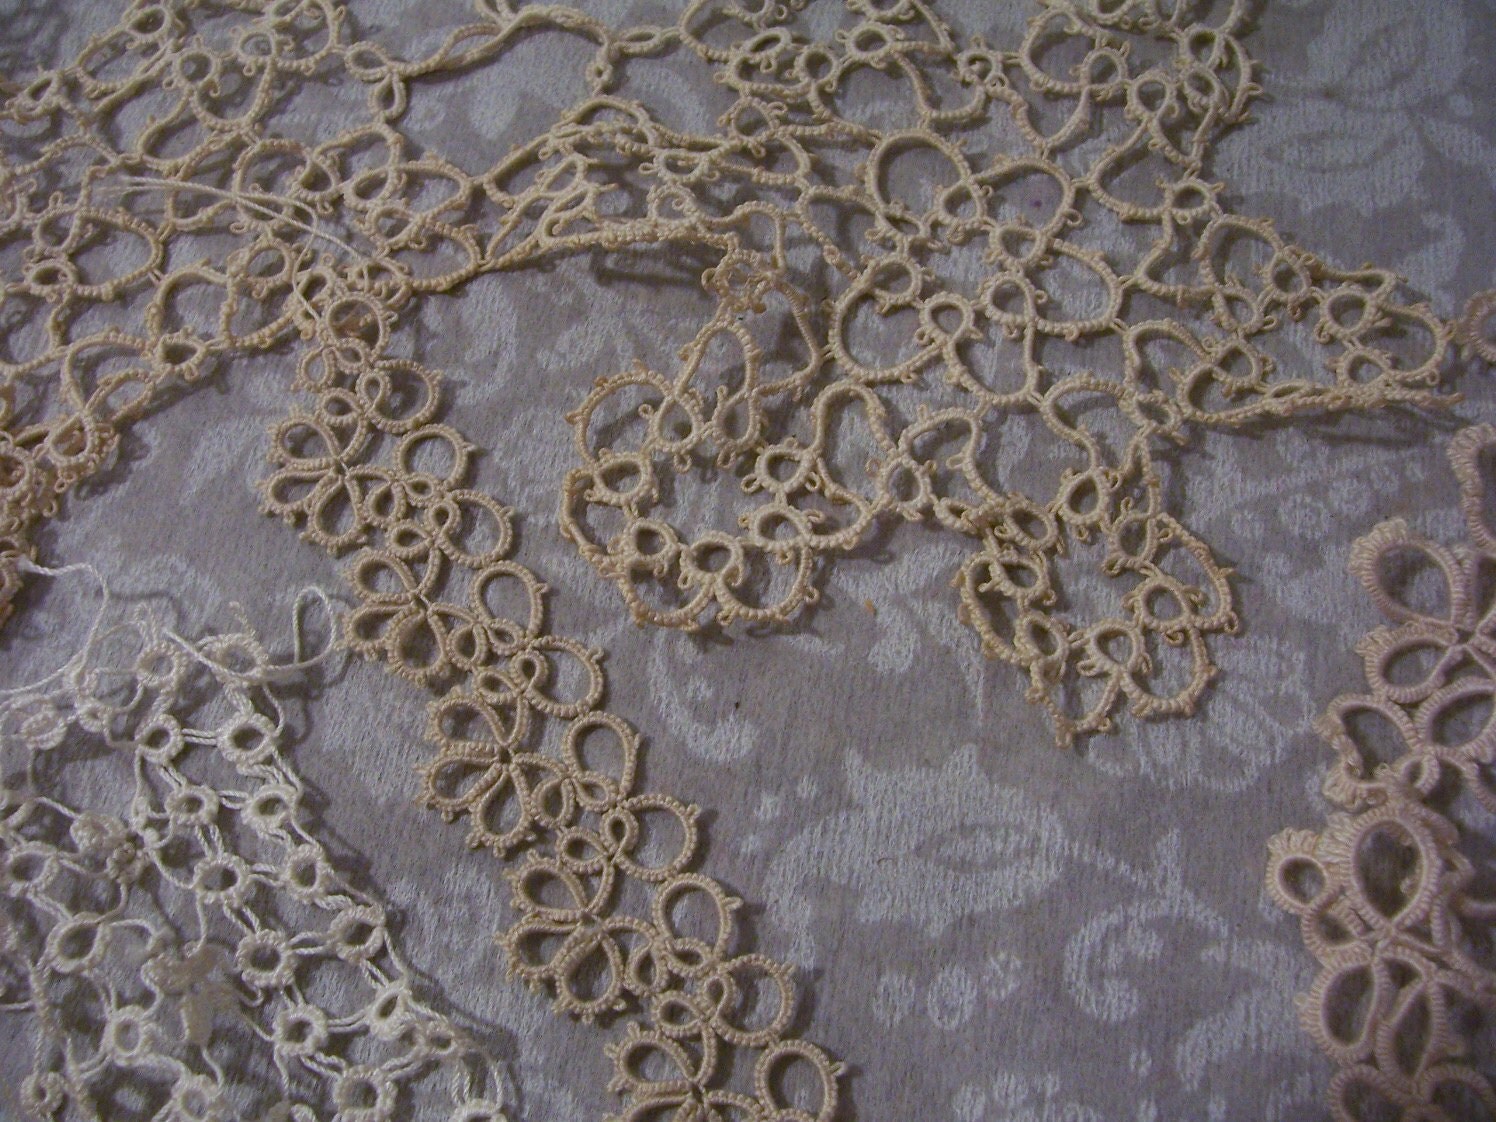
While I was surfing Etsy the other day, I came across this lot of tatted pieces for sale. I'm not sure which picture will come up when you click on the Etsy link because it just goes to the listing and not necessarily the one out of a group of photos that I was looking at. I posted it on the Tatting Goddess yahoo group in case anyone was interested in purchasing it although I think it is probably more suitable for CQ-ers to use. There was one edging I was interested in, to tat, not to buy. I'm pretty sure it is a vintage pattern but I haven't taken the time to look for it in my extensive collection. I found it in a House of White Birches publication shown below, Book #4 titled "Old & New Designs in Tatting & Crochet Braids". They republished many old vintage books and still hold the copyright.

I decided last night to try to duplicate it. If you're concerned about copyright infringement, keep in mind that I do not claim the design as my own, I'm not publishing my stitch count, and I'm not selling anything in relation to this experiment.

I was able to get a close stitch count from the Etsy photo but it still didn't tell me how to tat it, so I drew out the shape and tried to find a logical direction to tat in and a starting point. Then I sat down and tatted according to what I'd figured. Right off the bat something was wonky. I went ahead and finished the first sample and then compared it to the original. At that point, I could see I'd started off in the wrong place. Close, but it made a significant difference in the final look.

This morning I started tatting at a different point and it went much smoother. I also noted my clover at the bottom seemed a bit bunched so I changed the stitch count slightly as I proceeded to the next repeat and it lays better but I'm not sure it's looking the way I want. I'll probably tat a few more samples with minor changes to get it the way I want. I missed a join too and that makes a difference in how it lays.

For this sample, I wound approximately 3 yards on my shuttle and this is as far as I got before I ran out of thread. That means this edging is thread intensive. I used size 20 Manuela and that doesn't include the thread from the ball for chains. So maybe 5 yards total for just this much tatting? A finer thread would take less, of course, and you would work up a sample and check accordingly. This is important if you're using hand dyed thread because it comes in 50 yard skeins. In size 20, I'd only get 10-15 repeats of this motif which probably would not be enough for a mat so I'd need to order more than one skein. In size 80, it would probably be enough for a hanky edging but I'd check it out first!

Okay, the purpose of this exercise is NOT to show you how to copy someone else's pattern. The purpose is to show you one way to design something yourself by using a process similar to what I did with the edging. If you're clever enough to figure out an existing design, you're clever enough to design your own patterns.

I googled images with the search word "scroll shapes". One of the hits was this freebie page, Free Vector.com and here's one I picked to save in my "Inspiration" folder.

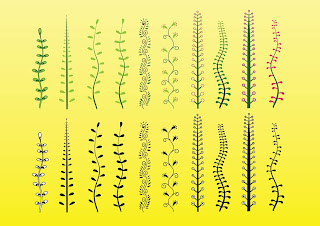
I'll probably use this more for embroidery but I'm posting it here because the lines are simple and a good example to start out with.

Here are some ideas to think about. The center of each of these is a line. Some are straight and some are curved. Chains are the most common way to depict a line, both straight and curved. How many ways can you tat a chain? The usual way with straight tatting, lockstitch chain, purl chain, rings thrown off chains - those are the first that come to my mind. The shape of your line will determine which technique you'll use.

Now see all the things outside of the lines? What kind of tatting comes to mind? Rings, beads, block tatting? So you start building your design. Are you going to tat it in one go or are you going to do sections? What order makes the most sense? As you put it together, other ideas will come to you and you may end up with something ENTIRELY DIFFERENT! It happens all the time.

Give it a try, play, and feel free to email me your results!

Friday, June 24, 2011

Pretty Chatelaine

I was browsing Etsy yesterday, looking at all the pretty things related to lace and lacemaking. I came across this Dragonfly Chatelaine by Lady Dusty Rose which I found intriguing, especially since she mentioned tatting at the same time.

These are her own lamp worked beads. There's a cutter (great for airplane trips!) and a hook. And see the thread wound around a cylinder? That's the ball thread holder - or shuttle! Isn't that clever? I was tempted to buy it but I'd already made a few purchases and I thought I'd like different colors, so I'll bide my time and see what she comes up with in the future, but I figured there were lots of tatters out there who would especially like this color combination. Or who love dragonflies. I love dragonflies and lampworked beads so that was a big draw for me to begin with! The Chatelaine is worth the cost of the beads alone, IMO. I've had a few lovely conversations with her and found her to be very pleasant.

Awhile back, during another browsing session but this time on Flickr, I found a collection of paper shoes done by a man named Carlos N. Molina and I asked him if I could post about them on my blog. He graciously said yes. Unfortunately, I could only manage to get a thumbnail photo to post but you should go see the whole collection on his site anyway to appreciate the depth and breadth of his skill in paper art.

I did buy these sweet lace clothespins from Inspirations by Faith. I couldn't be too bad after my expenditures from last weekend's Lace Day! These are pretty to look at but can also be used to roll ribbon or lace on. Hmmm....you see where this is going don't you? I'm thinking about upcoming hand dyeing days. I better get busy tatting some edgings!

Wednesday, June 22, 2011

#12 of 25 Motif Challenge

I thought this one was going to be much harder than it was! This is Plate 2, figure 9 from the D.M.C. Tatting by Therese de Dillmont which I've chosen to use for my 25 motif challenge.

The idea is to take the original instructions and tat them, updating with new techniques when possible. I also like to show some potential variations and use elements we have today that were not widely available back then, like the beautiful variegated threads and a huge assortment of beads and other embellishments.

Remember scallops? They are rings that are not completely closed. This edging starts off with a series of scallops, 4-6-4 ds.

Originally, I thought I could come back from the end of the row for the second row but my 2nd shuttle thread was at the beginning, so I still had to end off and start with 2 shuttles for the second row. This is mostly chain work with rings thrown off the chains but Dillmont only refers to right and left hand shuttle in the instructions.

It tatted up really fast!


Here's the stitch count for the second row.


It was suggested to crochet the header and then tat onto it, but since the single crochet goes OVER the bare thread space, that won't work with this one. The instructions said to single crochet 3 over the bare thread, then chain 5, then single crochet 3 over the next bare thread and continue on that way. The chain 5 was too much and created a loop so I shortened it to chain 3 which seemed to work out well. Then you chain 4 to turn and double crochet after skipping one stitch below. As with the last header, you chain 1, skip 1 stitch, double crochet in the next and continue with this the length. I blocked the tatting part but have not done anything with it since I crocheted the header on.

This was such an easy tat that I had time to tat a crown for Barbie with 2 strands of DMC copper metallic floss. My first thought when I tatted the original was of a crown.

So...I'm almost halfway through the challenge! I will complete the challenge before I finish the publication but I'll probably go ahead and tat the rest of the publication just because I want to follow through with it. But then again, I might be sick of it by then!

Monday, June 20, 2011

#11 in 25 Motif Challenge

Alrighty! I'm up to figure 8 in Plate 2 of the D.M.C. Tatting vintage publication.

This is the 2nd of 8 edgings.


Here's a close-up of the tatted part. There is a stitch count version at the end of this post. This is rings only and very simple. The hardest part is keeping the bare thread space consistent. I eyeballed it and you can tell, if this was a bigger picture, that I was off here and there. You could easily attach it to fabric just as it is but the instructions included a crocheted heading.

I used size 20 for the tatting and size 40 DMC for the crocheted part. I know I didn't use the crocheted header in the last figure but this one was a little different and I wanted to try it. I joined the thread at the base of the small ring and then single crocheted 3 times on the bare thread. The directions then said to chain 7 stitches and then single crochet 3 times on the bare thread before the small ring. Chain 7 was too long so I reduced it to 5. I realized later that the number of chain stitches should be the same as the single crochet involved in the small ring. There are 3 sc before the small ring and then 1 in the base of the small ring with 3 following, so that is 7 sc. By going down to ch 5, I probably should have only done 2 sc before the small ring, 1 in the base, and 2 after for a total of 5 sc. Still, it seems to look okay.

The second row of crochet is simply ch 4 to turn, *skip one stitch, double crochet in the next stitch, ch 1, and continue from * to the end.

This is a second piece I tatted to make an edging for a bag. I didn't want to use the original sample as they are all going into a binder along with my notes. I joined it all together which was great for finishing but tricky to block. I blocked it on the corner of my blocking board (Styrofoam covered with parchment paper). The tatting didn't need blocking but the crocheted part did. I might have had more luck steam pressing it but I was going somewhere and decided to just pin it.

Remember the embroidered piece I did a few weeks ago? I decided to make it into a little bag. The tatting is the perfect touch.

Here it is flat. Since making a bag was an afterthought instead of part of the original plan, I didn't place my ribbon opening well.

I buttonholed an opening in the seam which is in the back. I really think it should have been in the front. Next time....

For this one, I just draw up the ribbon and wrap it around to the front. I did think to miter the bottom corners so that it has a flat bottom allowing it to stand if desired!

Here's the stitch count. I didn't measure the bare space but it would depend on what size thread you're using. I think I read once that you need a bare thread from one ring to the start of another to equal half the ring size more past the picot on the right side. Obviously if you are tatting in size 80 that distance is going to be much shorter than in size 20. Click on the photo and it will be bigger so you can see the numbers better.

Of course I had to try it in color and with beads! I have an idea for this so it may show up in a future post.

I've figured out that I can't comment on some blogs from work, but I can from home. I have no idea why because I CAN comment on some blogs from either location. So hopefully I will remember to go back to the blogs I've tried to comment on and couldn't when I get home this evening.

Saturday, June 18, 2011

I drove 6+ hours only to get this....

Six balls of thread (I put two others back), a spool of metallic thread, two commemorative bobbins, two plain bobbins to match the two I'm missing from a dozen (not pictured here), and a gift.

Lunch at Omega's (a huge BLT plate with cole slaw, fries, a muffin and sesame bun) with some tatters!

Who just happened to be these ladies, minus Diane. Sue Anna from Sue Anna's Blog, whose computer is on the fritz; Diane from Lace-Lovin' Librarian, Barb Gordon who does not have a blog but is a familiar voice on many lists, Merrilee from Yarnplayer's Tatting, and me. Diane was not there until we returned from lunch.

Of course Diane felt compelled to give us one of her fabulous blinged shuttles! I'm getting quite a collection now. It's almost embarrassing! You'd think I was stalking her just to get one of her pretty shuttles.

I traveled with my lace friend Sally who took the bobbin lace class and finished up a gorgeous snake bookmark. She ordered the lunch L.A.C.E. provided, so didn't join us. Another member of our lace guild, Regina Bouley, came separately and also took the bobbin lace class so Sally wasn't without company.
I also got to meet Lelia, from Stitches of Life II and her friend, Karol, of Rosebud's Stitching.

It was a fun outing even if I was tired as a dog by the time I got home and crashed on the sofa for an hour. If I didn't mention it, this was the Lace Day sponsored by the Lacemakers of Illinois, L.A.C.E., Lacemakers and Collectors Exchange. My bobbins were hand painted by L.A.C.E. member Kate Wild.

Thursday, June 16, 2011

It Was a Good Night

Indeed, a good night! I finished up my Rose Ground sampler that I started the night before and then tatted the first part if Plate 2, figure 8 in the DMC tatting. Crochet will come later.

It was as good as eating ice cream and drinking champagne, surrounded by scented colorful flowers.

Good Times....

Wednesday, June 15, 2011

Anyone notice I don't have word verification anymore? It was suggested in a blogger forum to remove it as a way to help people comment easier. They said Blogger has spam filters now anyway. So I still moderate to approve the comment before it shows, but it's one less step for you.

I haven't started tatting figure #8 in the challenge but I wanted to show this because it has the crocheted header on it, like so many of them do in this vintage publication. I think it's kind of a pain and am not certain it's even needed for contemporary tatting, but I've tried it to see how much trouble it is. Given the lack of instructions, such as thread size and hook size to use, I managed okay, but would like a little more direction.

So...I was digging around in a small bag of "stuff" I found in the studio closet while looking for something else and guess what I found?

A length of tatted rings with a crocheted heading! I did NOT tat this. It's a vintage piece that was in some other lace I bought somewhere once upon a time. I didn't even know I had it!

Here's a close up. I think the thread is at least size 20 but it could be size 10. I can't really tell if the crochet thread is the same size or smaller.

Now I would like to find something that an edging like this is attached to. Did they stitch right up next to the tatting or was the outermost crocheted chain caught by sewing thread to lay against the fabric?

Anyone have something they could show???

Tuesday, June 14, 2011

Tatting Tea Tuesday

Wild Olive had a Tea Party Week recently. I was so hoping to find time to make the tea cup mug, embroider it and add a touch of tatted lace, but it was not to be.

Well....it could be if I wanted to delay this post even longer.

But, I've been really lax about Tatting Tea Tuesday and so wanted to post something relevant. I have no tatting at all to show today. I ended up playing with bobbin lace last night. Thought I would just wind some bobbins to work on a project tonight when I meet up with my lace friend but I so wanted to learn Rose Ground that I thought I'd go ahead and get started, saving the rest for tonight. Ha...I finished it! But, as usual for my first attempt, there is room for improvement so I will probably do another piece tonight anyway.

In the meantime, I have a lot of tatting that needs to be attached to something or other, plus 3 projects still in the works. I need to get back to the rosettes and the other project I hinted at in that post. I also keep coming across the tatting HERE that I started for a specific rock. The rock is on the bookcase and the lace is nearby with my other tatting. I just can't seem to get back to it!

I want to do something with the embroidery I finished recently and ....on and on and on. I did not seem to accomplish much on my days off but it I enjoyed them anyway. I did mean to finish up the fabric sorting and did not but I did go through some thread I was gifted with and will be having a giveaway related to that soon. It's all the fine tatting thread, not sure of the size since I have always mistaken the big "60" for the size when it is actually the yardage. It's either size 70 or 80, the tiny tatting thread. There's a story that goes with it so check back.

So, just for fun, here are some links to tea parties and crafts on other blogs:

Such Pretty Things has eye candy to die for and can't you imagine some pretty delicate tatted lace mixed in there?

Over at The Tea Cabinet, I saw some links to additional crafts. There's the edible tea cup party favor with the recipe to make.

There's a teabag wreath which I might make from all the tea my son and I seem to have accumulated and will never use. I could bring it into work and share it.

Look at these tea party goodies! Teabag shaped cookies - Yum!

Pretty tea sachets to make from Martha Stewart.

Monday, June 13, 2011

Figure 7 edging

I finished this up last night and blocked it before going to bed. It's tatted in size 16 Finca and the beads are probably size 10. They're slightly bigger than your typical seed bead. The ribbon is for scale. It's a 1/8" ribbon so you can see the edging isn't very wide, maybe 1/2". It was harder to work with in this size than the size 20 and seemed to take forever to tat.

This time I tatted the lockstitch chain across without any rings and then I came back across tatting a chain 5-5 and joining in the previous joins. It will be a surface trim on a bag which I won't show until next month. It looks better than in the scan. I tried scanning it with several backgrounds but the beaded rings simply don't show up well. I could try a photo, a macro, but I think you get the idea.

I realized in the shower this morning that I got a sunburn on my arms and my knees yesterday during a family outing. I was surprised, first because I was mostly at a table with an umbrella shading me and secondly, because I didn't even notice it until the hot water hit my skin this morning. So now I've got a farmer's tan to somehow even out or will wear sleeves all the time when in public. LOL!

It really chilled out the past 2 days. It's only 66º right now and about 45 minutes yet til noon. I imagine it will warm up to 70 something in the early afternoon. In the meantime, I'm enjoying it.

Saturday, June 11, 2011

#10 in 25 Motif Challenge

Yee Ha! I'm making up for lost time!


Alrighty! This is the first of eight edgings in Plate 2 of D.M.C. Tatting. It's titled as Figure 7 and is the simplest, except for perhaps Figure 8, in the series.

I used the trusty DMC Special Cordonnet size 20. It took 2 shuttles as a ring is thrown off of the chain. I suppose you could do the shoe lace trick but the rings are always a little wonky, leaning one way or the other when you do that. Blocking helps. It's just easier for me to go ahead with 2 shuttles. I put 3 yards on the chain shuttle and a little over 1 yard for the ring shuttle. I tatted all of it for this length of 7 3/4 inches.

This is just the first part. I did do directional tatting but the rings are so tiny that it's doubtful you can even tell. Using the ring shuttle, tat a ring of 2-2. Then reverse the work and chain 5. Using the ball shuttle (or chain thread, however it makes sense to you), tat a ring of 1-1-1-1, close the ring and then go back to using the ball shuttle as your chain thread and chain 5. Reverse work and tat the small ring of 2-2, same as you began with. Continue in the same manner for the desired length. Make sure you snug up the chain stitches before tat the ring on the chain.

On the original, the header is crocheted but I just didn't want to diddle with it. I used size 40 thread and put a few yards on my shuttle, leaving it connected to the ball. I joined in one of the small rings at the end and tatted a small ring of 5-5. It was a completely arbitrary number and the next time I might make it slightly smaller. Then I tatted a lockstitch chain of 6 stitches. In a lockstitch chain, you flip one stitch of the ds but not the other one. It really doesn't matter which order as long as you are consistent throughout. I then joined in the next small ring and tatted another ring. You do have to reverse the work to tat the ring and then reverse again to tat the lockstitch chain.

When I got to the end of the piece, I tatted a split ring in the last ring. since I wasn't using 2 shuttles, I just made the ring around my hand extra big and used the ball of thread like a shuttle. It was a little awkward but it was only 5 stitches and the only split ring.

From there I turned to go back and tatted the same lockstitch chain, 6 stitches to each segment and joined in each ring picot across. The number of stitches and size of the small ring might change according to the size thread you are using.

Here's a close up of the finished edging.


It ended up being the perfect length for a bag I want to embellish.....but then I don't have a sample for my sample book so I'm tatting another one.

This one is in Finca size 16, much smaller, and with beads. I'm having second thoughts. I think it will be okay but it just seems so tiny compared to the white sample! I hope to finish it up tonight but I'm also preparing for a family thing tomorrow so it might not be til Monday.

Friday, June 10, 2011

#9 in 25 Motif Challenge

Surprise! I finished figure 6 of Plate 1 in the D.M.C. Tatting publication.

This is the last one in Plate 1 and it is defined as a galoon. Remember a galoon is a surface trim, like braid, instead of an insertion or edging.

I tatted it in DMC Cordonnet Special size 20. I didn't do a very good job with closing the gap in the clover on this one but I paid special attention there later. I blocked this one a second time to open it up so you could see the chains. It has a tendency to pull in towards the center but the chain is an important element of the design, I think. A diagram is at the end.

I had some Lizbeth size 20-108, Sherbert Delight sitting on my stand. I love this colorway on the ball but I'm always disappointed in the way it looks tatted up. The colors change enough to keep it interesting and the changes are on a regular basis, but the dark is too dark for me. I've been trying to use it up in things I don't care about so it got elected for this.

I tried to make sure I pulled the clover together before tatting the chains on this and I added yellow beads between the clovers. The piece is 9 inches long and I was tatting it specifically to put on a headband. I didn't pull this one out in the blocking so the chains don't show up as much.

At the moment, it's just pinned on the headband at the ends but when I stitch it down, I'll make sure the strip is pulled outwards so that the chains show up.

I have so little hair that I'm not sure I can wear this but I tried it on anyway. I could find a home for it but will probably keep it in my samples for this challenge. I think some very narrow ribbon and perhaps a few small tatted blossoms on top of the galoon will give it more dimension but it's good just like this.

Here's the diagram. The sequence of tatting starts at "A" and ends at "H" and then you start over again.

Clover:
R1: 6-3-3
R2: 3+9-3
R3: 3+3-6
Reverse work
Ch: 3-3
Using the ball thread, make another clover. You're going in the same direction and do not reverse work until the this clover is complete and you're ready for the chain.

This means you use 2 shuttles wound CTM (continuous thread method). Initially I started out with a full ring shuttle which was around 9-10 yards but I only put 6 or 7 on the ball shuttle because I had it in my head that most of the rings were from the ring shuttle, but you are actually going back and forth. I had to add another yard to the ball shuttle so I think 9 yards on each in the size 20 would produce 9 inches of galoon. Beads are optional and you could use them any way you want in your own creative style.

Next up in this challenge are a series of edgings which look very pretty. They include crocheted headers so we'll see what happens there.