Wednesday, February 02, 2011

Motif #5 in 25 Motif Challenge

I had fun with this galoon and made lots of observations that I hope will help others who tackle this publication. This is the D.M.C. Tatting by Therese de Dillmont found free from The Antique Pattern Library. It's a wonderful repository for all kinds of antique needle art publications.

You might remember from the last post that I went back to the beginning and I am tatting the 6 patterns in Plate I. I just remembered that I tatted a ruffled scallop from another publication that I was going to show in this post but I need to tat it over. So I'll show it in another post. This one is going to be long anyway. Above is the photo in the publication of figure 2.

The pattern is worked in three rows but the second and third row are the same, just on different sides of the rings. The first row, which is the center line of rings, is written: With one shuttle: *3 stitches, 1 picot, 2 stitches, 1 picot, 3 stitches, 1 short picot, 3 stitches, 1 picot, 2 stitches, 1 picot, 3 stitches, close the ring = carry the thread under the ring and join it to the short picot = repeat from *.

So the ring is made with 1 shuttle like this: 3 - 2 - 3 ^ 3 - 2 - 3, clr
^ stands for "short picot"
You pull the shuttle thread from the closed ring under the ring and then pull it up through the short picot enough for a loop and put the shuttle through it like a shuttle join. Right next to the last ring, you begin another ring just like the last one and continue the same pattern for the length you want.

I realized as I drew it out before tatting that this is a very clever away to achieve the same line of rings we usually do with split rings. I originally thought the thread going under the ring was decorative and gave it an extra lacy effect but it is just plain practical.

I decided to tat a row of split rings in the same pattern and see how they compared. I had 16 rings in the original length so I tatted 16 split rings. Both are tatted in DMC Special Cordonnet, size 20. As you can see, the split ring length is shorter because you don't have any space taken up with the tiny picot join. The split rings are tatted 3 - 2 - 3/3 - 2 - 3, with 2 shuttles, of course. I also left a tiny picot at the beginning point of the first split ring to join the 2nd and 3rd rows to. That was just personal preference. You might use the galoon differently and chose not to.

I also want to point out that the rings were tatted in the same direction. In other words, the end where the tails show is the end of the length. I started at the opposite end in each, but does it look that way if you are only looking at the rings? I think I would guess the split rings actually started where the tails are if I didn't know better. The only thing I can think of at the moment is that the first line of rings with the thread pulled up through the tiny picot puts some tension on the ring and makes it rounder. Any other suggestions are welcome.

I've tatted the 2nd/3rd rows on the original. The instructions say: With 2 shuttles: Fasten the threads to the 1st picot of the first ring: *1 stitch = join the right hand threads to the 2nd picot = with the two shuttles: 2 stitches = with the left hand shuttle: 4 stitches, close the ring = with the two shuttles: 2 stitches = join the right hand thread to the 1st picot of the next ring and repeat from *

What this means is that the row is chain work with a ring thrown off the chain. I put most of my thread on the chain or ball shuttle and only enough to cover the distance with the ring shuttle. To cover the distance, I usually figure the length I'm going with the thread plus half more. So if the length were 12", I would put 18" on the ring shuttle unless I am also tatting some rings with it.

I joined in the first picot at the left, ch 1, j to the next p, ch 2, r 4 with the ch shuttle, ch 2, j to next p. This is where I started so you just continue the same pattern all the way. *+ (join)ch 1 + 2, r4, ch 2, repeat from *

I went all the way around, improvising a chain and ring at the end.

I did the same thing with the split ring length except I made Josephine rings instead of a small ring of 4 ds. Some vintage designers really liked small rings but I find them kind of ugly unless you are using a fine thread. Since the small ring was 4 ds, that meant 8 half stitches so I made the JK 8 first half stitches. I think they lay nicer than the small rings but you can do it either way. I've put the two together here for comparison.

Another difference I noticed was that the one with the thread pulled through the tiny picot tended to turn on me and I had to be very careful when tatting the 2nd and 3rd row to make sure the thread was underneath the ring.

Now I like to take these patterns one step further, besides updating the pattern, I like to find another way to apply it and I like to tat it in color. I already had a shuttle wound in Lizbeth Springtime and then didn't tat what I had planned so it became this. I used the original method of rings, pulling the thread up through a tiny picot, but I used Josephine knots instead of small rings.

Then I crocheted a little flower to cover where the ends meet. My plan was to tat a band for a plain candle votive holder I have and I was hesitant to join the ends permanently. Once I was done and pulled it around the glass, I found I had measured correctly and it slides on very nicely as you'll see in the next photo.

I thought about gluing it on but I really hate to use glue on tatting unless I have to. This way, the band can be slipped off and washed if need be.

I liked it so well that I've added another photo for you!

Tuesday, February 01, 2011

Recently I suggested a private exchange with Faith over at Simple, Vintage & Crochet. She crochets, I tat, and I had seen a crocheted basket potholder around the same time I tatted the mignonette basket so I thought an exchange of baskets would be fun.

Here's what I got! Isn't this cute? I love the suggestion of a hanky or piece of linen hanging over the edge and the butterfly and the flowers. I crochet too so I can appreciate the skill and time that went into this. Thank you Faith!

Originally I was going to put my basket for Faith on a pincushion but it seemed too big so I decided to make it into a pillow sachet of sorts. It really was fun stitching all the tatted bits in for the flowers.

I made the pillow easy to open in the back and put in a muslin bag of scented epsom salts, Dr. Teal's Therapeutic salts, to be exact, scented with eucalyptus and spearmint. It smells heavenly. In fact, I'm going to make a similar pillow and put Faith's basket on it for me! The salts can be put in bath water for a relaxing soak and smell good in the meantime.

So..now that the OWOH is underway and the exchange is done, I'm back to the 25 motif challenge. I got started last night and I think you'll find it very interesting when I get it done. We have a snow recess today because of the predicted blizzard (lots of ice last night too) so I'll have some time to work on it today.

Monday, January 31, 2011

The OWOH event is now closed. Winners are announced below as well as on my blog post for February 18, 2011.
~*~*~*~*~*~*~*~*~


Welcome to the 5th and final One World One Heart Global Tour! Click here to learn more.

"One World One Heart is a worldwide event for bloggers only. It gives all those who blog a chance to meet and mingle and form connections with those they may not have otherwise met from all over the world. In the past 4 years this event has grown to over 1,000 participants with lasting friendships (and even one love connection) formed along the way. Think of it as a GIGANTIC open house allowing you to travel without ever leaving your home........going from blog to blog(in various countries) seeing the wonder each one has created and meeting all the fabulous people behind those blogs. As a bonus each blogger participant will offer up a "door prize or prizes"....just for dropping by, saying hello and seeing their world. It's really that easy."

Last year was my first year to participate and this year will be my last since it is the final event. I love finding new creative blogs and the people who write them. I love mostly needlearts but have tried all kinds of creativity. Painting is about even with my passion for tatting lace. I also do a little bobbin lace, some needle lace, and Romanian Point Lace. Before I was lured into the tatting web, I loved to crochet with thread, largely because of its lacy effect. I also knitted and quilted but most of those have taken a back seat to tatting.

Tatting is NOT a dying art, btw! There are nearly 200 links in my right hand bloglist, all tatters. The links on my left hand bloglist are other creative people, some that I met in former OWOH events, some that I found through other people's blogs, and some I came across in google searches for a specific craft. Tatters number way more than the list at the right but those are the ones with blogs and no doubt, I'm missing a few. If you've been interested in learning tatting, check out some of the resources, also in the right hand side bar, particularly the link to Georgia Seitz. Georgia has hosted the FREE online tatting class for 11 years now. There are ongoing beginner's classes for both shuttle and needle tatting. There are years worth of classes, instructions, class logs, and patterns. It's heaven for the new tatter, but I warn you, it's ADDICTIVE!

I belong to a local lace guild, Lafayette Lacers, which is chartered by I.O.L.I. (International Old Lacers Inc.) Our overall goal is to pass forward the craft of lacing, teaching and demonstrating in the process. I've taught locally and in other states, even in Canada. I've also traveled and met other tatters around the nation and in Ireland and Australia. I'm currently working on the Masters phase of a tatting proficiency course and hope to finish soon. I think if you'll explore my blog as well as the links in my sidebar, you'll see that tatting ain't like yer grandma's doilies anymore!

I'm offering three prizes this year. You must be a blogger to participate. All you have to do is leave a comment at the end of THIS post. I MUST be able to contact you from your comment. Either leave your email within the comment or make sure your email is available from your blogger profile. If I cannot find a valid means of contact when I'm approving the comment, I will delete it. The event ends on February 17th and I will announce prize winners on the 18th and email the winners that same day for mailing addresses.

I'll be using the online random number generator. You can state a preference for your prize if you wish, but truly, only the 1st number picked will get their choice. After that, if it happens that the prize is still available for the 2nd number generated, I'll honor it but beyond that, you'll have to trust me to choose.

Most of my prizes are tatted. If you're wondering what to do with them, they're great embellishments for clothing or scrapbooking or crazy quilting. If you're into any kind of altered art or mixed media, they'll work there too. Nice also for card inserts or cardmaking. I've scanned them with a US dime, our smallest coin, so you can get an idea of the scale of the pieces.

This is a collection of hearts and butterflies. You never know, I might throw in a few more teensy tats before it's over.
The winner of the tatted hearts and butterflies is Gayle-Page Robak of Canada. Gayle works with mixed media and digital art. You can view her blog here!


If you're into fantasy, you might enjoy this dragon and the seahorses. Two of the seahorses were hand dyed by me. Some day I'd like to make a collage of Tatted Fantasy Creatures and dye them according to a specific color theme.
The next winner is Rebecca of Rebecca's Rainbow Kisses. Rebecca is from Massachusetts and is the mother of 4, including a set of triplets. I have a cousin with triplets and know how much work that is! Rebecca also makes wonderful clay art dolls and beautiful jewelry, among other things.


This prize is a pair of luscious tropical lemon-lime earrings and a bobbin lace bookworm bookmark.
The final winner is Calej from the Philippines. Calej expresses her art through many different avenuse. You can see them at Calej d'Art.


Most small tatted items, like the butterflies, can be completed in 1-3 hours. Anything over a inch or two will take longer. The tatted edging I made for my daughter-in-law's wedding hanky took me over 20 hours to complete. A doily that I made for my guild's event took 12-15 hours. Most bookmarks average 3-4 hours. If they are intricate or with a fine thread, they can take three times as long as that. I tatted a simple edging for a 6 inch pillow last week and it took me two evenings. Part of that time was sewing it on and I didn't tat the entire evening either time but I'm sure it took at least 3 hours for the tatting part. I also spent time test tatting three threads to see which color/size would work best so there was some time lost there too. You can only imagine how long a table runner or collar would take. That's why you rarely see a tatted tablecloth!

S0...good luck to everyone. If you have questions, feel free to email me.

Sunday, January 30, 2011

Yes, I got some "color" tatting in! This is Fox's Abigail. The center is some Altin Basak and the outer part is a Lizbeth thread. I got to empty a shuttle in the process! At first it seemed like it was going to take me forever to tat this, but next thing I knew, I was in the gate and ready to close it. Very nice design Fox!

This is how I spent my Saturday afternoon. This class wasn't in the library calendar that was sent out. In fact, I only knew about it because one of the organizers emailed me and asked if I wanted to participate. I love taking Rena Brouwer's classes. In fact, we talked today about how long ago it was that I took the first class. It was decades ago. My two youngest sons were toddlers and the older of the two hit 30 last summer. I remember especially the class with baby robins on a branch. I bet I painted that one 4 or 5 times after I got home because I loved it so much and wanted to perfect it.

I really didn't think I was doing very well even though both Rena and the lady across from me got excited about the colors early on. Then the lady across from me went on and on about how the light looked in the snow. I couldn't see it at all. Now that I'm home and can step away and look at it without a brush in hand which makes me want to-do-something-more, I'm pleased (mostly) with how it turned out. There's a fluffy area behind the tree that I'd like to do something more with but chances are that I won't. At least not now.

I had to make a trip to the post office Saturday morning to drop off a package and to pick one up. I love packages from overseas! You get cool stamps and cryptic little notes on the envelope. This one came from S.Africa and I've been expecting it since I ordered it.
(Ha! Just realized my address showed which led to me learning how to edit a photo in serif and export it as a jpg!)

Inside was a pristinely wrapped package, tied with very thin twine. I love feeling fiber from other places.

And here it is! I ordered this from Jezze who designs and prints her own fabric. She does a lot of other things too. I originally happened upon her blog when she showed some tatting but there's not really a lot of tatting on there, so it went into my "other" bloglist. I recently saw this small notebook cover made from her fabric and it was affordable for me so I ordered it. See that sweet folded paper doily? That was her thank you note to me.

I'm pretty sure it will hold the small moleskin I carry in my purse but it already has a little tablet in it. I might just switch them out. The fabric is heavy duty, like canvas, so I think I'll have it a LONG time. I love how she uses a ribbon and button to simply close it. I'm not sure you can see but there is an additional small pocket on the left which will hold a pen and perhaps some small momentos I tend to gather when I'm out.

Okay, I've been meaning to post this photo for quite awhile and keep forgetting. I found these when I was sorting through a box. They look like darning eggs but are quite small. I have NO CLUE what they are! Does anyone know? I bought them at a thrift store ages ago and I suspect I thought I'd use them for doll heads in soft body dolls.

OWOH starts today. I can join in at any time and may wait until Monday if I can't get my offerings done before the end of the day. I'm going to have three prizes this year and the third isn't ready. Yet. (The event does not begin until after midnight tonight so it will be Monday anyway before I post about it!)

Saturday, January 29, 2011

Motif #4 in 25 Motif Challenge

I went back to the beginning of the DMC Library - Tatting which can be found in the Antique Pattern Library HERE. Plate I has 6 samples and this post is about figure #1. The instructions call this a "galoon" which is a surface trim, not on the edge of the fabric or inserted between two edges. The directions start out: "With one shuttle: 4 stitches, 1 picot, * 4 stitches, 1 picot, 4 stitches, close the ring = 4 stitches, close the scallop....."

Wait! What is a scallop? Were they snacking while tatting? Ooooh...how messy!

Well, since that didn't seem plausible, I looked further. Plate I directions are after the "how to tat" directions which happens to include information about scallops.

This is a scallop. It's made by not completely closing the ring, leaving bare thread. These are plain detached scallops. They are made with 10 ds and "the semi-circles must touch each other at the base." This sample is done in DMC size 20.

This is a sample of connected scallops, ornamented with picots. The directions say: do 3 stitches, 1 picot, *then 4 times: 2 stitches and 1 picot and again 3 stitches, draw up the scallop; quite close to it begin a second scallop, do 3 stitches, join to the 5th picot of the first scallop and continue from *.

We would say: 3-2-2-2-2-3, partial close, *3 + last p on prev r, (2-)4X, 3, partial close, repeat from * for length desired.

I used two kinds of short form in this example. When you have a series of the same stitch pattern, you can enclose it in parentheses and indicate the number of times repeated. We would probably come up with a symbol or abbreviation for "partial close" or simply indicate at the beginning of the pattern that the rings are not to be completely closed. I think Mark Myers calls them "open rings".

If you're not familiar with (Tat-man) Mark's work, he has designed a number of patterns using this technique. You can find some here and here. He uses it a lot to mimic the bobbin lace look in tatting. You can see it creates a very open lacy effect.

So now we get to figure #1. This sample is tatted in Presencia (Fincrochet) size 30. It's a single shuttle pattern, known as a galoon. It's a combination of closed and open rings (scallops). Four ds is the magic number here.

R 4-4-4,clr, turn work. This is probably the same order of work you did in your very first bookmark. It's about the simplest form but we're going to use the scallops as a little twist.
R 4 (scallop), turn work
R 4-4-4, clr, turn
R 4 (scallop) turn (you are now back to where the 1st ring was made)
R 4 + last p of 1st r, 4-4, clr, turn
Continue in this sequence of closed ring, open ring, closed ring, open ring and join the closed rings at picots. I remember feeling confused about turning at the end of some rings. I wanted all my scallops to line up nicely and it seemed that the open part wasn't always where I thought it should be. Eventually I got into a rhythm and it all worked out.

Here's a small sample tatted in DMC Special Cordonnet size 20. I stopped here because I was out of time and just didn't get back to it, but it's a square at this point, and for those with designing minds, it could be a leaping off place for your imagination.

I found a small rock at Purdue one day just outside my building as I returned from an appointment. It was a kind of gold-ish looking stone and since Purdue's colors are gold and black, I thought it was a potential base for another rock cozy. So I brought it home and cleaned it up. I'd just finished the first galoon sample and wondered how it would look in black on this gold rock so I tatted the galoon in black and added beads. I crocheted around the galoon then to cover the rock. It's now with a friend whose last day is Monday after taking advantage of the early retirement incentive. I thought he could use it as a paperweight.

The remainder of the pieces in Plate I are increasingly more elaborate. The next few weeks are going to be busy so I will probably wait until I can focus clearly and then tackle them. I really love a few of them and can't wait to try them out.

Thursday, January 27, 2011

Oh Look! See what I found??

This is Springtime, probably my all-time favorite colorway in Lizbeth. I've used it extensively, this same ball. I even taught a class using it.

So I was winding a shuttle with it to make an edging. I felt something more than thread slide through my fingers and when I looked, doggoned if it wasn't this knot! This isn't a knot within the thread, where it's kinked upon itself. This is two ends knotted together. Isn't it cute how they do that?


Don't forget that the OWOH starts January 30th so I'll be posting my Giveaway then. On top of that, I'm celebrating a Blogaversary soon, on February 13th. There will be a Giveaway for that too. I was afraid it would be a little confusing as the OWOH event goes on until February 17th so ...pay attention!

I have lots of tatting to show. I just need TIME to sort and edit and present it. I crashed when I got home tonight for an hour and a half. Maybe longer. It took me forever to wake up. Same way last night except it was less than an hour. I'm so looking forward to the weekend, not only because I can sleep in and catch up, but because I'm registered for another watercolor class with Rena Brouwer! And that reminds me, my friend Suzanne gave me some watercolor pencils for Christmas and I want to try them out. Hmmmm....nope..it's almost midnight. BEDTIME!

Monday, January 24, 2011

Fun Stuff!

I followed a link on Tea Rose Home and found this intriguing project at Little Treasures.

Bra necklace from Little Treasures

I hate the wires in bras but haven't been proactive enough to take them out. Now I will and see what I can use them for. Tatted motifs would look very pretty here, don't you think? Go see what else she has made from bras! There's another necklace but also hair ornaments and lots of other fun stuff!

I can't believe I haven't removed those stupid wires. It's not like they're the tags you find on furnishings that warn you DO NOT REMOVE UNDER PENALTY OF LAW! Geesh! Did I really think they were supporting something? If you've seen me, you know that has never ever been an issue. You know, I'll bet you could even make a headband out of some of them. (okay, this could get risque so I will stop)

Do you remember that Lace-lovin' Librarian Diane had a giveaway recently of her latest fabric embellished shuttle? And I won!

It was in the mail when I got home tonight! She also sent 3 balls of thread and all in a very Mardi Gras-like bag. I love the glitter on this shuttle. It's in the coating and makes the mittens look like they're in fresh snow. You can't even tell it's fabric. I have got to try this technique!

I was trying to show everything at once but the bag didn't show up all that well so I took another picture after I put it all back in the bag. Thank you Diane!!!

Some days I am easily amused. I was in Walmart the other night and happened to be in the personal grooming section, the sample section to be precise. I found a cute little "toothbrush" that doesn't require water or toothpaste. It's basically for instances like a business lunch or a date, something where you can't readily brush your teeth but really do need to freshen up a bit. Don't have a pic of that, but here's what really intrigued me. I don't have a use for it, honestly, as my hair is so short, fine and thin that a brush is useless on my head but for 97¢, I couldn't pass it up!

It's a portable compact brush. It comes in a lot of colors but I picked this one. See this black spot? It's magic, you'll see.

Here it is open. There's a mirror that you can catch a glimpse of at the bottom. I had to be careful not to snap a photo directly at the glass but it does show up.

Now ~ here's the magic part! I'm pushing that black spot from the other side. Can you see what is happening???

TA-DA! It's a brush!
For some reason, that so tickled my funny bone!


Okay...next post will include tatting. I have a lot of the next challenge piece done but wanted to finish up something else tonight. Did I mention I had my first yoga class tonight? I can't believe how energized I am for a Monday night. Musta been that yoga!

Saturday, January 22, 2011

This morning was Tat Guild in Greenfield with Kaye Judt. The weather prediction was dire so I was uncertain about whether I would go or not, but the pathetic prediction did not come about and I went. There were a few new people there so that always makes it more fun.

I had a troublesome time with my scanner AND I couldn't seem to get a good photo of the project. I used the scanner for the bobbin lace bookmark I finished last night (on the other blog) and the camera for the BEE since it's 3D. Stacked rings and bees seem to be a popular combination but this is Kaye's own design and she actually calls it bobble tatting instead of stacked rings. I imagine the pattern will be in a future book or if you happen to be at one of the tatting events that she teaches at this year.

I've been having such a hard time with my camera. All the macros I snapped tended to be on the dark side though they looked nice and bright when I clicked the shutter. I finally checked my settings and found I had changed the exposure length at some point so we're back at the mid-point but I'm not sure when these photos were snapped in the process.

There is another variation I want to try soon too, if I don't forget. The little wings were made out of the plastic template material you buy for quilting templates. The bees buzzing around there were all so cute!

I have this book but it's not in English so I finally broke down and bought the English version. I've had to figure out the starting point on my own and it got tiresome!

I also bought a 50 gram ball of Presencia white. It's only 3 cord but it looks so luscious! A very bright white and shiny. I can't believe I'm buying white thread - but I know I'll use it for hand dying.

I didn't realize it but Jennifer also has a tiny bit of bobbin lace supplies and I bought a package of lace bobbins like the ones I've been using. They have the squared off edges ( I know they have a name that I don't remember) and don't roll around so much. Filled up my customer card so my next purchase will be 25% off! Whoo Hoo!

Fingertips are cracked again and I'm slathering lotion on like crazy. Penniwig had mentioned Eucerin as a helpful product so I got some "calming lotion" in that brand and it does seem to be even more helpful than the Aveeno I've been using, which had been the best so far. A bandaid overnight will probably finish off the healing. I was doing okay at home but when I returned to work last Thursday, I wasn't halfway through the day when I noticed my fingertips starting to split again. It's very dry there and I'm not willing to buy a humidifier for my office. Yet. If I'm still there next winter, I may.

Well...what shall I do next? More lace? Oh...I need to finish my OWOH projects. Better do that!

Wednesday, January 19, 2011

#3 in 25 Motif Challenge

Here's the third ground in Plate IV, figure 24 in D.M.C. Tatting. It's a round medallion that probably every tatter has tatted. It's so basic, I'm not even going to make a diagram. The rings are 3-3-3 and the chains are 5-5.

This is the original photo in the printout.


I tatted it in the usual size 20 DMC special cordonnet. As I pondered how to climb out of this medallion to another, I realized that it was not going to be helpful in the long term. Sure, I could do a split chain to end and it is possible to start a chain for the next medallion at that point but you end up at the same point when you complete the second medallion and there's no where to go after that. You are back at your starting point. Besides, starting with a chain like that, while doable, is very fiddly and I'm not sure it's worth the effort.

So I hid my ends after each medallion and started over new with each one. It took 25 turns around the post of my shuttle for each motif. I started out with 40 turns, then 30, and finally settled on 25. I ended up with 8-10 inches of thread on the shuttle after cutting the tails.

I decided not to do anything with colors or beads on this one. Probably every snowflake you've tatted is a variation of this basic shape and I think everyone is familiar with what can be done.

I wanted to talk a little about the original instructions for this one. I scanned and cropped the original and downloaded "large" but it isn't showing as big as I hoped. I think it will enlarge when you click on it though.

Note that the instructions tell you to tat the ring with one shuttle. Actually, it doesn't even say "ring" until you close the ring. THEN, after you turn the work, suddenly it says "with two shuttles". It doesn't say to chain or how to add the second shuttle. No wonder we are confused with the instructions. It may have been a common understanding at the time but over a century later, the terminology has lost its meaning.

I said in an earlier post that they often didn't mention picot length, differentiating between joining picots and decorative picots, but I was wrong. The picots in this piece are all designated as "short picots" and all are joining picots by modern standards. If they aren't for joins, they usually just say "picot" and if it's meant for something else, they will say "long picot", sometimes giving a measurement. But even with picots, I think a lot was left out assuming a common understanding of how big a picot should be.

Now, I'm not done with this medallion grouping yet! I said I wasn't going to do anything with color or beads. I do want you to see a little something that was often added to tatting back then.

First, I lightly couched the group to plastic covered fabric. This is what I use for Romanian Point Lace and needlelace. I have a couple of layers of fabric and stick clear plastic on the top but not to the edges. I stitch with a long stitch or zigzag stitch through all layers to keep them from sliding around. Then I couch the item on top of that.

I used size 70 or 80 tatting thread to stitch some needle lace in the negative space. The label is gone so I'm not sure which size it is. I used two different techniques for a needle lace spider, alternating them. My needle lace skills are not always the best and especially after a long period of non-use so ignore that part but don't you think it adds some zing? Delicate zing.

I often see a bit of needlelace like this in the center of motifs and sometimes in the space connecting them. Add to the needle lace some colored thread and a few beads and I think you might have an outstanding motif that originated from a very simple medallion!

This is the end of the "Grounds". I'm going to go back to the beginning and tat from there. That section is full of edgings, insertions and galoons. So many, in fact, that I moved further in the printout to start off because I didn't want my entire challenge taken up with those. They are pretty though and I'm anxious to get started on them.

If you go read Fox's post today, you'll see she has tatted an edging further on in the publication. That circle insert in the DMC photo is what first attracted me to this printout. I think there are four of them, edges matching or the edging used for the insert, but I fell in love with them and have been determined to tat them. Not just tat them but use them in inserts as shown. Fox's red insert and edging are perfect!

And that reminds me, I kept out my Valentine fabrics while cleaning. Must do something with them!

Tuesday, January 18, 2011

Finally!

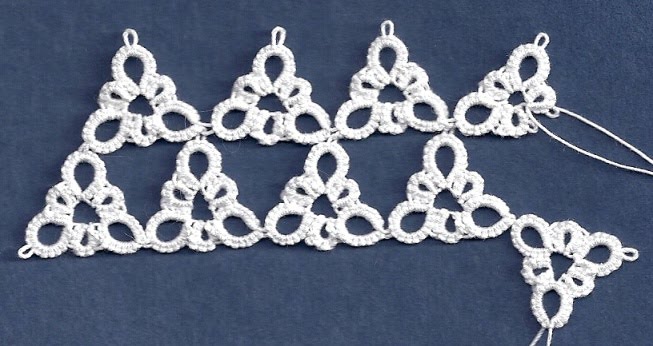
I'm still a bit frustrated but I managed a decent diagram for this ground. You're probably all thinking, get on with tatting already! I also don't show the inner thread where the rings start except on the top ring.


This is only if you are making one triangle. If you want to bridge to others, you're going to have to use a split ring somewhere or hide a lot of ends.

When I was tatting this part, I actually scanned along the way to show how it came together but I'll spare you all the other scans. I'm ending the second line and will join to the motif below when I finish the split ring.

As I mentioned before, the second and subsequent motifs for a line of triangles will start and end with the split ring and you have to turn the work over to reverse tat ring E before the last split ring.

I will start the next and final ground soon. It's pretty easy and one I'm sure you're all used to tatting at some point. It's the basis for a lot of round motifs.

I tatted another basket with another size 20 thread and was surprised at how much smaller it seemed. I can see by having them side by side that I tatted the mignonette rings much closer though and the spiral tatted handle is smaller which lends to a smaller look. I'm still having trouble with that left side but I think I've got it figured out. One side involves a split ring and the other doesn't so you have to compensate in the bare thread distance.