Monday, November 28, 2011

Years ago when I first started tatting, I found this tatted bow in Old-Time Crochet (Summer, 1994) in an article by Rebecca Hollenbaugh. I thought it was her pattern but as I read the article today, I found the pattern was originally in Better Living, April 1952. No author was credited.

I've always wanted to tat this bow but it looks a bit complicated and if I'm going to go to all that trouble, I better have a good use for it. Normally, I don't feel like I need to justify my tatting, but this one seems to call for it.

So....ideas anyone? Rebecca suggests attaching it to a hair comb but I don't have the kind of hair that will hold a comb or barrette. It's fairly large, 5" x 4" in size 30 thread. I really really need some inspiration!

Sunday, November 27, 2011

The motif on the left is from Patty Duff's Minitats. The other tat is just to get the thread off my shuttle. The amount needed was not as much as she had stated in the book but I noted it for future reference.

The thread is Lizbeth Christmas size 20. I already know I don't like this colorway but I tried one more time. It's time to find a new home for it but that will have to wait until after the holidays.

We had a lovely Thanksgiving at my youngest son's house which is about 45 minutes from mine. I went the day before and got to see my 18 month old granddaughter in action. She is quite the mover and shaker already! Mom does a good job keeping up with her too.

It was good to see the rest of the family. But I have to admit I'm still tired. I decided to tackle the hallway yesterday which is a small part of what I yet want to clean out. I have the hallway closet still and then my craft/computer room. I haven't felt up to doing it and now that I do, I need to be getting ready for the holidays instead - but how do you do that when the most important room to the holidays (craft room) is a mess???? LOL! It'll all work out.

Speaking of Minitats, I noticed the binding is coming apart on that book so I need to gather up all the books I want spiral bound and get them to the copy shop. That will be my Christmas gift to myself. Or one of them.

We've had a very mild November, especially compared to the subzero temps of last year, but I'm not complaining. I love mild temperatures and it could stay like this all winter as far as I'm concerned.

Tuesday, November 22, 2011

Angels and Needlebooks

I started this Praying Angel from Nine Tatted Angels by Monica Hahn last night and finished it up this morning. I know the I.O.L.I. Library has a copy but I'm not sure it's available elsewhere anymore.

Most of Monica's angels tend to have pointy wings and I like rounded or gently sloped wings. She likes to use clunies for the hands too but not being a very cluny-oriented person lately, I decided to use Bina Madden's Puff stitch instead for the praying hands. The wings could be done with or without the addition of needlelace. I thought, hmmmm....why not just make long picots? Well, the one side turned out but not so good the other side. The better side is the 2nd side so practice must be the key to good tatting, AGAIN!

I used Manuela/Hakelgarn thread that I bought a long time ago, size 20. It looks red and white striped on the ball but ends up looking more pink than anything. I was planning on a Peppermint Praying Angel, but she looks a bit more sherbert-y, I think.

There are boy angels in this publication too so if you have been looking for a boy angel, look for it. In I.O.L.I., it is #T-098. You do have to be a member to borrow from the library though and you have to pay shipping.

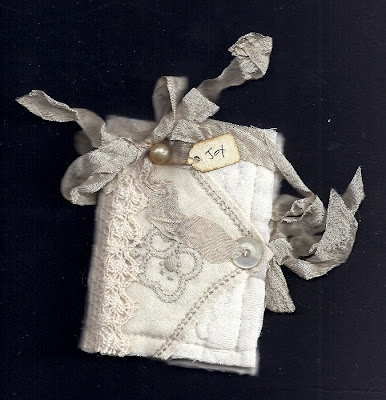
I don't actually promote other people's products but I do show what I like and what I'm pleased with. I have several blogs in a "Inspiring Blogs" list on the left sidebar and I do get lots of inspiration and ideas and enjoyment from them. Recently I was moved to buy this needlebook from the Etsy Shop of The Feathered Nest. I couldn't believe how fast it arrived and it's so sweet!

I've been keeping my needles in a separate pincushion but I think I'll put a few of the sizes I use the most in this needlebook and put it in my "to-go" bag. It also gives me a few ideas for all those vintage but damaged linens I seem to hoard. A shuttle-book, maybe? A tea book?

Sunday, November 20, 2011

#25 in 25 Motif Challenge

Yes, I'm done, The End.

These are Figures 20 and 21 of Plate III to complete the final motif!


I've gotten more detailed with this last one. I used split rings and split chains and switched shuttles quite a bit as I threw rings off of chains. You can use rings for the outer round or take liberty with the pattern as I did and make them Josephine Rings instead. Use 2 shuttles, with 6 yards on the main shuttle and 2 yards on the secondary shuttle. These were tatted in size 20 thread.


I hope you have enjoyed this series as much as I have. I did not do the plate with inserts since I've already covered well over 25 motifs for this challenge. I hope you understand vintage patterns and how they can be adapted with current techniques better. Please feel free to email me with questions about any of these! I did not have a test tatter for Plate III and used what I had come up with at the beginning of this challenge. I'd already completed Plate III and offered it elsewhere but it wasn't used, so it's been awhile since I've done this one and there could be even more improvements.

You can get the pdf file for Plate III Figure 20 here: Plate III Figure 20

And for Plate III Figure 21 here: Plate III Figure 21

Friday, November 18, 2011

#24 in 25 Motif Challenge

Here's Figures 18 and 19 of Plate III for the #24 Motif in the 25 Motif Challenge.


Pattern link is here: Plate III Figure 18 Medallion Pattern.


Pattern link is here: Plate III Figure 19 Medallion Pattern.

Thursday, November 17, 2011

Mary's Butterfly Stats

This time I did my homework. The butterfly is all rings so it matters how much thread is on the shuttle. I've found that 25 winds around a Clover shuttle is about one yard. I couldn't remember how much I wound the last time so I wound plenty this time, about six yards worth. Well....80-90 turns will complete the butterfly and leave a 10-12 inch tail for sewing. That's a tiny bit less than four yards. I think this was size 30 instead of size 20 thread but it's still the same distance around the core of the shuttle so you certainly wouldn't need more thread unless you use larger than size 20.

I also completed it in 50 minutes, under the hour! I left the long tail because I am going to stitch it to a muslin bag eventually.

Sometimes when you admire something online, you are pleasantly surprised by the postie in record time! I really liked this pendant Jane tatted up recently and dear friend that she is, she gifted me with it! I just found a pink-ish chain in my stash to wear it with. Thank you Jane!

Hmmmmmm....I see Blogger has changed the posting box format. All the key elements are still there though.

Well....off to something else!

Wednesday, November 16, 2011

Marilee's Tree in White

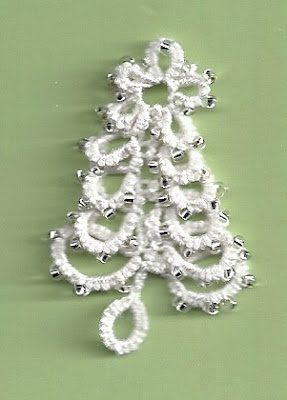
I made an incorrect join but it's getting easier. No break this time between sides (well.....very briefly!) So maybe the 3rd time will be the charm!

The thread is size 20 DMC and the beads are silver seed beads size 11/0. Tatted in less than an hour!

Tuesday, November 15, 2011

#23 of 25 Motif Challenge

I'm posting Figures 16 and 17 of Plate III for Motif #23 of the Challenge. This way I can fit all the medallions of Plate III in.

The original photo.


It really does help to read the pdf file which is linked later in this post and also in the sidebar. I started with a paperclip on a chain for the center. Yeah, cut and tie but the next part is also started with a paperclip on a chain with 2 shuttles.

The red star shows where I began on this segment. It continues on around but I wanted to highlight just the one segment.

And here it is completed!


Here's the link to the pattern: Plate III Figure 16 Medallion Pattern

Here's the original photo for Figure 17.


The diagram and again, the pdf is very helpful as it gets a bit fiddly with rings thrown off chains.


And the pattern is linked here: Plate III Figure 17 Medallion Pattern

Friday, November 11, 2011

#22 of 25 Motif Challenge

Update: Only the patterns tatted in each post will be linked. I have them done but only Figure 15 was posted today. Once I am through the challenge, each individual pattern will be here, but today's is only Figure 15. There has been some confusion about that!

This is what prompted me to do the 25 Motif Challenge again. I loved these medallions from the DMC Tatting Library. I actually tatted all 7 of these and will now show them to finish up my challenge. They won't be presented quite the same since I've already written them up but I am creating the numbered photos for the diagrams for these posts. I've also provided a link to the written text which has the more subtle tips and notes that the diagrams don't show. They are also available by link in my left sidebar under the patterns.

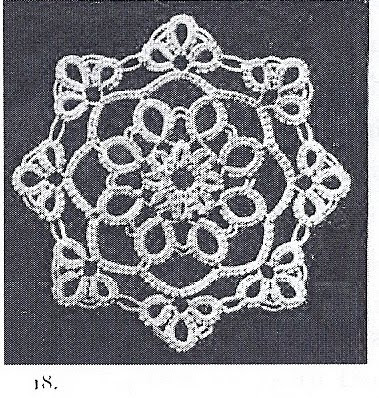
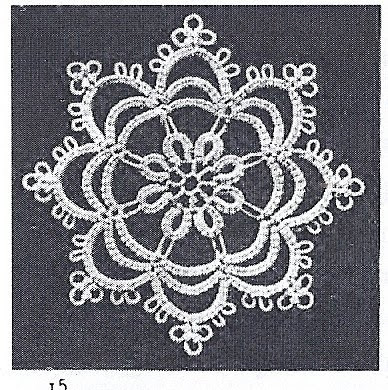
These are the original medallions (8 points is not a snowflake but I would use them as snowflakes anyway) as shown in Plate III.

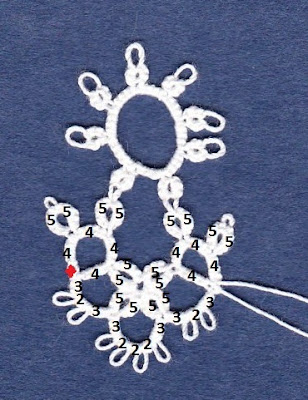
This is Figure 15 in the original.


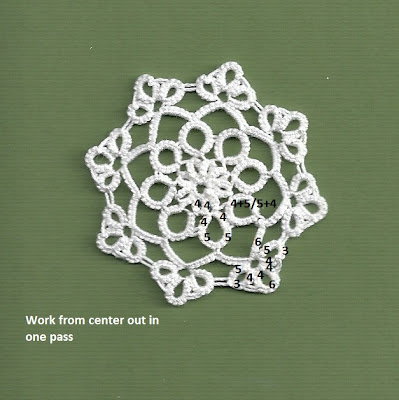
Here are the numbered segments. I've not shown how I did the needlelace in the center. To be honest, I don't remember how the instructions created those bars to add the needlelace unless they were stitched in later. In my adaptation, I did not use them. I started at the red dot to make the first ring and then ended with a split ring to climb out to the next round of chains.

The figure to the right is a beaded version and you can see I did not add the needlelace center there. All are done in size 20 White DMC Special Cordonnet.

You can access the PDF file HERE and it includes the diagram above as well as a detailed explanation of which shuttle does what, when to switch shuttles, how to add beads to the 2nd version and any little quirks I noted. I will double up on some of the posts to include all 7 in my final four motifs for the challenge but I hope you can take advantage of these for the upcoming holidays. They really are so pretty!

Thursday, November 10, 2011

Marilee's Tree

Last year I purchased Marilee's Layered Ring Christmas Tree Pattern but just now got around to tatting it. The first time I tat something, especially with a little different technique than I normally do, it's not very good, but I'm okay with that because then I know what to improve in myself.

I finished the first side and then laid it down to take a break and fix something to eat, allow myself to get sidetracked on the computer and pay some attention to the kitties and TV. Can you see what happened a hour or so later when I came back to do the other side? My tension relaxed. The rings on the other side spread out further than on the first side. I was afraid that would happen. I even blocked it, but to me, the difference is noticeable. Can I make a second earring to match? Probably not. Is it just the inner critic in me making too much of it? Maybe I should just start over and keep this one as a sample in my sheet protecter to remind me to try to tat the whole thing in one go and not go off abandoning a project mid-way. Actually I think I will try her white version. Or use some sparkly thread. The more practice, the more balanced it will look. It doesn't matter how long you've been tatting, practice also makes it look better.

I have so many people I want to gift with small tatting this year and I haven't even begun. I'm still trying to find ways to gift special tatting friends from kindnesses shown two years ago! You're all so nice and I can't keep up!

I used a small ruler to show the dimensions of this earring. Even though Marilee shows a ruler on her pattern, for some reason (aka selective vision) I missed it until I was almost done. It's much smaller than I thought but perfect for an earring! Or even a pendant. Or a gift tag or a card insert. It's tatted in Aida size 20 thread. I bought this ball of thread in Australia along with several others. I've used a lot of it but not a complete ball yet. Six years....thread lasts forever! I've moved on to size 30 and 40 more often as my preference but since I have so much of the size 20 and in colors I like, I try to tat with it as much as I can. I may have to start crocheting with it as crochet uses it up faster.

Wednesday, November 09, 2011

Mirror Mirror Inspirations

I really didn't notice the Mirror Mirror bookmark in Martha Ess's new book, Playing With Picots as it wasn't one I test-tatted and it's further back in the book than I've tatted so far. But then, I saw Wendy's tatting of it, which you can check out HERE and HERE!.

One of my early disappointments with Lizbeth thread was the way the colorway tatted out. Some were only 2 color but looked like more on the ball and they didn't do much for the tatted design. They've gotten better and it is obvious they are taking a cue from our talented HDT makers. I've noticed several very similar colorways lately - so don't forget our wonderful HDT dyers!

So, I'm very careful about which variegated threads I choose for tatting. I've actually gotten rid of many I don't care for - like all my Altin Basak variegated. I love the solids, but not the variegated. I'm not crazy about Omega variegates either but I love the solids - brilliant, bright colors! We're lucky to be in a the mainstream of so many new color variations these days. It's hard to keep up!

I got inspired by Wendy's bookmarks but wasn't going to post this one as I'm tatting it in ecru and white to paint dye on later. It looks rather bland in ecru and white. But then...before I tatted it, I discovered in #21 of the 25 motif challenge that I can add picots to and join Josephine Rings to picots. I rather like that ribbed wheel look when it's done properly and I was inspired to use the Josephine Rings in place of the regular rings Martha used. Both are fine but the name of her book IS Playing With Picots, right? So that encourages us to do the same! This is why I love vintage patterns. Between now and then, there is so much NEW to come up with! Tatting is most clearly NOT a dying art! It's a dyeing and technique art, a fiber art, a needlework art. The expansion of tatting over the past decade has been unbelievable. Don't you think? So I just wanted you to have a sneak preview of the "before" version. I plan to tat a few of these so I can play with color too.

This is tatted in J & P Coates 6 cord Mercerized in size 30 that I got from Carol Moser's estate. I didn't even realize it was 6 cord until I looked closely at the label. It tats up beautifully and I have no problem with slubs, knots or fraying - unless I frog a LOT.

Monday, November 07, 2011

#21 in 25 Motif Challenge

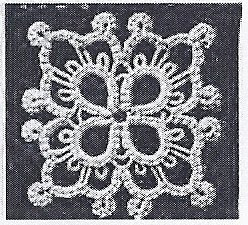
Here's the original photo from the DMC Library - Tatting of Plate V, Figure 28. This is my 21st motif.

Here's the tatted version with DMC Special cordonnet in size 20. It's done in two parts, the center 4 rings and then the chain surrounding the rings with Josphine rings thrown off the chains.
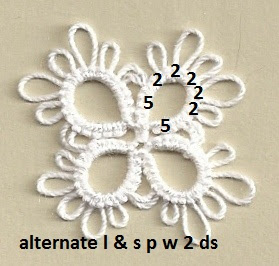
This is the center four rings which are exactly the same - well...try to make the picot length the same! There are 4 long picots and 3 shorter or regular size picots. No measurements were given for picot length so I guesstimated. I didn't use a picot gauge but if you have trouble eyeballing the length, it would be good to use one. I still get off just a hair when I use one so I try to estimate carefully. I was less careful in this early sample and more careful in the blue bookmark below.

These are the numbers according to the directions. If you are making one, it's precise. If you are joining, then you need to adapt. I found that you can leave a space for a picot in a Josephine ring and it will still look like a Josephine ring. But it took awhile for me to figure that out.
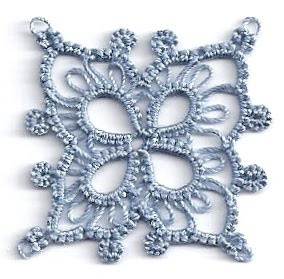
I started out making 2-2 rings at the corners to join into. When I got the second square joined, I didn't like the way the JR's flopped in the center, so that's when I tried making JR's with a picot (third square). It worked - and I do like the 1st half of the stitch best for JR's. They just line up more neatly for me but the white sample was done with the 2nd half stitch instead.

I went back to the first two squares and sewed the middle JR's together with a piece of thread, going through several stitches before and after so that it blended nicely. If you look closely at the enlarged version, you can tell that I changed from 2-2 rings (still 8 legs of thread) to the 8 st JR.

If I were to make the bookmark again, I would reduce the number of ds between the center chains so that the middle would be narrower. It seems to poof out a bit as is. I suspect this pattern has been the basis of many an adaptation for snowflakes over the decades. It's really easy. Maybe you could do a split ring at the last join of the inner rings and start the chain there, which would eliminate one set of ends to hide. Oh, this thread is Cebelia size 30.

You might notice a common element between this motif and the last one. Know what it is yet?????

??????

It's the long picot that it joined into by another thread which creates a triangular space. I wonder if that was a new design element back then. You don't really see it much these days either so all you designers....put that in your sketchbooks!

Friday, November 04, 2011

#20 in 25 Motif Challenge

This motif wasn't put on net so I didn't have that aspect to consider. This is motif #20 in the 25 Motif Challenge which is based on the vintage publication DMC Library - Tatting - Editions Th. de Dillmont. This is Plate 5, Figure 27.

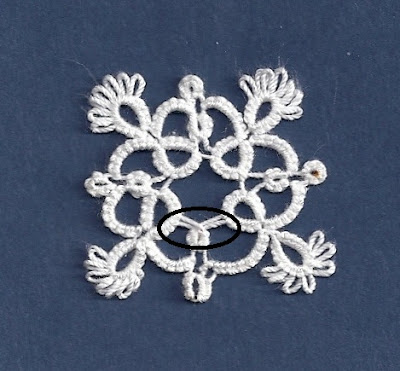
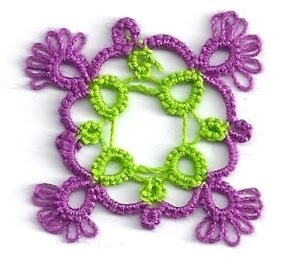
I tatted the original in DMC Special Cordonnet in size 20, as I have all the ones before. The instructions designated the difference between rings and chains by saying use one shuttle (rings) or two shuttles (chains). When the outer rings were tatted, which actually used the "ball" shuttle, it said to use the left hand shuttle. The large inner rings were tatted 5, long picot, 5, long picot, 5. No measurements were given for the length but the next small inner ring as well as the next large inner ring were joined into the same long picot. You can see it had to be long enough to accommodate a triangle shape. I learned the hard way that when you got to the last large ring, you didn't make another long picot - instead, you join into the existing long picot of the 1st large inner ring. I did so on the other samples but have circled the problem on this one if you make another long picot. Once you've joined to the existing long picot, then you have a space to join the last small ring and it works out nicely. It's just tricky to watch for.

The original instructions started with a chain and then moved on to the large outer ring/large inner ring. I found it awkward to make the final join and especially when I went to two colors - I had an extra end to hide because I don't like to tat over two tails at the same time. I think it makes it noticeably fatter. So in the two color version, I started with the large rings and was able to hide all my ends at the beginning and only had the two tails at the end to sew in.

You can see on the two color version that I made that last large inner ring join correctly to the long picot on the first inner ring. It makes a nice little triangle when all the rings are joined.

These are tatted in Omega size 30 which I think seems more like size 40. It's noticeably smaller than size 20. I tried using Josephine Rings on one of the motifs. Can you tell which one? Hint - they are much smaller than the regular ring of 6 ds. I used 10 half stitches but it was still really tiny so I went back to the regular rings. This would make a very pretty delicate looking open mat. Or a nice small photo frame. You might even be able to join a large decorative button through the tiny outer rings in the center and come up with a large-ish pendant since this thread is so tiny.

Stuff for the imagination, right?