Wednesday, March 30, 2011

Is it Spring yet?

The sun keeps shining and I see a few green things outside struggling to grow in spite of freezing temps so it is here...barely. Inside though, I've had so much fun tatting these tiny blossoms.

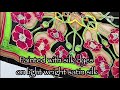
I showed the white ones earlier but I couldn't stop with white. I had to keep trying out other colors, stacking them up, marveling at their pretty little bits. I did send them all to a friend to do with as she wishes, but I think this might be my new shuttle ending pastime. There's so much that can be done with them. I've used this rosette as the basis for several of my patterns or as an embellishment on something else I've stitched. I usually add beads during the tatting but beads can always be added later. I think I'll tat up a little stash for myself to tuck away and bring out when I need a pretty pick-me-up visual.
Before I start the next challenge piece which I always make first in DMC white size 20, I wanted to tat something in color! At first I was going to do Jon's foldover bookmark but then decided I wanted something a bit different and I knew I wanted to add long tails that ended with a covered ball, like the thong bookmark I won from Umintsuru once.

So, I went looking for a suitable pattern. It had to be one that could be folded over at joins, which isn't as easy to find as you would think.

Did you ever see a pattern and wonder, "what in the world (or sam hill as crazy mom said) is that for?" I love Mary Konior's patterns, even when I don't have a clue what to do with something. She tatted all those fragments and single motifs that just beg you to do something more with them. I found one on page 76 of Tatting Patterns. It's called a "triad". But there's no mention of how you might use it.

So here it is, tatted in Altin Basak, size 50. It could be a pendant with the right beads to give it some weight.

Or you could turn it over and it makes a great crown motif!


Or you could put two of them together and....whooooaaaa....what's that ballerina doing there??? Heheheheh...really, it's supposed to fold over. Why is it dancing on pointy pink ballet slippers?

Okay...it's not a ballerina, but it wouldn't take a lot of tweaking to become one! Now you see how easily I get sidetracked.

Back to the bookmark...

Sunday, March 27, 2011

Plate 1, Figure 3 Final!

It's taken me so long to finish this last bit up that I feel I need a reminder of where I started with this specific part. This is the original Plate I, Figure 3 insert in Therese de Dillmont's Tatting D.M.C. which is found at The Antique Pattern Library along with a host of other vintage publications for free.

I started this project as part of the 25 Motif Challenge and this is a continuation of motif 6. You can see the bags I made from the first inserts HERE and HERE.

I wanted to play a little more with the pattern, adding more beads and in different ways. The beads I used in the pink insert were at the top of the ring where the crochet header joined. This time I decided to put them in the bare space between small rings. I only used 2 beads, size 11 seed beads and when I was done, I wished I'd used 1 more bead. I also used a smaller thread for this one, size 30 I think. I don't think I made notes anywhere since I thought I'd be writing them here (bad decision) and now I don't remember the other changes I made. I'm pretty sure I made fewer single and double crochets in the headers and that made it fit much better.

I really wanted to see what it looked like with another bead so I tatted this one with 3 beads in the bare thread space. I liked it. I also liked the strip as it was, before I tatted the other side so when I tatted the other side, I did not join them. I'm not going further with this right now but I can see making this into a necklace, but it would take some manipulation of the stitches, a change somehow, to get it to curve into a shape that will drape nicely around the neck. For you jewelry designers, feel free to take off with the idea.

I also only used single crochet for the headers. You could probably use some form of block tatting to get a similar effect.

I've had this part done for a long time and knew I would showcase them in a pincushion this time instead of a bag but was having trouble coming up with the time and energy to follow through. Life has a way of taking over.

I visualized this little pincushion with pin tucks but once I started pinning, I felt it was too bulky to look nice. Pin tucks look better on lighter fabrics. So I just stitched the two pieces, which would correctly be called edgings now instead of inserts, using the end threads to baste them down on the backside. Then I folded the fabric up over the crocheted header and machine stitched it down. The rest is simple pillow construction.

It seemed very plain as it was and I've mulled over adding an edging or tassels or buttons. I may still do so later but for now, a skinny ribbon did a good job of dressing it up. The fabric produced such a shine when I photographed it that I probably took 30 some photos just to get these few. It really is pretty and elegant looking in person but it doesn't like camera flash!

I decided to just use this insert as a surface trim. Again, I used the end threads to pull through the back and tack it down there. It's secured well. I didn't really want to make another pincushion so I decided to turn this one into sachet. Here's the bag of scented salts going in.

I spent all evening yesterday trying to tat an edging for this. All of my finer white threads are more ivory colored compared to the insert so I finally found a purple thread that will work. It's very slow going and I keep asking myself if I really want an edging on there. It's a Coats hand quilting thread which must have some polyester in the outer wrap. It tends to grab when I close a ring so it's taking longer. It's very crisp too and I'd kind of like it to drape a bit instead of standing out so stiff. My brain is tired of thinking about it though!

Next in line is figure 4 which is a floral based insert. This one will be very interesting too!

Friday, March 25, 2011

It's been a loooooooooooooonnnnnnnggggggg week.


We're finally starting the interview process to replace all those people we lost to early retirement. Yessirreeee. Long Week. So I finished up some tatting I started last night. Is there any such thing as a blue magnolia? There is now.

The pattern is by Nancy Tracy from Be-Stitched.com. Look for Feb 08 on the linked page. I'm very impressed with Nancy. When she started her newsletter and committed to a free pattern every month, I didn't think she could keep it up. I've seen lots of people try and get burnt out. Nancy smolders now and then but she always manages to come up with something. Additionally, she has a favorite recipe every month too. She's been doing this for at least 6 years and I think she deserves a hand for everything she has done to promote tatting. I have to admit that I buy most of my tatting supplies at lace day events or in person at The Tatting Corner but when I have ordered from Nancy, it always goes well.

I think the threads I used are Altin Basak. That brilliant blue is such a pretty color but the dye doesn't penetrate completely through and as a thread gets pulled or rubbed, the white shows. Some AB threads have been known to do this. Most of my stash is OLD and I'm slowly working through them with samples and practice pieces. I do not plan to replace them with the same. The size 50 is not a standard size 50 either, another annoying factor. I do have some of the newer solids and they tat beautifully but only a few and really....I'm not going to restock.

I plan to sew this weekend. I've sketched out that pincushion I plan to use for one of the DMC insertion pieces probably a zillion times in my head and half a dozen times on paper. I think it's time to put this segment behind me!

I've also been working on a crochet bonnet and another bobbinlace bookmark.

And by the way....Indiana Lace Day

It's coming up soon - two weeks from Saturday, on April 9th. There's more information about Indiana Lace Day IN THIS POST.

I plan to have the work I've done so far about the DMC Tatting by Therese de Dillmont there to see and also the bobbinlace I've been learning.

The last time we had a Lace Day, I remember a bunch of us went over to the pizza place across the street for lunch. I was thinking, if maybe a bunch of tatters (or lacers of any kind) wanted to eat together, there is also a place about 3 blocks down, not far from Walmart, Hunter's Pub South, which has a big variety of sandwichs and meals where we could eat. Not everyone goes for pizza - just an option you might consider if you're coming.

Monday, March 21, 2011

No Sewing, No Taxes

But I did get a lot of errands done yesterday and got yet another few boxes and bags out of the house! I've been tatting these little rosettes for a friend.

Back to work today. The temperature is already 62º and it looks like the entire week will hover around that temperature. Yay!

Saturday, March 19, 2011

Noticed any little glitches with Blogger lately? It might have something to do with the changes they've been making. If you haven't seen it already, check out their latest announcement. I have to admit that all these Internet resources change more rapidly than I have time to keep up with. I have a job and a home to take care. I really don't have hours to figure out facebook's latest change and then blogger and then Etsy and then Ebay and then my craft resource sites, etc. I appreciate the changes - they're usually an improvement once they get past the glitches, but there are only so many hours in the day!

That said, I've been off the past few days on vacation but my vacation was at home. More cleaning and sorting. I carted off 3 boxes to Goodwill last night and I have a bag of magazines to take to the library for their Freebie table and another bag of books to donate to my lace guild's table for the drawing on Lace Day. I have 3 boxes of books to take to Half-Price books so I can get even more books. (smile) I cleaned off my sewing table just a bit. See...I have to be in the mood to sew and the more clutter there is, the less likely I am to sew and I think that's why I haven't completed the insertion pincushions yet.

Still need to do my taxes. I cleaned off my kitchen table and set the folders and all RIGHT THERE so that I will sit down and do them. I made a batch of no bake chocolate oatmeal cookies instead, but I will do them soon.

In the course of sorting things out, I always find some tatting that feels imperative to do immediately. But every time I sat down to figure out which thread and prepare the shuttles, I got sidetracked. Finally, it was late enough I didn't want to begin something new so I just tatted off all the shuttles sitting on my table and in my bag. I'm not done with all of them as some have a project on them but I ended up with 36 empty shuttles! I just wound the thread of some onto floss holders and I did have about 10 that were already empty but it felt good to have that many ready to go. I also wound my lace bobbins to do another bobbin lace bookmark. Those are on my lace blog. I try to keep my non-tatting projects over there but some show here too.


These slippers, for instance. I knitted one for my sister's birthday since she likes to putz around in big warm slippers when at home. Only one because I wanted her to try it on before I made the second one. She did, they fit and she liked it so on I went to slipper two. I forgot that I needed to reverse the side where the button loop goes until I was done with the knitting so it looks like they are both for left feet but the foot part is the same. She was happy anyway. The pattern came from a 7 part mystery knitting project and is available free from Liannorginals.com. The black I made them in hides the design features but the thing I really like about them is that there is no seam underneath the feet. I plan to make more, in pretty colors.

Today, I hope to get some tatting in. I found a doily or table mat which has a center that intrigues me even though I don't generally do doilies. There are about a zillion cut and ties though. I may put it off until tomorrow. Taxes and sewing are waiting.........

Wednesday, March 16, 2011

I've been busy elsewhere and haven't been tatting until late last night, to empty a shuttle and unwind a bit. This is a pendant from Lyn Morton's Tatted Jewelry. I didn't put beads on it and it turned out I didn't even tat it in the right order but it all worked out. Most of the jewelry in the book looks very similar but I suspect it's the individual's tatting of it that produces the variations. Thread color, beads, what is used where. It was easy to make.

I ordered some free floss from Threads of Rosace which I saw posted on Suztats' blog last week. It arrived on Monday, very fast. I'll probably embroider with it but I could tat too. The free offer is still in effect as of today. They are promoting a new line of embroidery floss. It feels very soft and smooth but I won't know how it acts until I try it.

Just a minor diversion.....playing with the thread at Pixlr.com.

Tuesday, March 15, 2011

Front Line Crafting


"So what’s the moral of the story? Well, if you have a loved one serving overseas or if you contribute to care packages to support the troops, consider adding a ball of yarn, a couple of knitting needles, a chart or two, or even something like a tatting shuttle and thread to your offering. It’s a little thing, but it might be a real aid in helping someone stay sane and grounded in the midst of war."

I think this could apply even to care packages that are part of a relief effort. There is a more in-depth article at The Washington Post.

Sunday, March 13, 2011

Shamrocks to Make

I came up with these shamrock patterns last weekend but didn't have a chance to post them until now. Since I don't have the insertions finished, this is a good time to show them, giving anyone who wishes a few days to make them.

They're very simple.

I call this one Bloomin' Shamrocks and you can get the pdf HERE. I got my inspiration for this one from a heart necklace by Terry McGuffin. The printout had a date from years ago and I think the site no longer exists but there was a shape inside the main piece that got me thinking - if I turned it this way and added a dip in the pointy part so it's now rounded and then put more than one together....and it just panned out.

I call this one Lucky Seven Shamrock only because I ended up with 7 of them. You can find the pdf for this one HERE. It's actually 6 shamrocks and 1 four leaf clover.

The ideas came about when Georgia emailed the members of the online class (I'm a member) about shamrock patterns. I emailed back and said you could take any heart pattern, connect 3 of them at the bottom tip of the heart, and have a new shamrock pattern. My recent topsy turvy with Vicki Clarke's Dagger Heart was behind that thought.

Well, typical Georgia-fashion, she emailed back and asked if I would whip up a few and send her pics. I was working on the insertions and trying to get back to my bobbinlace practice so I didn't want to spend much time on it. I looked for a few EASY heart patterns and of course, couldn't find them (stumbled across that binder later in the week) so I winged it.

My first thought was of the "heart balloons" that I've shown before and are actually someone else's idea - though I don't have that original at my fingertips either. Anyway, that heart is a dimpled ring made with a picot and this one uses the first half/second half ds set to make the dip in the ring. This is so simple, I knew it had to be done before but I don't know the stitch count or if it was a dimpled ring or what, so I'm not claiming originality in the idea, just in the way I came up with a stitch count and connected them. I tried a google search and saw some very similar, including a shamrock bookmark by Sharon Briggs that was in her quarterly newsletter several years ago. You could only get it by subscription and that wasn't a year I subscribed so I didn't know about it. It's very pretty though - a vining shamrock with enough substance to make a good bookmark. The other shamrocks I saw in google images were along the same idea but just a little different.

The instructions tell you what size thread I used and even how many times to wind the thread around the shuttle for one shamrock so you can conserve your thread!

On a final note, as you're tatting lucky shamrocks, send a little luck to our Japanese friends who are suffering dreadfully right now. There are many ways to help but sending "good luck" is a form of prayer that surely helps as much as physical aid.

Friday, March 11, 2011

I had hoped to finish the last two segments of figure 3 by today but this whole week has been hectic and tiring so ...another day or so won't matter. Vicki Clarke asked in a comment if I would show the back side of the inserts so I thought I would show that today.

This is the inside of both bags. The black one won't show you much about the process since I added a white background. I didn't take a photo or scan before I stitched it on. I just used a sort of hemming blind stitch to attach it to the top and bottom fabrics which were folded over like a hem. I was more concerned about how I was going to hide the ends that looked so unfinished.

Then next two segments will be stitched on top of fabric instead of taking the place of fabric so maybe I should do a tutorial later on about insertions. I'd like to get a little better at it though.

For this one, on the wrong side of the fabric, I drew around the insertion rectangle to get the size and shape. I then drew another line slightly inside of that one, more at the sides, for a little wiggle room. I didn't want to have to stretch out the lace. I drew a line from corner to corner and cut along the lines of the resulting X. That gave me 4 flaps to fold back. I think I pressed them but it might have been finger pressing held down with straight pins afterwards. Then I stitched a running stitch close to the fold all around with some white perle cotton thread. I was hoping for a more decorative effect but in the end, you barely see it. I also added French Knots in the tatting thread around the edges but it looked not-so-good so I took them out. I trimmed the four folded back pieces that were stitched down now fairly close but not too close. I trimmed them again once I was done with the insertion.

Then I took sewing thread and took the needle through a crochet stitch and then caught a few threads of the fabric in the fold. I went all the way around like that. you can see at the ends that I whipped the long bare threads to the fabric too. Those were actually the tails that I attached to the opposite side to give it stability at the end. I knew I would be hiding it with fabric. I debated about putting a backing on this too since it is a bag and anything put in it could theoretically catch on the lace. Since this is a sample, it's unlikely it will be used that way so I didn't.

I have a publication I bought from Gillian who used to host the Bellaonline Tatting site which is about insertions and mounting tatting. I'll go over it and see if there is a "cleaner" way to do this and then post a tutorial. If you've ever seen the tatted insertions used in the old Anna magazines, you probably fell in love with them. It's still something I want to do with kitchen curtains.

I also wanted to mention that I'm planning on displaying what I've done so far with the vintage tatting at our Indiana Lace Day on April 9th, 10:00 a.m. to 4:00 p.m. It will be held at:
Christ United Methodist Church
3610 S 18th Street
Lafayette IN 47909
NW corner of Veteran’s Memorial Pkwy [formerly 350 S and S 18th)


Looks like we'll have five vendors (John Aebi, Fredworks, Kathy Kirchner, Debbie Beever, Jennifer from Tatting Corner) so this is a great opportunity to buy lace supplies without paying shipping! No charge to get in. There are some mini-classes that cost $10 for supplies and those are limited in number. For more information, email Carolyn Regnier.


I did get the last OWOH win today. It came from Kelly, a mixed media artist from Tennessee. It's a magnet which is now on my fridge. I don't have very many metal surfaces since there are so many electronics around these days but my refrigerator can always use refreshing!

Tuesday, March 08, 2011

I kept thinking there was another prize I'd received from the OWOH event but I couldn't find the email. I don't know what I did with the email but the beautiful Golden Key was on my kitchen countertop this morning shouting at me that IT was the one I'd forgotten! I got this lovely gift TWO days after the event ended. It came from Incipient Wings immediately. I think she even sent the notice the night before so it was the very first one I got.

Allow Ourselves to Dream


Isn't that a wonderful reminder? The key to our future is in visualizing and expecting the very best. Even when the reality isn't, looking for the very best in everything can be the key to survival. I guess that's why I kept it out in plain sight!

Monday, March 07, 2011

I had to spend this evening putting some things away and winding bobbins for a lace project. Then I played a bit with some watercolor pencils a friend gave me for Christmas. So of course, now, at the very very last minute, in fact minutes AFTER my bedtime, I'm finishing off this bag.

I thought the edging (added yesterday) dressed it up more than just having the insert. There was just too much white dwarfing the color. Then I put in a blue ribbon drawstring. I was going to crochet a cord and then realized it would be too much pulling on it and would soon be out of shape. The insert has touches of blue in it and this was the closest match I had in my huge stash of ribbon.

It's big enough to hold a glasses case or maybe some scented soaps. It can just be a gift bag or ...something pretty to look at.

I think I'm going to stitch a tab button closure for the black one and I do plan to have the other two done before Friday. Well...I hope. Wednesday night is free. My daughter's birthday is Thursday. Maybe I'm thinking too ambitiously. And if I don't get my hiney to bed, NOTHING will get done!

Sunday, March 06, 2011

Plate 1, Figure 3 continued

I got two of the inserts in bags today. The other two are somewhat different and will have to wait for another day. I struggled with these as it was.

This is just a reminder of the original insert.


This almost looks like leather in the scan but it's actually a synthetic slick two sided fabric that was kind of a pain to work with. I tried machine stitching the insert in and that didn't work at all. I didn't have much control, even with pin basting, and it got all wonky on me so I ripped it out. Thinking that might be the case, I had used the machine's basting stitch so it wasn't all that bad to rip out. So then I hand stitched it to the fabric.

The sides puzzled me. I had the bag too wide so had to find a way to make up for the shorter width of the insert. I sewed a strip down each side but even that was tricky. I couldn't sew over the lace for fear of catching a thread from the insert so I waited until I put the white fabric background behind the insert and then stitched around it all covering the ends of the insert.

For this one, I cut open the space for the insert and handstitched around the edges, trimming the fabric when I was done. I actually stitched a border of French Knots around the edge in the same thread the insert was tatted but it looked really REALLY amatuerish so I took them out. The knots looked good on their own but I couldn't get the spacing right and the color just threw everything off.

Here's a close-up. I haven't attached a fastener on either of these. I think I will make a buttonhole and add a pretty button to the top one. This one has a casing for a cord or ribbon though I stitched the seam wrong for that to work. I should have stitched the seam before I stitched the casing but I'll make it work. It will just be more time and trouble. I'm also thinking about tatting a simple edging for the top.

So...two more to go! And this is why I don't want too much length. I get too wrapped up in variations and then it takes me forever to use them the way I want to. Inserts typically go on table mats or linens, perhaps clothing if you're inclined towards that. I am, but I don't have the time or focus to do it right now. This is only the second time I've tried to stitch a tatted motif as an insert. I'd forgotten how frustrated I was the last time! I'm sure the more you practice, the better you get.

I'm really anxious to do the next two. I think one will be a pincushion....maybe both. I think you'll like them even better. I really need to open an Etsy shop!

Saturday, March 05, 2011

Prizes from OWOH

Heart Earrings from Lisa's Clay Happenings. Lisa designs and makes a wide range of jewelry. These are mother-of-pearl clay. Lovely!

This prize just arrived this week all the way from Israel. A lovely painting which will go with my decor very well, some hamsa charms, and an aromatic scented soap that I just keep sniffing since I set it in front of my computer! The gift came from Elsina of EMS Arts. She has a wide range of creative talents and I didn't know which to feature so go visit!


I also won these beautful potholders stitched by Anna at Sewing through the Muck. They are thick and gorgeous. She tells me I have to dirty them! They are to be used!

I was notified that I won another prize, a "surprise", but haven't received it yet. It's been 3 weeks since the ending of the event so I'm not going to count on it. It seemed like I received another too, but there's nothing in my emails or memory - Ha! So much mail coming and going lately that I absolutely don't want to leave anyone out but please let me know if I did.

Wednesday, March 02, 2011

I finished up the stems for the other dagger hearts and grouped them together for a scan. I'm done with this diversion for awhile.

I'm still working on the figure 3 insertion. I haven't done any sewing yet but I did feel inspired to tat with beads in a different way. These are only little snippets. Once they are stitched on fabric like an insertion normally is, it will look yet again different.

The difference between this one and the one before is the number of beads...and....I haven't joined them together. I'm anxious to see how this will look stitched on fabric too. Once I get the sewing done, I'll be finished with figure 3.

Yesterday I was exploring some crochet on Ravelry.com and found a new source for vintage tatting. I followed the link for a free crochet button pattern and it was at an online archive of Australian articles. Just for kicks and giggles, I entered "tatting, tatted" in the search field and was amazed to see it come up with 24,656 pages of articles, notices and patterns. The text is electronically translated along with the original and you can get it as a pdf or text version. And it's FREE!!!!! I found several articles/patterns by Norma Benporath, a well known Australian tatter. As with all vintage material, much of it is hard to read in terms of pattern writing but certainly worth a try. I only looked at about 5 pages and much of it was notices about tatting awards or programs but there was still a significant number of patterns. Edgings, motifs, doilies. The black and white photos are hard to see but if you're up for a challenge, go for it! (update - apparantly tatting is only in the first 10-11 pages. 26,000 + is the total of pages archived, not tatting references.)

Tuesday, March 01, 2011

I loved the Dagger Heart designed by Victats.

Only thing is, Valentine's Day is over and it's March now. I kind of lose my interest in hearts once February is done....but LOOK!

Turn it topsy-turvy and it becomes a Spring Flower! I love multi-tasking motifs!

And here are more blooms waiting for their leaves.