Thursday, September 30, 2010

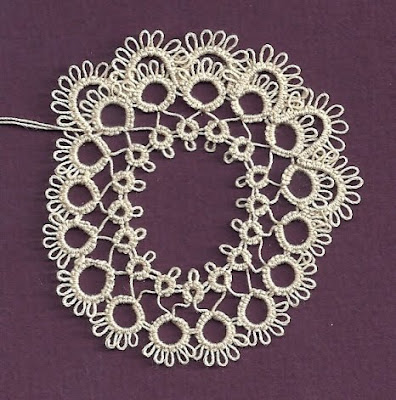
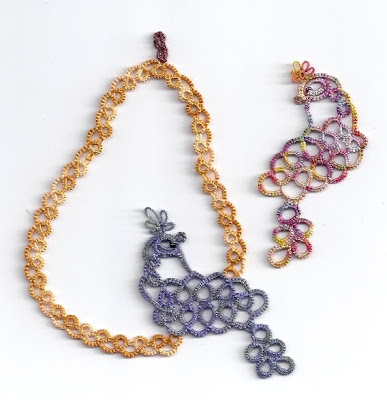
I finished motif #6 last night. These two and the wire thingie that I used an ecru edging on are all the same size. Once I dye them all....what kind of creative mosaic can I make....hmmmmm.....

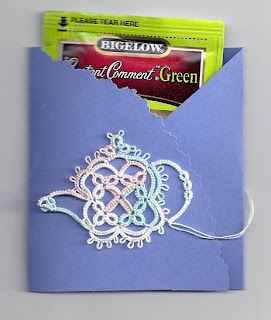
I also tatted this teapot from Martha's book which is destined to become a bookmark once I add a tail to it. In the meantime, I spied this tea envelope and realized it would make a perfect embellishment. Now that I think about it, there are some small tatted teacups in her book that would fit on here very nicely too. I just have to figure out where I got the template. This one is glued down.

Wednesday, September 29, 2010

Maybe it was that full moon recently but I've noticed other people telling tales of tatting woes too. This one isn't recent. In fact, I've been noticing it sitting on my hutch in the kitchen for days and I'd pick it up and wonder why it was there and lay it back down again. I don't remember tatting it or at least only very vaguely. Why did I leave it here? So I finally brought it into my studio and scanned it, even though I knew it had probably already been scanned and posted about months ago, maybe even a year or two ago. Like Isdhara, I didn't even see the problem until I scanned and for some reason, THEN it popped out at me! I kinda sorta remember now. It's one of those tricks the eyes play on the mind. I also found out the editing program I used to use to put words on my pix is no longer on my computer. Double oops! I liked that feature along with the framing it did.

I've been tatting motifs for the dye pot again. I actually planned to do lots of hearts this time but I keep getting sidetracked. This one is completely rings. I like the little Josephine knots in the center. I can't believe how many ends I had to hide in this motif! I left a tail at the beginning because I wasn't sure where I was going to end the first round. Usually I tat the beginning tail in but sometimes it comes in handy to make a snug final knot or join and it did this time. There are two rounds to this and so I ended the first round but that meant another tail end at the beginning of the second round. Then I ran out of thread about 5 rings before the end. More tails. At the very end, I tatted one too many large rings and had to retro-tat. I can't remember now, but I think the thread ended up breaking and I had to add yet another new thread in. So I had tons of ends to hide and it was a challenge just to add a new thread in without it being obvious. I was glad to see John was having the same issue as far as adding in a new thread inconspicuously.

Here's the next motif in progress. It has chains framing the motif. I'm almost done with this ball of vintage Star size 30 thread. This is motif #6. The one before is motif #7.

Both patterns came from this book. I should tat more from this book but for some reason, it usually just sits on my shelf. I tatted the basket in it for an exchange once. I'm going to have to tat one for me sometime because I really do love it!

Monday, September 27, 2010

Isn't this button gorgeous? I ordered it last week from the Etsy shop of Older Rose. I think I mentioned before that she has tutorials on her blog showing how to paint them yourself. I have to tell you though, the button in person is stunning and looks much better than the ones on her blog and shop. Those are small pics and don't do the artwork justice. You can't see the pearl of the button shine through or the details. These are painted on vintage pearl buttons.

Now I want a hummingbird one. This one will have to be showcased somehow. Any ideas out there?

Here's the corsage now that it's pinned in a frame and slightly re-ribboned for the exhibit my lace guild is having in November. It's hanging on my tea calendar until I take it in.

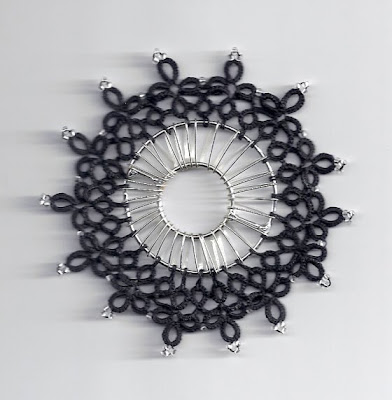
Here's the wire wheel with a black tatted edging and beads. I stiffened it but I'm not happy with the way the Stiffy worked on this. I also miscalulated a bit. I had it right at first but the first two rings were too close so I cut out one, and I thought it ended at the perfect spot but I did need that ring....just a wire spoke over instead of where it was at. Now if I actually make this into a pendant, I'll put the bail in the space above where the missing ring is and it won't be so obvious.

I just had to see what it would look like! There's too much height with the button and wire wheel so the scanner makes the background fuzzy. My camera battery is charging and I didn't want to wait so I went ahead and scanned. I don't plan to use the button this way, but it's one idea going into the inspiration folder.

Sunday, September 26, 2010

Embroidery Floss in Tatting

Years ago, when I started tatting and read every tat list post ever written (internet was new too!), there were references to tatting with embroidery floss. I was tatting with whatever I had on hand, not having learned about "good thread" yet, so I was using perle cotton in size 5 and bedspread crochet cotton size 10 for a lot of my EARLY work. I could barely see the knots on that big thread because my eyes didn't know yet how to see the tiny stuff. So when someone mentioned embroidery floss, separated, I couldn't imagine tatting with it.

Did I mention I broke a lot of those big threads because of my poorly made knots?

It took me a few years to try embroidery floss out but when I did, I tried it all! This entire elephant was tatted using 2 strands of rayon floss. It adds shine, depth and texture, but rayon is slippery. The newer rayon floss is not so bad. I often use the metallic floss for jewelry, especially earrings, but these days there are other very strong threads that are easier to tat with. A single strand of metallic would break but more than 2 strands was often too heavy for beaded earrings. It does add some sparkle though.

Here is an excellent reference shared by Sheron Goldin for the 2008 online tatting class. It covers everything you want to know about using embroidery floss for tatting.

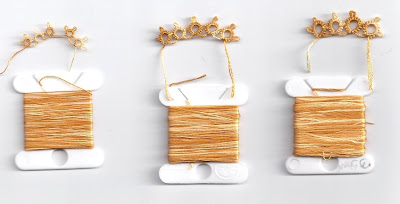
Here's a quick visual - I separated the 6 strands of cotton floss, pulling out one strand at a time for the first 3 strands. Then I wound 1 strand on a floss holder and the other 2 on another. The remaining 3 were wound on another. Then I tatted (yes, last night after I said I wouldn't tat anymore!) a sample of each. I wound the shuttle 20 turns which was too much just to show a single ring so I tatted til I ran out of thread on each one. I thought I joined in that gap of rings in the single strand sample but ....that's just another example of how my tatting was going yesterday.

Here are the samples without the distraction of the floss holders.

Yes, I've had a much more productive day in tatting! Here's the pear in that same embroidery floss. I'm not sure which partridge looks better in the "seat" of it and I've added the extra element of changing backgrounds.

At first I wasn't sure that the lighter partridge looked right but now I think so. Wish I'd scanned this set up on white, but I can try that later. The way this one is done, you would almost have to frame it or stitch it down or even glue (gasp!) it down. The directions do not attach it to the partridge but now that I've made it, I think if I make it again, I will attach the pear to the bird.

Backgrounds are funny. I wanted to tat on this wire with black thread and silver beads but decided I needed a test tat first. I found it looks really striking on a black background too but that was from laying it on top of the scanner.

Here it is with the scanner's white background. See how much "lighter" in texture it feels? This one is going in the dye bag so you'll probably see it again when I've played more.

I'm also painting wooden snowflake shapes for thread holders. It's only 5:12 p.m.! I suppose I could take a nap too. It's pretty chilly out - just enough to have me dressing warmly inside and looking for things to bake in the oven. I've got beans in the crockpot. What a nice Autumn weekend!

Saturday, September 25, 2010

As I mentioned in an earlier post, I'm starting to build up a stash of motifs to dye again. Today really wasn't a good day for tatting. This is my third attempt at Totus Mel's moth. First I tried it with the inverted picots but I didn't like the joins in the middle of the body. That wasn't where I made my mistake though. I think I forgot a picot on one side of the body. Then in the second attempt, I had the picots, but right off the bat, I joined in the second one of the body which made me think I'd forgotten a picot again - til I saw the first one hiding. Then I did this one which seemed to be going okay but I was nearly out of thread by the final join and when I went to pull the shuttle off the thread, it snapped. So I tried to get by with hiding only one end. That probably would have been okay except I left the house after that and by the time I came home and tatted the heart motif and got to the scanner, I forgot that I only had one thread hidden. I kept thinking that side looked short for some reason so I tried to even out the chain and as I tugged, I was pulling the hidden end. ARrrgghhhh!

I didn't do so great with the heart either. It's from Pam Palmer's Twelve Days of Christmas. In my first attempt, I joined the next to last ring in the wrong place but didn't figure it out until I was done. So then I tatted this one. It has a mistake too but it's very minor. I started off in the wrong direction so I had to twist the first ring to get the second ring (outer rings) in the right direction. So...no more tatting tonight!

Realizing early on that I wasn't doing so well on the tatting front, I decided to shower and get myself out of the house. I needed cat food and it was a good enough excuse, plus I picked up the mail. I had absolutely no intention of going to JoAnn Fabrics, but daggone if that car finagled me there anyway! Well...I need a pattern for a grandson and I was hoping they were on sale but they weren't. I did find a few things that it felt like I needed though.

The gold plated tapestry needles claim to slide through fabric easily and given how my tatting was going today, I need all the help I can get in needlearts. The package also says it is resistant to humidity and body oils. Summer is still hanging around in spite of the official onset of Fall. AND it says it is allergy resistant! I didn't know needles were prone to allergies but see what you learn??? Frankly, I bought them because they are gold and shiny and it will be easy to differentiate them from the regular needles in my pincushion.

There was some Gutterman machine embroidery thread on sale which comes in so many lucious colors that I thought I really should take advantage of the opportunity. After much studying and sighing and rocking from one foot to the other, I plucked three beautiful shades of yellow from rows and rows and rows. I carried them all over the store while I picked other things up only to return them to their original slots. Instead, for the price of one spool, I got a skein of yellow rayon floss and a skein of yellow/gold cotton floss. I may use the cotton to make a pear for the partridge.

Beads and jewelry findings were 40% off too so I wandered up and down the isles, trying NOT to buy anything but I did get a tube of size 6 beads that I want to use for beading. There is a bracelet I've been wanting to make for a long time. I didn't scan them but it's a rich color combo of copper, gold, brown, and beige glass (except for the copper and gold which are probably metal). I also bought those round wire thingies. I buy shapes like that all the time with the intention of tatting on them and never seem to get to it.

I've actually separated them so I can take this back to my tatting chair. I have a rather large snowflake hanging by my computer that I received in a Christmas exchange a few years ago. I held up the wire round thingie and it fits perfectly in the center. Well THAT gave me ideas! No...I won't even attempt to tat on it tonight but I will let the idea ferment overnight and give it a go tomorrow.

I hope everyone else fared better with tatting today than I did!

Thursday, September 23, 2010

New Editor - Blah!

I did try the latest new editor. It looked like I had uploaded 4 photos but I ended up with only one. I have it already figured out how to get the one I want on top with the old editor. Now it will take way more manipulation than I've ever done before. The one nice thing is that you can "preview" before publishing and see what it looks like. I saw there were several complaints already. This explains some of the issues bloggers have been having lately with their photos and posts. It seems I won't have a choice for very long. I suppose I can always find a different source for blogging.

I'm tatting again for the dye batch. I realized I have a lot of ecru colored thread that was given to me and ecru dyes as easily as white so this seems like a good way to use it. This edging is from Tatting by Cathy Bryant. It uses two shuttles. I've got about 18" inches done now and one shuttle is nearly empty. I don't like the way I have to fiddle with it to get it to lay nicely. The segments tend to flip. Once it's stitched down, it won't be a problem, but getting it to behave for dying could be something else.

I really miss the "recent documents" feature on this computer. I couldn't find where I put the word doc that I saved but I did find the printout. This is crocheted ricrac from http://foxslane.blogspot.com I'm going to try to substitute it in some of my regular ricrac/tatting patterns. The key is to use the right thread and hook size to match regular ricrac. I noticed even when I tested the vintage patterns that some ricracs didn't work as well as others. The vintage directions didn't give any dimensions to work with. This braid is also used in Romanian Point Lace sometimes too, especially where you want a little more frill than the basic cord.

I now have a defective water tank in my well pit to deal with along with house repairs and replacing the pole my electric meter is on. Funny how one thing leads to another and another and another. Eventually it will all come together but for now it's very frustrating. That could lead to all the MORE tatting!

Wednesday, September 22, 2010

Partridges and Hearts

I had to chuckle. For some reason, this one looks better in the scan than in real life. This is thread I dyed last May, from some vintage unknown thread. Well - "Daisy" by Belding Lily Co, which is not a known brand these days. It's a 3 cord thread and tends to be fuzzy compared to 6 cord. This colorway is a subtle blending of green and blue shades, a bit on the muddy side but I like it. It almost looks like bits of white showing through but there isn't any white at all. Maybe a reflection?

I needed a little thank you gift to tuck into a card so I tatted this up this morning - Heart's Desire, by Susan Fuller, in Lizbeth Caribbean size 20. It appears my scanner is the source of the white highlights. They were not there before I edited and then once I resized, they magically appeared. I don't remember that happening before. I wonder if I accidently changed a setting of some kind?

This has got to be the largest version of Heart's Desire that I've ever tatted! Since most of my Lizbeth tats up slightly smaller than DMC size 20, I was suprised. Maybe I've just always done this heart in size 30 or 40. Or maybe I've been using smaller threads so much lately that this just seems bigger. I've never added a bookmark tail to this pattern either but even before I did that it seemed quite large. Did you notice the last ring on the tail is heart-shaped? More picots on the tail split rings probably would have matched the heart better, but I was getting tired of it, believe it or not!

I took a vacation day to attend a job fair in Indy and then decided not to go. This does give me the opportunity to make some calls about my house repairs from the tree incident. I just got the final numbers last Thursday and have not had time to set anything up since. One thing I've been noticing in recent years is that I'm getting so tired of making ALL the decisions. I wonder if anyone else who is single ever feels that way? Or even not single - sometimes all the decision making falls on one person simply because the other won't. I think I procrastinate sometimes just to avoid having to do that. I do prefer having choices, don't get me wrong, but I just wish the best thing would automatically happen sometimes. Especially in areas I'm not that proficient in.

Monday, September 20, 2010

Tatting Tea Tuesday


Ever wonder what machine embroidered tatting looks like? Click here to see! Be sure to click on the images to enlarge them when you get there. Above is one small sample. I suppose you could do the same thing with hand embroidery but it would be very very tedious. It does fool you from a distance though. I mentioned some time ago that I almost bought a piece in a thrift store until I looked closer at it. The lighting was poor there and I had to take it to a better lit area.

Tatting Tea Tuesday has escaped me for weeks now. I did just brew a pot of chai flavored tea to ice. I started another partridge last night in a different thread but stopped at the tail. I was tired and I knew if I tatted the tail, I would feel committed to staying up and hiding the ends and then blocking. Next thing you know, it's midnight! So I went to bed instead.

Tonight is my watercolor group's meeting. I have yet to go to a regular meeting so I think this will be the one. That's why I put it on my calendar. There is so much I need to do this week though. I can't possibly manage to do it all....but it's okay. Nobody's life depends on it. LOL!

Maybe we should have a Tatting Chocolate day.

I stopped in an art gallery as I left Nashville yesterday. I picked up a few free brochures and flyers on a table and was especially intrigued by this one. What a great fundraiser!!!! Shopping is great there so I'm thinking it would be a fun roadtrip right before the holidays.

Sunday, September 19, 2010

I managed to tat something this evening! This is the partridge from the partridge in a pear tree in Pam Palmer's Twelve Days of Christmas. Checking an entry from back in May, I know this is thread I got from Karey Solomon. If I make the pear, I think an old gold would be good for the pear. I'll see what I have in my stash. I'm not too keen on making the pear right now, but I can always make it in the future. I really have wanted to make this bird for a long time though.

Maybe I need a place to put all my flying tats! Dragons and dragonflies and butterflies and birds! I ran across Mark Myers Tinkerbell diagram recently too. Unfortunately, I have to make up my own stitch count first. I should make up a sample sheet with rings in assorted stitch counts so that I have something to refer to in terms of size when I get around to that pattern. Also in different thread sizes. I think I've even seen something like that in one of my books but it seems like it was only one thread size.

I got quite a bit of home stuff done today. Laundry, changed sheets, swept floors, even cleaned the toilet! I spread it out and watched some Quantum Leap DVDs and did some needlelace. The tatting was last today.

I'm out of town for a good bit of tomorrow, driving to Nashville, IN to do some ergonomic assessments in a regional home extension office. They are part of the University so we offer our services there too. I hope it's a nice drive and I do love Nashville, having family roots from both sides there. Decades ago, either Felix or Chris Brummett was the local law enforcement person there. DECADES ago. I've only seen photos of the brothers. Actually, it was almost a century ago now that I think about it. I can't drive and tat so no new stuff to post tomorrow unless I'm really energetic when I get home after four or five hours driving total.

Oh hey! Well...my calendar says the first day of Autumn is September 23rd. What happened to the seasons changing officially on the calendar on the 21st of each quarter? I was going to say....Tatting Tea Tuesday and the First Day of Autumn are on the same day but I guess not. I just might celebrate it anyway!

Saturday, September 18, 2010

The Toymaker's doodles ~ go see! I was trying to imagine her cutting out those shapes and then coloring them in and having them turn out so perfectly!

I woke up pretty much on my own this morning in plenty of time to meet my son to look at some garage replacement ideas. No one was there but we looked around and I'll be calling the company soon to get more information.

I planned to go to a community garage sale in a little town close to me after that but then I chided myself into not going. I am trying to get rid of stuff, not add more to the mix.

I bought two tops at Goodwill the other night - half price even! One is actually a zip up sweater and the other is a knit V-neck top. Anytime I buy something there, I'm visualizing it with tatted lace. Have I ever shown you anything like that, clothing that I've trimmed in tatted lace? N-o-o-o-o-o-o-o. I never seem to get around to it! There is a pattern for a V-neck insert in one of my books that I've been looking at lately. Can't find it right now but (of course) I know what thread I'll use and it will work for the knit top I bought. I'd love to get started on it if I could find the book.

Now...why can't I find the book? I put a bunch of stuff away today. I tend to accumulate thread, beads and books around my tatting chair in the living room and eventually I make myself put it away. I put most of the tatting books away last night. If I could remember which book it is in, I'd probably find it quickly. It's something I haven't used much. I keep thinking it's something I got more recently. Ah...found it! It's the latest Japanese book I purchased - Tatting Lace. It's on page 22 and where it says "yarn", there is #40 on that line and I hope that is the thread size but it looks like a bigger thread in the photo. The way it's made though, I can just continue to add rows to make it bigger.

I tatted two versions of the ribbons and bow edging I'm trying to figure out. I'm still not happy with it but may try again tomorrow.

This is another pattern I was playing with a few weeks ago. I didn't like the way the wheel turned out so I decided to play with it and added variegated green petals in two sizes. The wheel was bowed to begin with and I've sort of forgotten where I was going with it now. LOL!

After getting lots put away, I worked on my embroidery sampler and then even started a needlelace piece. It's a simple oval shape and I'm just doing corded single Brussels, Corded double brussels, and probably triple corded brussels as I move down the piece. It's been so long since I've worked on needlelace that I thought this would get me back in the rhythm of it without ruining something else.

I also bought something today. It's not tatting related but it's something I often use with tatting. I bought one of Older Rose's hand painted buttons! I got one of the bluebird ones. I'd like a hummingbird one too, but I'd also like to paint my own. She has tutorials on her blog which I intend to try out one of these days!

I also took a LONG nap today. I've been sleeping a lot - which is kind of normal with the changing of the season into Autumn. Even so, I've been yawning for a few hours now so I guess I'll even get to bed early tonight.

Friday, September 17, 2010

I stumbled across this vintage lace that I bought in a baggie in a thrift store somewhere along the way. There is quite a bit of some of it but most of it has a damaged spot here and there. I think the bullion centers in the top tatted piece were either crocheted or done by needle and thread before being joined to in the tatting. I might take these to my next dye session but I'm also thinking of embellishing a sampler pillow with them.

I tatted one of Bjorne's snowflakes in these bright neon colors. I've done this flake before, in tiny gold thread that kept breaking. I need to do a plain simple white one and then dye it!

Right before I left work this evening, I sketched out an edging based on that bicolor rose in the last post designed by Carla. I didn't tat it yet but I hope to this weekend. Carla will probably get the first peek.

My time is pretty tight over the next week, but I hope to spend some time playing with my drawing program so that I can diagram decently. Ruth Ann Adams sent me a tatted scene she made and I want to diagram her pattern for her. It's just a matter of finding the time. I need to get permission from her to show it but I think if I do that you will be very impressed.

Oh how I wish I had the energy to be productive for 24 hours straight sometimes!

Tuesday, September 14, 2010

When I got home last night, there was an unexpected package from Singapore in the mailbox. I was expecting some mail but not from Singapore, so this was a DELIGHTFUL SURPRISE! See the added bling??? Isn't it gorgeous?

I've been coveting one of these shuttles. If you've read this blog for long you probably know that in spite of a huge shuttle collection, I consider the Clovers my "working shuttles" and use them almost exclusively. This is a much appreciated gift from Umintsuru. Thank you so much! If I wasn't in the middle of a somewhat difficult T.A.T. project that requires close concentration, I would have immediately loaded this up and tatted with it. I tried really hard to finish it, but burning eyes said to STOP. Tuesday night for sure!


I was lucky enough to be asked to test tat it. It is quick and easy unless you are adding beads and those take only a bit longer.


This is my favorite.
I forgot to snip his feet!


Barbie doll purse! That was my first idea for this piece - that it was the perfect size for a doll bag. By the time I got around to blogging, I'd forgotten about it mostly and kept thinking of a cat instead. I said "mostly" because I kept feeling like I'd forgotten one of my ideas. You see how fleeting they are? WRITE THEM DOWN!

Sunday, September 12, 2010

My nine days are almost up and I return to work tomorrow. I could use days and days of vacation, but couldn't we all?

I was doing a lot of blog surfing earlier today. One of the tatting blogs is in Italian and most of the time I just look at the photos and try to figure out the gist of it, but today I used the translator and looked through all the pages, a luxury, indeed!

The translated name of the blog is Grandmother's Tatting. I bet you didn't know that. I knew the word "tatting" was in the title but that's all. I came across a two-colored rose motif, which I believe is the owner's design. She usually states where she got the pattern from so I'm assuming this is hers. I was intrigued by the use of two colors to begin with, although they were ecru and white. The use of split rings set up a pattern of color, which I didn't really even recognize until I tatted it myself. Can you see what I discovered after I tatted it?

See those pink bows all around the center? LOL! I'm sure that wasn't the intention and even when I tatted it, I was thinking how the green would bloom into a pink flower but the ribbons stood out instead!

This is my second one. I made lots of mistakes with the first one. I didn't put enough green on the 2nd shuttle. I made the center ring and then hid my ends, adding in the two colors after and hiding the ends of the joined threads. Then I had to add more of the green and that meant more ends to hide. THEN, as I got to the very end, I realized I was short ONE split ring! POOH! And other expletives I can't put in print. So for the second one, I just joined the two colors together, left a short space before starting the center ring, long enough to be the same as the other picots since when I closed the ring, I would have to make a mock picot and I didn't want the mock picot in two colors. Didn't know if it would work, had never tried it before, but it did!

She (I think her name is Carla) called it a bicolor rose but I'm inclined to name it Ribbons & Bows. It would make a nice Christmas motif too in Christmas green with Christmas Red bows and maybe a few sparkly beads like lights on a wreath.

Now see.....another name for this motif could be "Inspiration Motif" because it's already fired off two ideas. Here are a few other ideas that came up as I was tatting it:

This shape made me think of a cat. You could make double picots in place of the regular ones at the top and block them so they are pointy. Add a tail and you're done.

This one made me think of a bunny. Add a couple of beads in the center ring at the top, make the ears longer and more pointy - and add whatever else tickles your fancy.

When I added the 3rd arm of the outer segment, I saw a face with a hat in the middle. With the 4th one, I began to see a person. I made myself stop scanning and continued to tat. This was tatted in Venus size 40 for both parts. I'm not sure of the colors.
*~*~*~*~*~*~*~*~*~*~*

Part of my surfing today led me to an older site, the Bead Prayer Project. It was completed in 2004 but I thought it was a nice idea. Sometimes you just want to make a little something for someone,offering a little bit of help or encouragement, and you might call it Beaded Prayers or Blessings or Inspiration. You put the written thought in the container you make and embellish it. Beads were the focal embellishment of this project, but I think a bit of lace would be welcomed too. Just an idea.

Hope your weekend has been as beautiful outside as mine has!

Friday, September 10, 2010

Finished Corsage & Spammy emails

Here's the finished corsage. I stiffened the flowers - that's what you saw in the last post. They really don't fit together all that neatly, at least for me. Even so, it was fun to make.

In this shot, I stuck them in an Avon bird candle holder. I got this sweet dove at Goodwill. I need to either scrub it or give it a coat of paint. I hadn't been sure what I would do with it since I knew I probably wouldn't use it for candles, but you never know. The little bunch fits in there nicely though.

I just finished checking my email and have been noticing a disturbing trend. The first few I got, I emailed back very nicely and said no. Then I just deleted them when I got them. Now I'm designating them as spam. What kind of emails am I talking about?

You know, tatters - or even creative people in general, are generous and eager to share. But be careful as there are those who take advantage of that cheery nature. What I've been getting are emails from people I've never heard of, asking if they can link to my site. Or they include a link to their site where they're selling something. Often it's not even tatting related. Usually it's a site that sells clothing or shoes or something totally unrelated to tatting, but sometimes it is tatting. In other words, it is unsolicited spam. Now everyone wants to help another tatter, but I'm not going to plug someones work I don't even know and never even heard of. Just because I'm a member of a group they're selling through doesn't mean I agree to advertise for them. What I've been noticing is that they are all worded the same. So - just be aware that the email you're getting telling you they admire your craft and want to link to your site may well be followed by the request that you show their link too. If you follow the link, you'll probably find it's not in your best interest to follow through. If it's someone you know and feel comfortable with, then go for it. Otherwise, check further.

Wednesday, September 08, 2010

I noticed that Umintsuru has been tatting a lot of patterns from Lyn Mortons's Tatting Patterns. I've only tatted a limited amount from this book, notably the Hearts and Flowers motif that attracts so many people, but I actually bought the book because I saw this corsage in it and fell in love.

You can make it with 3 flowers or 6 flowers. Actually, I would prefer to use it as a hair ornament but my hair is so fine that it will NOT hold anything, even things designed for fine baby hair. So I thought I might actually make it as a clothing decoration or maybe for a bag.

Here's one view of the 3 flowers. I tatted them with one of the skeins of thread I dyed on Monday. A nice combination of Autumn colors, don't you think? I'm not sure if the white bits are detrimental in this or not. If I didn't know they weren't supposed to be there, I guess I wouldn't think anything of it.

Here's a view where they are more separated. I've got to find beads to set them off and also my florist's wire and florist's tape. I'll go through my ribbons to see if I have anything to complement the colors. Maybe I'll make it into a brooch for my fall jacket which I'll probably be wearing before too long!

Today has been full with the insurance adjuster, a company to tarp the roof, and the return of the woodcutters. The smell of sawdust and the sound of chainsaws is beginning to fray my nerves but lacework and stitching have kept me grounded. I was pleasantly surprised to learn I'll get a new roof on the garage! There was so much of the crown of the tree on it that I couldn't really tell what kind of damage there was and it was already in bad shape. I will be responsible for other repairs to the garage but it'll all work out. The people I've dealt with this time have been super!

Even so, I'm ready for everyone to go home and for me to enjoy what's left of my vacation!

Tuesday, September 07, 2010

This isn't the greatest scan because it was raised in some places and I had to put a fabric background to cover it instead of the scanner lid. I tried both ways. This is the brightest and clearest in spite of the shadows. This is the last of the batch. I rinsed them this morning and blocked them. As you might guess, much of this is shuttle endings and mistakes but there are a few good pieces too. I really wanted to see if I could dye the little blue rosette at the top one color and the leaves a different color without them blending together into one color. I was partially successful. Most of the blue is in the blossom and most of the green is in the leaves. The problem is that the whole thing is wet from the presoak so the color is naturally wicked into whatever is touching. I could dye one segment and hang it so that the color stays in that area. Then presoak (?) again at another session and do the leaves alone. That sounds like an awful lot of trouble. Maybe I wouldn't have to presoak for as long the second time, maybe just enough to get wet and in that case, I could only dip the part to be dyed. Hmmmmmmm....I'm trying to keep track of all these "mental notes".

I wasn't going to dye any skeins of thread but at the last minute the night before, I wrapped two skeins of Lizbeth white, since I had nothing to lose there. The odd thing was that they floated in the presoak solution. I had to keep pushing them down. While I mostly liked the colorway that resulted, I was disappointed to see large amounts of white spaces that were not planned or expected. I'm assuming it didn't take the dye well for the same reason it kept floating, whatever that is.

Someone asked what I was going to do with all of this. I didn't preplan anything special since I knew it was all experimental. There are some pieces I don't like and some I love. The edgings can always be used on something. Flowers and butterflys can always go on/in cards or on a fabric landscape. The shuttle endings and mistakes are generally destined for crazy quilting, embroidery or cards.

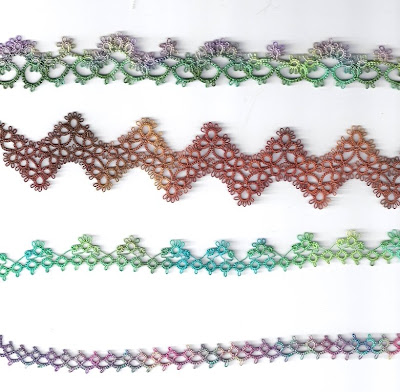
Speaking of edgings, I wanted you to have a better look at these. The top one is a vintage pattern that I mean to write out in modern terms and add to the pattern links. I loved the way the "flowers" look vintage. I think I started with grape and then added lemon or the other way around. The combination seemed to "age" each other. I would probably pick a different green colorway next time but this one is okay. It tends to bluish tones in some areas and yellow tones in other areas so it works okay with the grape/yellow flowers.

The zigzag edging was a play with shades of brown and it's what inspired my results with the cross. The edging was purely accidental but once I saw it, I knew I wanted to be more deliberate with the colors on another piece.

The Hen & Chicks edging was one of the last edgings I colored and I hadn't used greens all that much yet so decided to go with blues/greens. I didn't really have a large selection of red/yellow to work with but maybe next time. I have a yard of this edging made which enlarges my options for usage.

And then the simple ring/chain edging I mentioned before. I think it's about 24" long. Lots of options for this one too.

The first two edgings were painted laying down since they are short. The last two were wrapped on cylinders; H&C on a big cardboard cylinder and the other on a straw,covered by saran wrap. I mentioned in yesterday's post how I painted the straw laying down and the H&C with the tube standing up.

Someone came out this evening and cut up the tree enough to be off the house and garage so that the insurance adjuster can make an assessment. While that was happening, I cut out the outfits for the sock monkeys I made awhile back. I hope to sew those tomorrow afternoon.

I haven't tatted anything yet today but I did do some drawn thread stitching that I'm practicing. It will be on my lace blog.

And I'm off to stitch/tat/watch tv/relax!

Monday, September 06, 2010

The Big Dye Day!

My lace friend Sally and I got together today to play with thread, ribbon, fabric and dye. I was amazed at how fast the time went. I thought I'd get photos while we were playing but I was way too engrossed to bother!

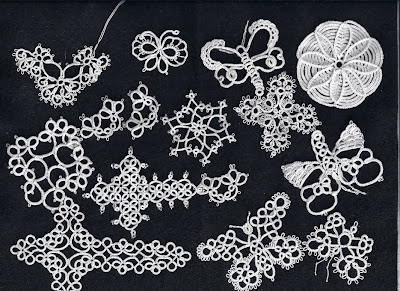
You've seen most of these as I tatted along the way but there might be a few new ones. I grabbed some bits and pieces from my "fail tin" and my shuttle endings that were in white.

Don't you like the stark black and white contrast here? I will admit I was getting very tired of tatting in white and thought I didn't have enough, but I did. I was still using up the last bits when the end of the 4th hour rolled around!

Here's the encased results. I didn't wait too long to rinse out the first ones I dyed. I knew it had been hours since they were colored.

DRUM ROLL!!!!!


TA-DA!!!! Full, Living Technicolor!!!!


I'm still rinsing and blocking in small batches. I need to be able to match up the lace with the baggie it came home in because that's where I recorded the colors used. It reminded me of playing with watercolors. The colors tend to float and blend in unexpected ways. I learned to stand up the cylinder that I wrapped lace around so that the same colors would run down the same path instead of a different color path but I have some that did that too.

The little butterfly on the left was my very first attempt. I didn't know how much the dye would bleed into other parts. The colors aren't as symmetrically divided as I had them in my head, but it didn't turn out too badly. I didn't premix colors except in one case much later and that was for fabric. Everything was painted on with a stencil brush or foam brush. There were some small pieces that I dipped but very few of those.

I love how that cross turned out! I think I used golden brown, which was very light, all over and then nutmeg in the center. Then I added lemon on the outer edges and it made it literally glow!

I had hoped to tat more of the sunflower like medallions before today but it's okay because we already KNOW we're going to do this again so I'll tat more for later. I had a project in mind, that also involved yo-yo's. It was also an experiment. One is tatted in Lizbeth and one is tatted in DMC cordonnet, both in size 20. I'll just leave it at that for now. I might have more to say later, when some other pieces are rinsed and dried.

The greenish butterfly seems a little drab with all that bright color around it but on its own, it really is very pleasing and will look good in the right color environment. The little fragment flowers from Konior's book were unexpectedly pretty. I'm clueless about what to do with them but something will come to me.

The simple ring and chain edging was wrapped around a saran-wrap covered straw. I laid it down on its side thinking I would paint a length, turn, paint another length, turn, etc. this is where I learned that wasn't a good idea for the way I expected it to turn out. It did provide a sort of "confetti" look though. I notice it's paler at one end compared to the other. I suspect when I stood it up, much of the color ran DOWN before I finished wrapping it for transport.

Here's a sneak preview at what is on the blocking board right now. I still have another batch waiting to be rinsed and blocked but these are probably all the major pieces.

I realllllllly like the way the hen and chicks edging turned out! I knew I would though I didn't know what color combinations I would use until I was ready for it. There is a very good chance I will tat another yard to dye in a different colorway next time.

I have more comments on the colors I used for these but I'll fill you in on that tomorrow. For now, I think I'll go fix a very late dinner.