I had fun with this galoon and made lots of observations that I hope will help others who tackle this publication. This is the D.M.C. Tatting by Therese de Dillmont found free from
The Antique Pattern Library. It's a wonderful repository for all kinds of antique needle art publications.

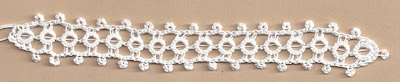
You might remember from the last post that I went back to the beginning and I am tatting the 6 patterns in Plate I. I just remembered that I tatted a ruffled scallop from another publication that I was going to show in this post but I need to tat it over. So I'll show it in another post. This one is going to be long anyway. Above is the photo in the publication of figure 2.

The pattern is worked in three rows but the second and third row are the same, just on different sides of the rings. The first row, which is the center line of rings, is written: With one shuttle: *3 stitches, 1 picot, 2 stitches, 1 picot, 3 stitches, 1 short picot, 3 stitches, 1 picot, 2 stitches, 1 picot, 3 stitches, close the ring = carry the thread under the ring and join it to the short picot = repeat from *.
So the ring is made with 1 shuttle like this: 3 - 2 - 3 ^ 3 - 2 - 3, clr
^ stands for "short picot"
You pull the shuttle thread from the closed ring under the ring and then pull it up through the short picot enough for a loop and put the shuttle through it like a shuttle join. Right next to the last ring, you begin another ring just like the last one and continue the same pattern for the length you want.
I realized as I drew it out before tatting that this is a very clever away to achieve the same line of rings we usually do with split rings. I originally thought the thread going under the ring was decorative and gave it an extra lacy effect but it is just plain practical.

I decided to tat a row of split rings in the same pattern and see how they compared. I had 16 rings in the original length so I tatted 16 split rings. Both are tatted in DMC Special Cordonnet, size 20. As you can see, the split ring length is shorter because you don't have any space taken up with the tiny picot join. The split rings are tatted 3 - 2 - 3/3 - 2 - 3, with 2 shuttles, of course. I also left a tiny picot at the beginning point of the first split ring to join the 2nd and 3rd rows to. That was just personal preference. You might use the galoon differently and chose not to.
I also want to point out that the rings were tatted in the same direction. In other words, the end where the tails show is the end of the length. I started at the opposite end in each, but does it look that way if you are only looking at the rings? I think I would guess the split rings actually started where the tails are if I didn't know better. The only thing I can think of at the moment is that the first line of rings with the thread pulled up through the tiny picot puts some tension on the ring and makes it rounder. Any other suggestions are welcome.
I've tatted the 2nd/3rd rows on the original. The instructions say: With 2 shuttles: Fasten the threads to the 1st picot of the first ring: *1 stitch = join the right hand threads to the 2nd picot = with the two shuttles: 2 stitches = with the left hand shuttle: 4 stitches, close the ring = with the two shuttles: 2 stitches = join the right hand thread to the 1st picot of the next ring and repeat from *
What this means is that the row is chain work with a ring thrown off the chain. I put most of my thread on the chain or ball shuttle and only enough to cover the distance with the ring shuttle. To cover the distance, I usually figure the length I'm going with the thread plus half more. So if the length were 12", I would put 18" on the ring shuttle unless I am also tatting some rings with it.
I joined in the first picot at the left, ch 1, j to the next p, ch 2, r 4 with the ch shuttle, ch 2, j to next p. This is where I started so you just continue the same pattern all the way. *+ (join)ch 1 + 2, r4, ch 2, repeat from *
I went all the way around, improvising a chain and ring at the end.

I did the same thing with the split ring length except I made Josephine rings instead of a small ring of 4 ds. Some vintage designers really liked small rings but I find them kind of ugly unless you are using a fine thread. Since the small ring was 4 ds, that meant 8 half stitches so I made the JK 8 first half stitches. I think they lay nicer than the small rings but you can do it either way. I've put the two together here for comparison.
Another difference I noticed was that the one with the thread pulled through the tiny picot tended to turn on me and I had to be very careful when tatting the 2nd and 3rd row to make sure the thread was underneath the ring.
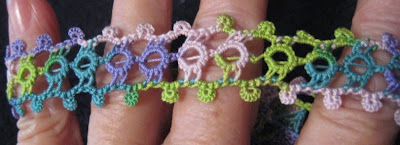
Now I like to take these patterns one step further, besides updating the pattern, I like to find another way to apply it and I like to tat it in color. I already had a shuttle wound in Lizbeth Springtime and then didn't tat what I had planned so it became this. I used the original method of rings, pulling the thread up through a tiny picot, but I used Josephine knots instead of small rings.
Then I crocheted a little flower to cover where the ends meet. My plan was to tat a band for a plain candle votive holder I have and I was hesitant to join the ends permanently. Once I was done and pulled it around the glass, I found I
had measured correctly and it slides on very nicely as you'll see in the next photo.

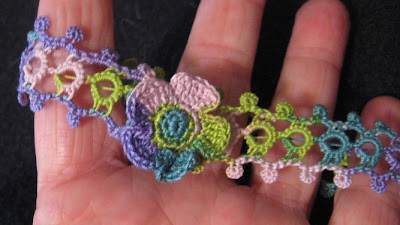
I thought about gluing it on but I really hate to use glue on tatting unless I have to. This way, the band can be slipped off and washed if need be.

I liked it so well that I've added another photo for you!


.jpg)


%2B(650x228).jpg)


 I tatted these last night and left them to block As someone mentioned, it seemed like a lot of work, so I only made small inserts. They really didn't take all that long to tat and the crochet part generally goes much faster than tatting.
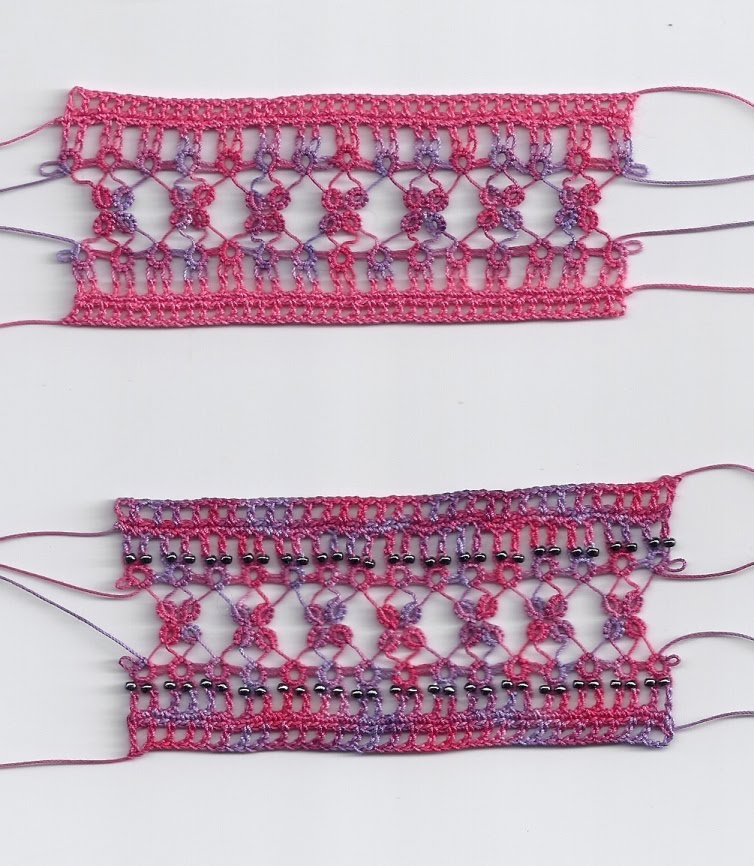 I used some of the thread I dyed last Spring which I think is size 30. I had so many threads wound and while they were initially labeled, in the dying frenzy later, I lost track of the size and brand. I have a lot of this color combo which I don't particularly like but that means I can save my favs for what I know will work out.


.JPG)


