Monday, February 25, 2008

Monthly Drawing Correction & Shuttle Answer

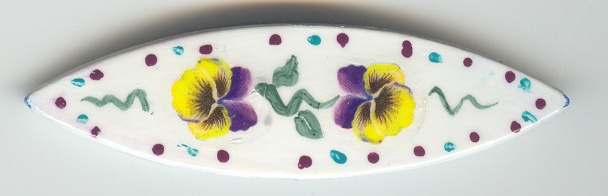
Yep, one more angel! This one went to a friend who sent me several tapes that I'm interested in. I used the layered picot for the crown on this one too, but I made the front loops a bit shorter and added beads. I had the beads on my ring shuttle, forgetting this is a chain until it was too late, so the beads didn't exactly go on the way I planned. Where would we be if we didn't have mistakes to learn from? Besides, this is a nice technique in itself and I would have wanted to try it sooner or later.


Comment from Moronez for April 21, 2005 entry:
I just discovered this blog and now you have my curiosity. I would love to try my hand at customizing a shuttle myself and have lots of questions.

What type of shuttle are you using for a base and where do you get it at? What type paints are you using and what do you seal it with? Are they still usable once they are customized?

Love your work.


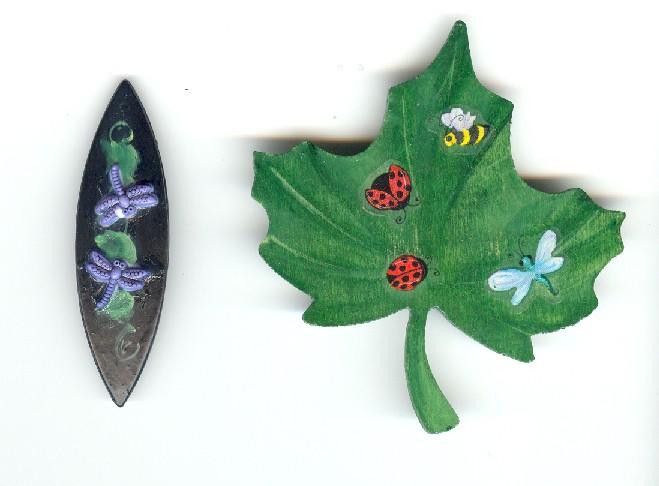
Thank you! There was no address to reply to so I'm answering here. I've used different combinations of paints. This particular shuttle is a generic one that I bought from http://www.lacemakerusa.com/ but I've also painted on aero-type shuttles and have been gifted with dressed-up Clover shuttles. For these, I like to sand them a bit with a very fine grit, just to rough them up so the paint will stick better, and then base-coat them with acrylic. I may have only used nail polish on these but polish tends to chip so I like to use that as the last coat now. This one is a combination of acrylic paint and a decal. Then I seal it with a few coats of clear nail polish which also adds gloss to it. Yes, they are usable. I slide a thin piece of cardboard between the tips to keep them from being painted shut. This one was acrylic paints with a couple of dragonfly buttons with the posts cut off and this one was simply painted with acrylics. That faded red spot is a mistake which hopefully showed up a lot more on the scan than the actual shuttle. I also use several coats of nail polish with glitter sometimes or for the metallic look. I love painting them and hope to do some more soon!

Change in Monthly Drawing - You only need to enter once! I'll keep the entries from month to month until the year is out. The winners won't be returned to the pot. If you change your email address however, you will need to email me again and tell me.

Isn't this fun????

Sunday, February 24, 2008

Special Notice - Anniversary Celebration All Year Long!!!

As I posted earlier, I celebrated five years of blogging about tatting on February 13, 2008. I wanted to do something special but I was crunched for time in a lot of ways. I wanted to create a slide show highlighting those years and couldn’t find my 2006 photo disk at the time. I found it today but it will take hours to put it together so don’t hold your breath – it will show up eventually.

I’ve met and interacted with so many people over the years. I feel bad sometimes because I don’t remember names like I used to. I see at least 500-600 people on campus, one-on-one, each year and I can’t remember their names either. I have a good memory, but not as good as it used to be. At one time, I could have told you what you were wearing when I met you, what was going on in your life if you told me, and what the weather was like. I just can’t do that anymore…and frankly, it’s not important. It’s not that I completely forget you; I just forget your name. Remind me with a few clues and it all comes back.

The slideshow isn’t the only thing I wanted to do. That’s more for me, to remind me of everything I’ve tatted because the majority of it is gone now, and like names, I forget them. I also wanted to recognize all the people who have helped me become the tatter that I am today. I’ve said it many times – I’m not sure I would have pursued tatting beyond simple edgings and bookmarks if it hadn’t been for the internet. Seeing the potential of tatting and meeting so many creative and talented people was a significant milestone in my creative life. It is my intention to focus on at least one of those influential people each month for the next year.

The other thing I want to do is recognize and appreciate each of you. How can I do that? I don’t know of any way to reach each and every single one of you but I do want to offer the opportunity for me to share with you individually. So each month until the next anniversary, I will also have a drawing and one person will receive some kind of goodie bag from me. The drawing will be on the 13th of each month. To enter the drawing, simply email me at ginab6@yahoo.com. Put “monthly Tatting Goddess drawing” in the subject line. This is open to anyone who tats anywhere in the world. It would be helpful to me if you could add a few tidbits about yourself, your mailing address of course - or you can wait and see if you’re the one drawn before giving me your address, what you like to tat, your favorite colors, threads, patterns – anything you want to tell me about yourself.

I am SO looking forward to making something for the winner each month! So don’t be shy – sign up every month! Unless you win….that would just be greedy to be the winner every other month. LOL! I’ll post a reminder now and then and I’ll also announce the winner each month.

:-) Gina
Nata #67

The Sherbert Angels

You might remember from my last post that the vintage edging I tatted recently had me thinking of angels and I did have a go at creating one from that design, but it faltered and because I wanted to get an angel done now for a project, I left it for another time. I have another angel in the wings too...it's been there for a few years now, ever since the angel round robin. In fact, I can remember when I started it - on my first trip to FL to visit my cousin in March, 2002. It's still in my notebook, along with the reindeer.

So I fell back on a favorite, two favorites in fact. Both are designs by Martha Ess. Mark Myers has some angels I particularly like too, in his Tatted Gathering of Angels. I like to use the tiny angels in his Angel Jewelry Set to give away in cards or tiny frames, especially as a momento for someone who has passed on. I wanted something a little bigger this time though.

So this is Martha's variation of a pattern by Brigit Phelps which I think I posted about here and on Dec. 10,2007 both. Since I was using the glass heart and it seemed to take up more space than beads had previously, I made the skirt longer by adding a few repeats of the chain/picot sequence. This one is tatted in Sherry Pence's Rainbow Sherbert, size 20. The thread appeared out of nowhere - I think on my computer desk - so I thought it was time to try it out. I'm not sure where I have Marilee's thread but I have several bags of thread here and there that I need to put away and it's in there somewhere. It will appear "out of nowhere" when the project is right, I'm sure. LOL!

I also tried something a little different for the head. I made long picots and then threaded beads on before joining at the next spot where a picot would be, making another long picot right after that. It ended up looking like I had just used 3 beads in the picot. I'm not sure what I had in mind now but it was a little different effect than what I ended up with. I still like it.

The next pattern is also a Martha creation but this one is an original, named Marjorie's Angel. My copy was from the round robin printouts but Martha has it on her webpage now. I made a few slight changes here too. One inadvertantly - the rings at the tip of the wings have 4 picots when they are supposed to have 3. I saw my mistake when I got to the second wingtip and decided to make them match. I also decided to substitute fluffy (also known as ruffled or layerd) picots for the split ring halo. You can't really see it very well in the scan but there is a double layer of picots. These kind of decorative picots are made by measuring the length of your picot, making 2 first halves of the ds, measuring another length, and making 2 second halves of the ds, and you continue alternating the 2 first and second halves. You can play with them in other ways too, by making one side longer than the other or by adding beads to one or both sides. Ah...just got an idea for another angel crown. I wasn't going to make another one but I might have to now.

This thread is Flora size 20 and I'm not sure what the color number is but it always reminded me of orange sherbert so that's why I called these the Sherbert Angels.

Saturday, February 23, 2008

#21 - #25 of 25 Motif Challenge

And I'm done!!!!

The very last one is my favorite. I'll probably do that one again. #21 repeated one segment in the instructions...it was a repeat, then said to join and then repeated the line again. LOL! I had nearly filled my shuttles so #22 and #23 were from the same thread, Aida size 20 for the brown and DMC Cebelia size 20 for the gold. You can see where I used a split ring to climb out on #22. It was late at night and I kept thinking I really should go find the directions for a single shuttle split ring. I didn't know how I was going to get the ball thread up where I needed it - but I think now that I simply would have encapsulated it. It was a fiddly motif. The outer round does not join at all. You think the small rings join at first glance but they don't. #23 left out 4 ds at the first ring of the second clover. I corrected that ring but then made a mistake on the third ring which I corrected on the later clovers. #24 was fun to do in two colors but remembering my 2-color split ring in #22, I decided to cut & tie and hide my ends instead. And then the last one, #25 tatted up so nicely. No problems with the instructions and I really like how it looks.

This book also has 6 very simple edgings and 2 crosses. One of the crosses reminds me of one in Workbasket which I tatted for a very early exchange. Perhaps she designed that one also. There are also photographs and written instructions on how to tat at the beginning.

So what am I going to do with all these motifs? Halfway through, I got to thinking that I should have done them all in the same thread. I'll have to think about a way to preserve them now. I don't want to just stick them in an album somewhere.

Now I can get to an angel. Jane's angel postings have got me inspired. That vintage edging I did awhile back keeps saying "angel, angel" to me. We'll see if I can manifest the image that is in my head.

Monday, February 18, 2008

25 Motif Challenge - #17,#18,#19, #20


I didn't feel quite up to speed yesterday, very tired and a headache off and on so I didn't do much. Napped and tatted. I'm missing the CD with photos from 2006 so I haven't gotten any further with the slide show. No matter...we'll just celebrate til I'm done celebrating. LOL!

The above four motifs moved along quickly. There weren't really any discrepencies in these and I had to wonder if more than one person wrote up the patterns. I used split chains and split rings where I could so that would automatically change the instructions but there was nothing wrong with them as they were. One might have had a picot missing. Maybe I'm getting used to no reference to joining rings at the side - can't really remember and I don't have the book with me right now. I remember that I only made one note though. There is still the sequence of 2-2-2-2 for tiny rings. LOL! #18 and and #20 are a break from the usual designs. She has most of these ending at a place where you can leave a loop for hanging. That's why #18 started with a chain, so that it ended where the chains joined instead of at the base of the clover. I chose to start with the clover and ended at the base of the clover but it looks the same - without the hanging loop. #19 was tricky because there was a tiny split ch 1-1 between rings to end with. It was so fiddly I kind of fudged. Oh - that's where the discrepency was! The instructions said to chain 1 ds, 1 1/2 ds, and then go to the ring and repeat around. What is 1 1/2 ds? I would take it to be 1 ds and then the 1st half of another but looking at the photo, there was a picot right in the center. The instructions didn't mention a picot. So I made it up, ds,p,ds,rw.

In the meantime, I think I'm trying to do too much. I'm gathering information to apply for my ASP. I have to do it NOW if I want to apply for a grant from work to fund part of it. Also gathering information to connect with several realtors and make a choice of who I want to work with (WHEN????? - where will I find time!!!) I still haven't done my taxes. I have 2 conferences to attend - one in Indy next week and in Columbus, OH the following week.

So....things may be sketchy here for awhile.

Wednesday, February 13, 2008

FIVE YEARS OLD!!!!!

My very first post! Tatting - that delicate wispy threading of air pockets that makes an enduring lace. It's become an obession with me - more than crocheting was, more than quilting, more than even painting - only because it was more portable.

When I started a blog, the freebie version didn't offer much. I was initially inspired to start blogging after reading my friend Tim's blog. Tim now has his own website but he had been writing in a blog for a year or so when I met him. We helped each other out learning how to use photos - finding a free server to host the photos and upload from there. He taught me how to do the html for links. On March 11,2003, I was still struggling but managed to upload a scan of the alligator I tatted and a paisley heart that I tatted for an exchange. I didn't have a scanner and had to go to my sister's house and use hers, save it on a disk, and then come home and upload it to the online server location. If you were to read from the beginning of this blog, you would see how I learned step by step. Many of my photos are missing now because I no longer use the free online server. Much has changed over the years.

Google bought Blogger and suddenly, what I'd been paying for became free. They added automatic html and editing capabilities. They made adding graphics easy. OH how easy it is now!

I thought I could get a slideshow made highlighting the past five years but it's after 9:00 p.m. and I have 2 more years to go.....so it will wait.

Can you believe no pics at all?????? Just like the first entry.

But I have to tell you....I've loved every minute of this blog and every person I've met through tatting and every book and every thread and every bead and every shuttle and every pattern. The slide show will be great and worth waiting for.

Happy Tatting!

Tuesday, February 12, 2008

I wanted to tat a bookmark for my daughter-in-law to-be whose birthday was last week. I only found out that day! I got her something else too, but this was to tuck in the card. I started with Sue Fuller's Heart's Desire heart, but I used a printout from the online class that I printed out a long time ago. It only gives directions for the first half of the heart. LOL! I kept thinking, "I don't remember it being this complicated." I had to reverse everything in the directions....sigh....THEN I pull out Sue's book and see she had it all written out there. I knew I didn't have to figure it all out before! I used size 50 Flora and when I blocked it, I was sure it was going to look terrible and out of proportion so as it was drying, I tatted Sue's smaller heart in the book which goes very quickly. I decided to go with it for the bookmark and continued on with a set-stitch or node-stitch tail and added a dimpled ring heart at the end of the tail. It turned out better than I thought it would. It doesn't look all that heart shaped from this angle, but that's ok. I love the shape for a bookmark. I also love the red heart.....not sure what I'll do with it yet. The smaller heart is tatted with Olympus, size 40, color M8 - whatever that means.

This is a vintage edging from a Needlecraft magazine that I also tatted last night. Well...it's a sample. I was trying out the pattern and emptying a shuttle so this is as far as I got before I was out of thread. I really like the way this looks and hope to tat one to attach to a linen circle...or square....or oval...pattern to come when I have more time.

And this is what I've been knitting. I cleaned out a tub of yarn last week when my sister and daughter were here. I was still left with lots of "fuzzy" yarn so I thought I'd start knitting it up. I was trying out a stitch (yeah - I like to test those stitch patterns) and have in mind a cowl or mobius type thing but I may run out of yarn. Only 1 skein of this one. If that's the case, I'll rip it out and make a hat. LOL! It's okay....it's not an effort going to waste. I'm getting a feel for the yarn and needles and learning lots.

Monday, February 11, 2008

#12-#16 of 25 Motif Challenge

It's a good thing I'm doing this as a challenge because I'm bored already and would probably stop at this point if I hadn't committed myself. Some motifs are very similar, such as #11 and #12. I think the only difference between the two is that #12 doesn't have as many picots on the chain segments of the inner round. I used a split chain to climb out to the outer round. The author likes to use those little rings of 2-2-2-2 a lot. I'm not too fond of them myself. After the first chain, she says to "tighten rings" but I'm sure she meant to snug up the chain. In #13, as with many of the motifs, no mention is made of where to join more than once. For instance, there is no mention of which picots to join to when tatting the outer round. If you didn't have the photo to refer to, you wouldn't know.

In #14, nothing is said at all about joining the center rings but it was clear in the photo that they were joined at the side picots. Maybe it was just assumed that you knew where to join, but I would not assume that a beginner would know that. However, there are 7 edgings at the beginning of this book and she does instruct where to join in those - so maybe it was a valid assumption from her point of view. I believe I made the last chain on the inner round of #14 a split chain (only 2 stitches) and then the final ring was a split ring to climb out to the next round. On #15, this one also had a split chain at the end of the round and before the last ring. It was tricky because it faced inward and I had to do some manipulations to keep the chain correctly positioned. You can tell it does not want to lay as smoothly as the others. #16 used measured picots. This was the last one I tatted last night and it looks like I might have blocked it a little better. I reshaped it with my fingers after I had already scanned it and it looks more even now.

I got the pendant I ordered from Irish Molly! I wanted to see the technique up closer. I really wanted the Victorian Pendant too but decided to hold off on that one until later.

In 2 days I celebrate my 5-Year-Anniversary for this blog. I wanted to do something special but it's creeped up on me faster than I expected....so we'll see if I can come up with something or not.

Wednesday, February 06, 2008

#10 & #11 for 25 motif challenge


I actually tatted #10 after #11 because I wanted a little time to figure out how to make those bridges from one round to another. The only thing I did differently was to make a mock picot at the end of the center ring instead of a cut & tie. The instructions leave out a segment of 7 ds, p in the outer round and do not mention joining at the sides at all. So if one were to follow the instructions only, they would get an outer round of chain arches with 2 picots. For #11, the instructions were good. I climbed out of the center with a split chain and I also used 2 shuttles so my "points" on the outer round are more arched than pointy. If you do the shoelace trick for the rings off of the chains, the chain segment is more angled than rounded. She uses 7 rings for the center of this one and several other motifs. I thought that was a little odd as most motifs are made up of even numbers - either 4, 6 or 8 rings - maybe up to 12 for a larger wheel.

Patsy Goodman recently suggested making sure you measure all 4 sides of a hanky you are considering embellishing with tatting to make sure they are the same length - especially if you are tatting corners into the edging. I suspect that might be especially true if you've prewashed a new one. Fabric can be pulled out of shape just like tatting, so "blocking" by pressing it or pinning it within lines might be a good idea.

Piecework is currently hosting their Pincushion contest with a prize of $500 cash! You can get the rules and entry form here. Deadline is March 1. While you are at the first link in this paragraph, check out contest winners from the past!

Last night I bought a pendant on Etsy - made of polymer clay with flowers on it in a way I haven't see before. I can't wait to get it.

Tuesday, February 05, 2008

#8 & #9 for 25 Motif Challenge


I don't want to complain too much about this book and yet, I do feel like I should point out the errors for those who want to make the motifs themselves. I don't have my copy with me so I can't be too detailed but I know some picots were missing in #8. It did give measurements for the long picots that are joined on the long sides but never any explanation about joining. Fortunately, there are photo examples of each motif.

For #9, I tatted a split chain and a split ring to climb out of the center. The rest went quickly and it blocked out beautifully.

Here is the edging to go with the medallion from the last entry. Although I have 2 shuttles used in the instructions, I tatted this with a ball and shuttle and did the shoelace trick for the small rings that are thrown off the chain. This is size 20 Aida thread and I had the shuttle full, tatting it empty. There are no directions for a corner but you can lay a mirror against the area you want to make a corner and figure out how to adapt the pattern. I'd love to do this in a smaller thread now.

2 shuttles, CTM (continuous thread method of winding)
R ring Ch chain - picot
clr close ring
rw reverse work
+ join

[R 5-3-3-5, clr, rw
Ch 5 ds
Small R w/ch shuttle 5-5, clr
Ch 5, rw
R 5+ to last p on 1st r, 3-3-5, clr, rw
Ch 8, rw
R (clover) 5+ to last p of prev r, 3-3-3-3-5, clr (4 p showing)
R 5+ to last p of prev r, 3-3-3-3-3-3-5, clr (6 p showing)
R 5+ to last p of prev r, 3-3-3-3-5, clr, rw (4 p showing
Ch 8, rw
R 5+ to last p on prev r, 3-3-5, clr, rw
Ch 5
Small R w/ch shuttle 5+ to prev small ring, 5, clr
Ch 5, rw
R 5+ to last p on prev r, 3-3-5, clr, rw
Ch 6-6, rw]

Repeat [] for desired length except join 1st picot of 1st r to last p of last r prior to ch 6-6

Saturday, February 02, 2008


I'm guilty of this. LOL! Not of going to the library and filling out the cards but I do fill out cards for the free issue and then don't subscribe. It's not too often that I'm so impressed that I want to subscribe. I've found some really good deals in the past year where I was only paying $10-$12 for a year but unfortunately, I don't have time to read them like I used to. I subscribed to Piecework recently - apparently - since I got an invoice. I know I did but I can't remember what prompted me to do that. In the meantime, another magazine I ordered has not arrived yet. I don't pay until I see it. I've let the $10 ones expire. I'm 6 months behind in reading them. Of course, the ones I really like are expensive. I enjoy Threads magazine. I only like about every 4th issue of Piecework...I think that's why I let my subscription expire years ago.

Too bad there's not a tatting one. There are enough new designers and "books" coming out that I'm sure it could be supported. Too bad I'm not in that business.

Third Annual Bloggers Poetry Reading for the Feast of St. Brigid (also known as Groundhog Day). Well, I'm too late for this unless I make up a poem before I publish, but I did enjoy the one in the link that managed to include some needlearts within it!

My threads, they spoke
with quivering hope
That soon they would be tatted
with beads and things
of chains and rings
elegantly framed and matted.

How's that for impromptu?


I finished my documentation for the Hector class. Here are a couple of samples if you are interested.


"Tatting Magic and Mystery" - our annual Tatting Seminars in Hector - is happening April 5 & 6. We're really excited because it's our 10th anniversary and after a lot of planning and begging and work, our program is stellar! If you would like information, sent as an email attachment, please email me off-list. We know not everyone will be able to come, but even if you can be with us only in spirit, we'll have a way for you to participate if you like. More details soon on that...( Karey Solomon )


I'll post contact information as it becomes available. In the meantime, put April 5th & 6th on your calendar! If you need Karey's email, contact me privately at ginab6 at yahoo dot com.

Here is a "dainty medallion" from August, 1925 Needlecraft magazine. It's pretty simple and there is an edging that goes with it that I will try to post tomorrow.


2 shuttles, CTM (continuous thread method of winding)
R ring Ch chain - picot
clr close ring
rw reverse work
+ join

R 5-3-3-5, clr, rw
Ch 5 ds
Small R w/ch shuttle 5-5, clr
Ch 5, rw
R 5+ to last p on 1st r, 3-3-5, clr, rw
Ch 8, rw
R (clover) 5+ to last p of prev r, 3-3-3-3-5, clr (4 p showing)
R 5+ to last p of prev r, 3-3-3-3-3-3-5, clr (6 p showing)
R 5+ to last p of prev r, 3-3-3-3-5, clr, rw (4 p showing
Ch 8, rw
R 5+ to last p on prev r, 3-3-5, clr, rw
Ch 5
Small R w/ch shuttle 5+ to prev small ring, 5, clr
Ch 5, rw
R 5+ to last p on prev r, 3-3-5, clr
Ch 6-6
R 5-3-3-5, clr, rw
Ch 5
Small R w/ch shuttle 5+ to prev small ring, 5, clr
Ch 5, rw
R 5+ to last p on prev r, 3-3-5, clr, rw
Ch 8, rw
R (clover) 5+ to last p of prev r, 3-3-3-3-5, clr (4 p showing)
R 5+ to last p of prev r, 3-3-3-3-3-3-5, clr (6 p showing)
R 5+ to last p of prev r, 3-3-3-3-5, clr, rw (4 p showing)
Ch 8, rw
R 5+ to last p on prev r, 3-3-5, clr, rw
Ch 5
Small R w/ch shuttle 5+ to prev small ring, 5, clr
Ch 5, rw
R 5+ to last p on prev r, 3-3-5, clr, rw
Ch 6-6, + to base of 1st r
secure and hide ends