Monday, April 28, 2008

Hector 2008 Slide Show


I couldn't name all the people. Have fun finding yourself.

And here's my class:

The Mystical, Magical Biscornu

The word "biscornu" is a French word and is officially, an adjective and not a noun. According to the Dictionary of the French Academy the adjective "biscornu" originates in XVI century, composed by the prefix bis- which gives idea of plural, and "cornu" = "with horns" (literally it would be, "several horns") and means: having an irregular shape, bizarre, unnecessarily complicated. It has become the popular term for this 8-sided pincushion.


Materials:
(2) 4" squares of fabric - will make a 3” pincushion
fiberfill or wool for stuffing
1 small decorative button for flower center, shank buttons look nice but you could use a button with holes or a large bead.
1 small flat base button for bottom
Sewing Needle large enough for tatting thread
shuttles
Size 20/30 tatting thread color of choice to coordinate with fabric (Size 10 can also be used)
12”-13” simple tatted edging of choice*

To prepare the fabric for class:

Classically, backstitching is done by hand ½” in from the edge with strong thread. You CAN machine stitch, but make sure the thread is strong enough for the stitches to be “woven” into a seam later with a 3rd thread.

For the edging, tat 12-13”” of edging. You can use your favorite design or you can simply tat this one which works up quickly:
R 4-4-4-4, clr, rw.
Ch 4-4, rw
Repeat sequence joining the first p of ring to last p of previous ring. DO NOT END OFF! Keep shuttle and ball attached or leave enough thread to complete another sequence or two if you need them. You will not really know until the pincushion has been sewn together if you have enough edging. The seam should equal 12” but may vary from person to person. Stop at 12” until the pincushion is complete.
(Please note - original biscornu was 4" so the edging equaled 16" and I just realized I did not change that in the subsequent version of the instructions!)

In class:

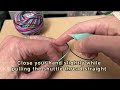
Finger press the outer ½” of the square to the inside of the square. Take the point of one square and match it to the center point of one side of the second square. Use a needle and thread to weave the two rows of backstitching together. The point of one square should always touch the mid-point of the 2nd square. Stuff before completing the last half of the final side of stitching.

At this point, you should be able to see the zig-zag 8-sided shape of the biscornu. Now you can embellish it as you wish.

Center blossom: Leave a 10-12” tail before beginning the first ring
R: 6 – 6 – 6 – 6, clr
R 6 + to last p of prev r, 6 – 6 – 6, clr (repeat 4 times)
Last R: 6 + to last p of prev r, 6 – 6 + to first p of first ring, 6, clr

Do not cut thread

Outer blossom: Start close to where last blossom ended.
R: 10 – 4* – 1 – 1 – 1 – 1 – *4 – 10,clr The picots between 4* and *4 should graduate in size from small, medium, large, medium, small. You can also tat them all the same size if preferred.
R: 10 + to last p of prev r, 4* – 1 – 1 – 1 – 1 – *4 – 10,clr (repeat 4 times)
R: 10 + to last p of prev r, 4* – 1 – 1 – 1 – 1 – *4 + to 1st p of 1st ring, 10,clr


Cut from shuttle leaving 12- 15 inches which you will thread through a sewing needle.


Take a few stitches to secure both layers of blossoms snugly. Center blossom on top of biscornu and run threads down through bottom. At bottom, catch the small flat button and bring the needle back up through the pincushion.
When you come up, catch the button or bead you have chosen for the blossom center and go back down through the center and through the bottom button. Come up again, catching the button, and then down again. Secure thread, hide and cut. Thread tail left at beginning and hide in seam, cut.

Attach tatted edging to the seam. You can pin it to the seam and tell if you are going to need to tat another ring/chain sequence. Sometimes going over the corners takes up more than a straight edge. Allow a little extra at those points.

You may add tassels at the top 4 corners if you choose or beads or buttons or leave plain.

So there’s your biscornu which looks complicated but really isn’t!

Sunday, April 27, 2008

(I'm combining two entries plus the current one as one to avoid 4 posts for one day! These were also in my drafts)

I've been busy for quite awhile and relied on Google alerts for updated blogs but of course, it doesn't catch everything so I went through my links today to catch up - and in the process, I deleted any links that hadn't shown activity since July of 2007. I kept one or two simply for the content that is there because it's a great resource. I believe I might be missing a blog or two also. I try to catch them through the alerts but I don't always have time to add the link to my blog.

I'm also going to put links at the side for video tutorials of tatting techniques. There are several out there...no need to reinvent the wheel; although some are better than others, it's still good to see the differences in technique and how shuttles/needles/thread are handled.

I've also been so busy that I haven't had time to put the Hector photos in a slide show. (guilty gulp!)


A member on my Tatting Goddess Updates Group posted a question about the lock stitch chain which she had used in the past but forgot how and wasn't having much luck with googling. Riet answered her and I added to it. I thought it might be helpful for readers who aren't familiar with the lockstitch chain to put it here too. Riet had answered saying to make the first half of the ds normally and to make the 2nd half like you make the send half of a split ring - which means you wrap the thread unflipped. I continued with this:

You *can* make a lock stitch by not flipping either half of the double stitch as long as you are consistent all the way through. In other words, you can flip the 1st half and NOT flip the 2nd half OR you can NOT flip the 1st half and then flip the 2nd half. By not flipping the stitch, you have locked it in place. If you are using two colors, each color will show in the chain whereas if you tat a normal chain with all the stitches flipped, only the ball thread color will show. The lock stitch chain also tends to be longer than a normal chain with the same number of stitches because they are locked into place and don't slide to snug up. That's why you have to consistent with your tension too because you can't snug it up later.

from Judith Connors' Illustrated Dictionary of Tatting:

lock stitch - a double stitch of which the first half is not transferred. (1) It may be used to begin a pattern which starts with a chain, preventing the first few stitches telescoping into themselves. (2) It effectively locks and separates the tensions in two consecutive chains. This allows the second chain to turn up to 90º from the direction of the first.

lock stitch chain - A length of chain made by using a number of consecutive lock stitches, i.e. alternating unturned and turned half stitches. Because the tensioning effect of the carrying thread is negated, such a chain remains straight.


In my sample above, the lockstitch chain appears slightly curved. Part of that was my tight tension but it is not blocked. If I were to wet it and pin it on the board, it would lay perfectly straight when dry.

I mentioned this tatting in an earlier entry. They were designed by the late Betty Alderson of Snowgoose and published in The Needleworker, April/May 2000 issue. The Needleworker is no longer published but a few back issues are still available from Interweave Press. They are not of this particular issue and it is largely cross-stitch oriented but there are a few other needlework projects in each issue. I got mine secondhand somewhere along the line.

They are sachet bags and I still have to put some kind of potpourri in some net bags to slip inside of these and put a "thank you" tag on the other one. I like the little handle which allows you to hang it over a dresser knob. It probably would not fit over a door knob unless you made a longer handle or it was a small knob.

I intended to make two completely different colors but when I got done with the first motif, for some reason, I thought I had put the ball of thread back in the craft room and went to get it, winding the shuttles and starting off...only to notice it was a shade different from the one I had just finished. At that point, I realized I still had the first ball of thread on my table and it was not only a slightly different color, it was a different size thread! So both are similar colors and I really don't think I have time tonight to make another set. I guess I could just make one since I'm only giving each secretary one to begin with. That means I'll have a spare for some lucky monthly winner! I'm currently working on Irish Pam's drawing gift and that's another thing I haven't posted about.

Saturday, April 26, 2008

Challenge for Altered Art


Several months ago I was reading in a quilting blog where they took a piece of art and interpreted it with quilting. I thought to myself, " What a fun idea!" Only instead of quilting, we could interpret the art in tatting. I wish I had the link..and I may have, buried somewhere. The idea is to alter the original idea in whatever way you need to in the media of your choice. So I was on the lookout when I went to second-hand stores....what would lend itself to tatting?

This is the picture I ended up with but it's almost too easy. Lots and lots of flowers! But I still want to try it. I'd rather start with something that seems easy and then move on to something more challenging than to try something I'll give up in before it's done.

Anyone who wants to give it a go with their own choice of artwork is welcome to join in. I'd love to hear about your experience!

There's nothing saying you can ONLY use tatting. I would think a variety or collage of needlecrafts might be very appealing.

(this is one of 3 posts I had in drafts and forgot about since I was so busy and didn't take the time to look!)

Thursday, April 24, 2008


Someone asked me to clarify what "reverse work" means in tatting patterns. I was going to tat and scan and then remembered my digital camera is good for short videos so I tried that instead. I don't know how to edit what I shoot yet so bear with me on this.

Even though I haven't posted for about a week, I've been tatting...a little. I'm working on something for our secretaries at work. Almost done but I think it might have to wait until next week. It's a pattern by the late Betty Alderson from Snowgoose - a pattern she had published in a magazine. I've also been going to the pool at the gym and got to rake leaves the other night (resulting in one blister in spite of gloves) so life has been busy.

Wednesday, April 16, 2008

April Mystery Motif Revisited


Right before I left for Hector, NY, I posted the text in a tatted pattern from the January, 1921 issue of Needlecraft. It didn't take long to figure out the text was wrong so I posted the photo very quickly before I left. The pointed edging, as you might remember, was actually a combination of the square and round motifs from the pattern. The round one was correct, but not the square one. No one told me if they got it figured out from the photo so worked it up myself. The following instructions are written in modern notation....sort of. I've tried to write it in a a way that a beginner can read and understand, explaining a bit as I go. The shortest notation would actually be like this: Ring A (2-)2X, 4 -- 4 (-2)2X but I thought that would add even more confusion for a newbie. I also used "ring A" and "chain A" where the same sequence was repeated. When it involved a variation, such as a join in a different place, then I gave it a different letter. I hope that isn't too confusing. If you have any questions, feel free to email me!

April Mystery Motif – Square

Clr = close ring
Rw = reverse work
P = picot
Ch = chain
+ = join
CTM = continuous thread method (wind 1st shuttle, do not cut thread, pull 4-5 yards off ball and then cut, winding 2nd shuttle from cut end)
Inward Facing Picot – see any of the following websites: http://groups.msn.com/TheSocialShuttle/inwardfacingpicots.msnw
http://www.bellaonline.com/articles/art18859.asp
http://www.georgiaseitz.com/2002/hansonbfly.html


~ ~ ~ ~
1 shuttle with approximately 18” thread

Central Ring – 1 ds (hiding end in stitches as you go), (p, 2 ds) 7 times, p, 1 ds, clr, cut & hide final end. Set aside.
~ ~ ~ ~ ~
2 shuttles CTM

Ring A: (2 ds, p) 2 times, 4 ds, long picot (1/4”), 4 ds, (p, 2 ds) 2 times, clr, rw
Chain A: (3 ds, p) 5 times, 3 ds, rw
Ring B: 2 ds, p, 2 ds, + (join) to 4th p of prev ring, 4 ds, + to long p of previous ring, 4 ds, p, 2ds, p, 2 ds, clr
Chain A, rw
Ring B, rw
Chain B: (3 ds, p) 5 times, 3 ds, + to long picot that three prev rings were joined together in, rw
Chain D: You continue with a chain here but with the opposite shuttle so you “switch working shuttle” or if you happen to use a ball and thread instead of 2 shuttles, you can do the shoelace trick to get the ball thread in the proper position. This next chain should arch in the same direction as the previous chain.
5 ds, p, 5 ds, + to p of central ring that was set aside, 5 ds, p, 5 ds, rw

Again, you need to switch the working shuttle or do the shoelace trick. Hang a paper clip on the working shuttle thread to make an inward facing picot. This picot replaces the long picot used for joins in Ring A in the remaining sequences around the square. This needs to be a long picot so to keep it from snugging up, make the first ds a lockstitch by not flipping. Then
Chain C: 2 ds (with lockstitch just made this will be the same as 3 ds in Chain A), p, 3 ds, p, 3 ds, + to center p of last Chain B, 3 ds, p, 3 ds, p, 3 ds, rw
Ring C: (2 ds, p) twice, 4 ds, + to long inward facing picot (remove paperclip), 4 ds, ( p, 2 ds) twice, rw
Chain A, rw
Ring B, rw
Chain A, rw
Ring B, rw
Chain B, rw
Chain E: (SS or SLT) 5 ds, + to last p of Chain D, 5 ds, + to central ring, skipping one picot from last j to central ring, 5 ds, p, 5 ds, rw
Repeat from Chain C twice, but with last Chain E, + last p of chain to 1st p of first chain D, rw
Switch working shuttles or SLT and make Chain B, + in middle picot of opposite Chain A and then join at end in base of 1st ring.


This is a heart bookmark I made for someone as a gesture of goodwill. Someone won the bid on a book I sold on ebay. The customer wanted it sent media mail and did not request insurance. I packed it well, using bubble wrap and a good size envelope. This was back in January. The customer just recently contacted me saying the dustjacket crinkled and the spine was dented and felt a small refund was in order. I didn't, of course, since I have no control over what goes on in transit and no insurance was purchased...and it's been a few months. If contacted immediately, I probably would have offered to buy it back but not at this point. Still, I feel badly that it was not in as good of shape as when it left me so I sent a small check that will cover the insurance on another purchase of equal value and included this bookmark. It's the Puppy Love heart by Susan Fuller and I've added the set stitch or ric rac stitch chain for the tail. For those who don't know, this stitch is made by tatting a series of the first half of the ds and then tatting an equal number of the second half of the ds and repeating this sequence over and over for the desired length. You keep snugging it up to keep the spirals even. It makes a very pretty and sturdy cord.

Next post should be photos and stories of Hector.

Sunday, April 13, 2008

Blog Anniversary Winner for April!

Congratulations to Pamela Myers from Cork, Ireland!

Pam won the April drawing for the continuing Blog Anniversary Drawing. To enter, just send me an email at ginab6@yahoo.com with "monthly drawing" in the subject line. You only need to enter once and I will acknowledge that I've received your post.

I tatted 2 more bookmarks from Dianna Stevens' book. I think I'll go ahead and send these out. This week is Administrative Professional's Day and I need to put something together for the 2 reception area support staff. I wonder if they are tired of tatted stuff?

Anyway, the "Roger Rabbit" bookmark is tatted with 2 strands of DMC rayon floss. I had it already wound on floss holders from several years ago when I tatted Pam Palmer's elephant for my daughter. I added the ring at the bottom with measured picots. The other bookmark is another thread that was wound on a floss holder but I believe it is some King Tut thread that someone sent me. I added a tassel at the end of that one. I love these bookmarks and wish I made more of them to keep on hand.

I have not had time to look at and edit all of the Hector photos. Hopefully some time this week I will get to it. For now, I'm going to take a look at the April mystery motif and see if I can't find the problem with the written pattern.

Friday, April 11, 2008

Hector Goodies!

THANK YOU EVERYONE!!!!

There were so many "gifts" that it is hard to know where to begin, so I just started uploading photos and I'll describe them as they show up. Sue was going to bring me a pillow but the size of it coupled with new luggage restrictions eliminated that possibility - so she brought me some embroidered napkins and bobbins instead! She also passed on some bobbinlace instructions that I didn't photograph, but I'll hopefully get to try them at some point.

Shirley P. also known as "Angel at Large", a dear soul I've seen so many times at these events, gave me wrapped package that I was very surprised to receive. Shirley is so generous and often drops off little goodies here and there through her day. The photo in this bag is from Hector Falls, the place I stayed the first time I came to this event. The other gals have often stayed there again in succeeding events but I've found places a little more within my budget - still, it's my FIRST Hector memory and special for that reason. The candy was deposited in a community jar at work. I gained a few pounds between not exercising and Hector meals so I decided to pass those on.

It's a tradition to receive a goodie bag when you go to a tatting event. I loved the plain black silk (?) drawstring bag - very Victorian to me. There is a small hemostat and snacks to keep our energy up, a couple of spools of thread, a 10 year Hector anniversary pin, a LOVE pin,some beads, a sweet knitted mitten, a baggie with thread and beads, AND next year's challenge - a BIG BALL of thread that we are challenged to use up by Hector next year.

Any time I've taught at these events, I've been surprised to get a teacher's gift too. I don't expect them..but they sure are the frosting on the cake! This tin has a gorgeous magnifying glass, a woven bag which I put the included Clover shuttle in, some charms that included the initial "G", and what I believe is a bar of handmade soap. A little container of handmade cream is missing from this photo. I had taken it out of the bag and set it in my car between Saturday and Sunday. It was VERY warm on Sunday...and when I got back to the car, it was liquid! It did solidify again but was about half the original size and a brownish color instead of creamy white so I had a feeling it had also cooked a bit. I debated but finally tossed it.

Connie Angeline contacted me before Hector to ask permission to use a photo from my blog to make some postage stamps to put in a wonderful container of items for the silent auction. I think I might have a photo of the box that I'll put in a slide show. She gave me a sheet of the stamps as a thank-you. I think I'd heard somewhere that you can design your own postage stamps but have never seen it done. Wow...now I feel like I'm part of American history!


I got the cord crocheted for my bag before I left and was quite pleased with it. This is the front.

And this is the back. I stitched the cord from the inside of the pouch and used buttons as embellishment and a way to secure the cord all the way through the pouch.

I printed this vintage pattern out when the link was posted by Shay from Little Grey Bungalow and just now got around to making it. It has a few mistakes but is really very easy. It is one center ring and the rest is chain work. I saw that Wally used 2 colors on her version and I found that very appealing but I was just using some thread I had on a floss holder. I also stopped and started so many times, before I left for Hector and then actually finishing on my way home so the tension is as wobbly as I was at the end. LOL!


Now when you get, you should also give. That's how we keep the positive flow of goodwill energy going. I'm on a few crochet lists too and heard of a teenager who is having a rough time right now. We were invited to provide some sunshine for her. I suspect she will get a lot of crocheted goodies so I've decided to go with tatting instead. This is a swan bookmark from Dianna Stevens' animal bookmark book. I also have the cockeral in progress and will make a few more to send all at once. You can never have too many bookmarks!

Tuesday, April 08, 2008

Wish You'd Been There!


Hecter 2008

Back from Hector! Do I have any projects to show? No-o-o-o-o but I have "starts". LOL! I'll get to that later.

Right before I left, I had an email from Jolande, the March winner of the Blog Anniversary drawing. Jolande lives in the Netherlands. I tried to hurry what I made for her since it was going to go so far, but she got it in less than a week! I didn't photograph everything - only the tatted stuff. The tea towel is so Spring-looking and we're all ready for Spring, right? Especially since Winter seems to have lingered far longer than usual. The butterfly edging is one of Mary Konior's patterns that I especially love.

The other item is a tatted brooch. I learned from Sue Hanson how to tat around old jewelry pieces. This used to be a clip earring. The challenge was the triangular shape but I played around with it and came up with something that more or less followed the shape. It really was fun to do!

Next Sunday I'll draw the April winner!

Okay, back to Hector! The drive there was long and dreary with rain, fog or overcast skies all the way. I stayed at a Super8 Hotel in Bath, NY, about 35 miles from the location of the event. I have to say it's my favorite one so far. It was only $50/night. It was clean and in a good location, with lots of other businesses around that I would have loved to visit if I'd had an extra day or so. On the way there, I noticed my parking lights would not go off. I turned my headlights on and off repeatedly, like the parking lights were somehow stuck. I checked the owner's manual. I couldn't find a specific reference to parking lights, only "lights". I asked the attendant at the nearby gas station if he knew of a reason why they weren't going off and the only thing he could think of was a short. I called my son who works at the SIA factory but had to leave a message. I told the clerk at the hotel about the lights because I figured someone would report them being on. Her boyfriend was also there and said I'd probably have a dead battery (also a concern of mine) in the morning...and then suggested I take the fuse out. He very kindly went out with me and found the fuse and showed me how to remove it. So then I called my son back and left another message telling him I'd taken the fuse out and that would take care of it until I returned home. Well.....for the next three days it was a morning and evening ritual to remove and replace the fuse every time I left it or drove it for long periods of time. Yesterday, on my way back, I happened to notice a band of red on what appeared to be a button on the steering column. When I craned my neck up over the steering wheel, I could see the button had a icon that looked like a light. Hmmmm....surely that wouldn't be the parkiing lights right there in the middle of the steering column? So I pushed the button and the red band went away. Then next time I stopped the car and got out, sure enough, the parking lights were off. I was feeling pretty dumb at this point but when I checked the owner's manual again, there is no mention of "parking lights" in the text and the close-up photo of all the controls on the dashboard did not show THAT button. Furthermore, two men didn't have a clue....so why should I feel dumb? It's a DUMB place to put the button for the parking lights!!! Every car I've ever owned had the parking lights included with the regular lights. So if you happen to have a Subaru...keep that in mind.

I bought 3 books and 3 balls of thread. I know that doesn't sound like much but I already have an extensive collection of both. I'm amazed I found that much to buy!

On Saturday, I taught the biscornu pincushion for the first two classes and then took Rita Cochrane's class which was a little pin that looks like a basket and then flowers pop up in the basket. Very Clever! I have to do the start of the basket over. Don't expect to see it anytime soon but it is COOL!

On Sunday, I had Martha Ess's class which featured tatting made to resemble crewel embroidery. I only got the center latticework done on that. Might be awhile before you see that one too. After that, I started Karey's baby dragon. All three of these projects are very time-consuming. Don't hold your breath waiting on me. LOL!

Sue Hanson brought Mary Konior's lace which was an absolute delight to get to see. I didn't take photos but I know Sherry Townsend did. They are the same pieces in Mary's books so I didn't feel a need to take photos but now I wish I had.

There were some familiar faces from the Palmetto Guild, as well as the Fringe Element Tatters guild. Someone mentioned there were about the same number of attendees as the year before but I thought the place was packed. You can tell by the video that the place was full and LOUD. Georgia was unable to come this time but Ruth Perry filled in for her.

I have tons of photos to edit and put into a slide show. I have lots of stuff to scan. I just don't have time to do it all right now so consider this a sneak preview. See how many people you can recognize in the video!

Wednesday, April 02, 2008

April Mystery Motifs


Well..it appears the April mystery motif has turned into an April Fool's after all. I just tried to tat it...WITH the photo...and it's not the same...something is left out and something is out of order, but the instructions are exactly as they are in the publication. It's too late tonight but I'll try to scan the photo tomorrow and post it...and I'll leave that as your challenge instead...to figure out what it's really supposed to be!

Decided to go ahead and post it because I won't have time tomorrow night!

Tuesday, April 01, 2008

The orange flower matches the orange in the fabric better than the purple. I have lots of purple thread but none that really matched.
I'm also crocheting the cord in the Romanian Point Lace braid style. It's hard to figure out how long to make it. The pouch is small enough to be worn around my neck but I'd like to be able to loop it through a belt loop too.

My package arrived from the Spring Random Re-gift Swap over at Just Be Connected, a network of creative crafting bloggers. Dyan, my partner in this exchange, has a store FlowerChilde Garden, which features aromatic healing mists and crystal essences. Yes, I got one and it's a lovely scent! Dyan is also an Angel Therapy Practitioner and writer of children's books, living in Jamaica. I love everything in the package!

I love the idea so much of a re-gifting exchange that I'm thinking of arranging one on my Tatting Goddess yahoo group. The idea is to regift something you already own. You cannot purchase anything. Even if it is something you make, it has to be from what you already have. The only cost involved is in shipping. In this case, it was between here and Jamaica...which is more than domestic mailings, but since it's all a "re-gift", it's not too painful. LOL!

So...today is INTERNATIONAL TATTING DAY!!!!! That means you have to take time out to tat and eat chocolate and blissfully enjoy the day. It's also April 1st. Nope, no April Fool's Day tricks here...but I do have a tease. Here is the mystery motif for April. See if you can follow the text instructions correctly. No photo will be revealed until April 15th, a nice diversion from tax day, if I do say so.
April Mystery Medallions

Square:
1. A ring of 1 double knot, (picot, 2 double knots) 7 times, picot, 1 double knot, close, tie & cut thread.
2. A ring of (2 double knots, picot) twice, 4 double knots, a long picot (about one fourth inch), 4 double knots, (picot, 2 double knots) twice, close.
3. A chain of 3 double knots, (picot, 3 double knots) 5 times;
4. (A ring, joining by 2d picot to 4th picot of preceding ring, and by 3d picot to the long picot of 1st ring;
5. A chain, as before) twice, joining last chain to same long picot of 1st ring; * a chain of 5 double knots, join to a picot of center ring, 5 double knots, picot, 5 double knots, a joining by 3d and 4th picots to 2d and 3d picots of last chain of last corner, long picot, then a chain as before;
6. A ring joining to last long picot
7. (A chain, a ring joining by 2d picot to preceding ring, and by middle picot to same long picot) twice, joining last chain to same long picot.
8. Repeat from *, missing 1 picot of center ring between the joinings and ending with the long chain (joined to center ring), joining this to long picot of 1st ring made, then a chain of 5 picots, 3 double knots between, joined at base of 1st ring.

This completes the square medallion. Join 6 of these in a row by picots of 2 consecutive chains (2d and 3d chains) of one corner, leaving 4 free picots on the inside of the space between medallions.

For the Round medallion:
1. A ring of 5 double knots, (picot, 5 double knots) 3 times, close;
2. A 2d, 3d, and 4th ring the same, joining each to preceding by side picots, and last also to 1st and drawing together closely at the base, forming a four-leaf clover. Fasten off securely.
3. Fasten thread in the picot which joins 2 rings, make a chain of 6 double knots, picot, (5 double knots, picot) twice, 4 double knots, join to middle picot of ring.
4. Chain of 4 double knots, picot, (5 double knots, picot) twice, 6 double knots, join to picot connecting next 2 rings;
5. Repeat, joining the last chain where 1st started and fasten off.