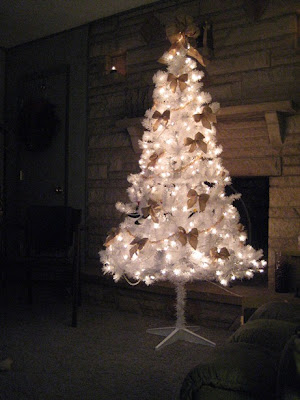
May you all carry over the good of 2011 into 2012 and make it even better!
Crewelwork Then & Now, Reviewed
5 hours ago
A journal of my adventures in tatting lace. Tips and tricks and inspiration...... Blog Contents Copyright 2002-2011 Regina A. Brummett
 I decided to do something a little different today and bought some decaf Earl Grey which has a nice smell to it. I've brewed a pot for iced tea and it's in the fridge cooling now.
I decided to do something a little different today and bought some decaf Earl Grey which has a nice smell to it. I've brewed a pot for iced tea and it's in the fridge cooling now. Many years ago, when Maus hosted various tatting round robins, one that I participated in was a Christmas Round Robin. I tatted this rocking horse for one of the participants and always thought I'd make one for myself. Well, yesterday was that day!
Many years ago, when Maus hosted various tatting round robins, one that I participated in was a Christmas Round Robin. I tatted this rocking horse for one of the participants and always thought I'd make one for myself. Well, yesterday was that day! I haven't been tatting much or else the tatting was something I can't show yet.  I tatted this bookmark recently but just added this tail this evening. Originally, I tatted a purl tatted tail and experimented with adding split rings along the way. It didn't turn out very well so I clipped the experiment off and added the new one this evening. The pattern is from Martha Ess's book.
I haven't been tatting much or else the tatting was something I can't show yet.  I tatted this bookmark recently but just added this tail this evening. Originally, I tatted a purl tatted tail and experimented with adding split rings along the way. It didn't turn out very well so I clipped the experiment off and added the new one this evening. The pattern is from Martha Ess's book. I may not have been tatting but I've been working on my RPL bells. Here are the latest five I just finished this weekend. I'm done with them for the season. These may go in some cards.
I may not have been tatting but I've been working on my RPL bells. Here are the latest five I just finished this weekend. I'm done with them for the season. These may go in some cards.  Years ago when I first started tatting, I found this tatted bow in Old-Time Crochet (Summer, 1994) in an article by Rebecca Hollenbaugh. I thought it was her pattern but as I read the article today, I found the pattern was originally in Better Living, April 1952. No author was credited.
Years ago when I first started tatting, I found this tatted bow in Old-Time Crochet (Summer, 1994) in an article by Rebecca Hollenbaugh. I thought it was her pattern but as I read the article today, I found the pattern was originally in Better Living, April 1952. No author was credited. The motif on the left is from Patty Duff's Minitats. The other tat is just to get the thread off my shuttle.  The amount needed was not as much as she had stated in the book but I noted it for future reference.
The motif on the left is from Patty Duff's Minitats. The other tat is just to get the thread off my shuttle.  The amount needed was not as much as she had stated in the book but I noted it for future reference. I started this Praying Angel from Nine Tatted Angels by Monica Hahn last night and finished it up this morning.  I know the I.O.L.I. Library has a copy but I'm not sure it's available elsewhere anymore.
I started this Praying Angel from Nine Tatted Angels by Monica Hahn last night and finished it up this morning.  I know the I.O.L.I. Library has a copy but I'm not sure it's available elsewhere anymore. I've been keeping my needles in a separate pincushion but I think I'll put a few of the sizes I use the most in this needlebook and put it in my "to-go" bag.  It also gives me a few ideas for all those vintage but damaged linens I seem to hoard.  A shuttle-book, maybe?   A tea book?
I've been keeping my needles in a separate pincushion but I think I'll put a few of the sizes I use the most in this needlebook and put it in my "to-go" bag.  It also gives me a few ideas for all those vintage but damaged linens I seem to hoard.  A shuttle-book, maybe?   A tea book?


 I've gotten more detailed with this last one. I used split rings and split chains and switched shuttles quite a bit as I threw rings off of chains. You can use rings for the outer round or take liberty with the pattern as I did and make them Josephine Rings instead. Use 2 shuttles, with 6 yards on the main shuttle and 2 yards on the secondary shuttle. These were tatted in size 20 thread.
I've gotten more detailed with this last one. I used split rings and split chains and switched shuttles quite a bit as I threw rings off of chains. You can use rings for the outer round or take liberty with the pattern as I did and make them Josephine Rings instead. Use 2 shuttles, with 6 yards on the main shuttle and 2 yards on the secondary shuttle. These were tatted in size 20 thread.


 I hope you have enjoyed this series as much as I have. I did not do the plate with inserts since I've already covered well over 25 motifs for this challenge. I hope you understand vintage patterns and how they can be adapted with current techniques better.  Please feel free to email me with questions about any of these!  I did not have a test tatter for Plate III and used what I had come up with at the beginning of this challenge. I'd already completed Plate III and offered it elsewhere but it wasn't used, so it's been awhile since I've done this one and there could be even more improvements.
I hope you have enjoyed this series as much as I have. I did not do the plate with inserts since I've already covered well over 25 motifs for this challenge. I hope you understand vintage patterns and how they can be adapted with current techniques better.  Please feel free to email me with questions about any of these!  I did not have a test tatter for Plate III and used what I had come up with at the beginning of this challenge. I'd already completed Plate III and offered it elsewhere but it wasn't used, so it's been awhile since I've done this one and there could be even more improvements. 


 This time I did my homework.  The butterfly is all rings so it matters how much thread is on the shuttle.  I've found that 25 winds around a Clover shuttle is about one yard.  I couldn't remember how much I wound the last time so I wound plenty this time, about six yards worth.  Well....80-90 turns will complete the butterfly and leave a 10-12 inch tail for sewing.  That's a tiny bit less than four yards.  I think this was size 30 instead of size 20 thread but it's still the same distance around the core of the shuttle so you certainly wouldn't need more thread unless you use larger than size 20.
This time I did my homework.  The butterfly is all rings so it matters how much thread is on the shuttle.  I've found that 25 winds around a Clover shuttle is about one yard.  I couldn't remember how much I wound the last time so I wound plenty this time, about six yards worth.  Well....80-90 turns will complete the butterfly and leave a 10-12 inch tail for sewing.  That's a tiny bit less than four yards.  I think this was size 30 instead of size 20 thread but it's still the same distance around the core of the shuttle so you certainly wouldn't need more thread unless you use larger than size 20. Sometimes when you admire something online, you are pleasantly surprised by the postie in record time!  I really liked this pendant Jane tatted up recently and dear friend that she is, she gifted me with it!  I just found a pink-ish chain in my stash to wear it with.  Thank you Jane!
Sometimes when you admire something online, you are pleasantly surprised by the postie in record time!  I really liked this pendant Jane tatted up recently and dear friend that she is, she gifted me with it!  I just found a pink-ish chain in my stash to wear it with.  Thank you Jane! I made an incorrect join but it's getting easier.  No break this time between sides (well.....very briefly!)  So maybe the 3rd time will be the charm!
I made an incorrect join but it's getting easier.  No break this time between sides (well.....very briefly!)  So maybe the 3rd time will be the charm!  
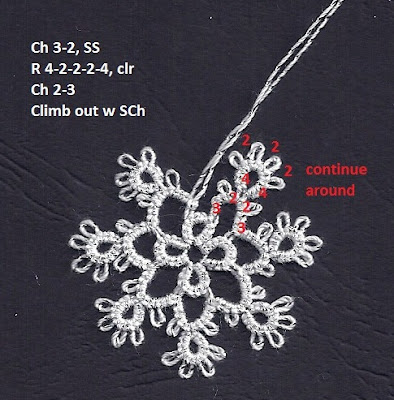
 It really does help to read the pdf file which is linked later in this post and also in the sidebar.  I started with a paperclip on a chain for the center.  Yeah, cut and tie but the next part is also started with a paperclip on a chain with 2 shuttles.
It really does help to read the pdf file which is linked later in this post and also in the sidebar.  I started with a paperclip on a chain for the center.  Yeah, cut and tie but the next part is also started with a paperclip on a chain with 2 shuttles. The red star shows where I began on this segment. It continues on around but I wanted to highlight just the one segment.
The red star shows where I began on this segment. It continues on around but I wanted to highlight just the one segment.


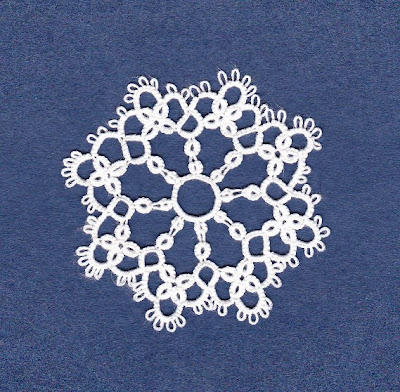
 These are the original medallions (8 points is not a snowflake but I would use them as snowflakes anyway) as shown in Plate III.
These are the original medallions (8 points is not a snowflake but I would use them as snowflakes anyway) as shown in Plate III. 
 Here are the numbered segments. I've not shown how I did the needlelace in the center. To be honest, I don't remember how the instructions created those bars to add the needlelace unless they were stitched in later. In my adaptation, I did not use them.  I started at the red dot to make the first ring and then ended with a split ring to climb out to the next round of chains.
Here are the numbered segments. I've not shown how I did the needlelace in the center. To be honest, I don't remember how the instructions created those bars to add the needlelace unless they were stitched in later. In my adaptation, I did not use them.  I started at the red dot to make the first ring and then ended with a split ring to climb out to the next round of chains. The figure to the right is a beaded version and you can see I did not add the needlelace center there.  All are done in size 20 White DMC Special Cordonnet.
The figure to the right is a beaded version and you can see I did not add the needlelace center there.  All are done in size 20 White DMC Special Cordonnet. Last year I purchased  Marilee's Layered Ring Christmas Tree Pattern but just now got around to tatting it.  The first time I tat something, especially with a little different technique than I normally do, it's not very good, but I'm okay with that because then I know what to improve in myself.
Last year I purchased  Marilee's Layered Ring Christmas Tree Pattern but just now got around to tatting it.  The first time I tat something, especially with a little different technique than I normally do, it's not very good, but I'm okay with that because then I know what to improve in myself.   I got inspired by Wendy's bookmarks but wasn't going to post this one as I'm tatting it in ecru and white to paint dye on later. It looks rather bland in ecru and white. But then...before I tatted it, I discovered in #21 of the 25 motif challenge that I can add picots to and join Josephine Rings to picots. I rather like that ribbed wheel look when it's done properly and I was inspired to use the Josephine Rings in place of the regular rings Martha used. Both are fine but the name of her book IS Playing With Picots, right? So that encourages us to do the same! This is why I love vintage patterns. Between now and then, there is so much NEW to come up with! Tatting is most clearly NOT a dying art! It's a dyeing and technique art, a fiber art, a needlework art. The expansion of tatting over the past decade has been unbelievable. Don't you think? So I just wanted you to have a sneak preview of the "before" version. I plan to tat a few of these so I can play with color too.
I got inspired by Wendy's bookmarks but wasn't going to post this one as I'm tatting it in ecru and white to paint dye on later. It looks rather bland in ecru and white. But then...before I tatted it, I discovered in #21 of the 25 motif challenge that I can add picots to and join Josephine Rings to picots. I rather like that ribbed wheel look when it's done properly and I was inspired to use the Josephine Rings in place of the regular rings Martha used. Both are fine but the name of her book IS Playing With Picots, right? So that encourages us to do the same! This is why I love vintage patterns. Between now and then, there is so much NEW to come up with! Tatting is most clearly NOT a dying art! It's a dyeing and technique art, a fiber art, a needlework art. The expansion of tatting over the past decade has been unbelievable. Don't you think? So I just wanted you to have a sneak preview of the "before" version. I plan to tat a few of these so I can play with color too. Here's the original photo from the DMC Library - Tatting of Plate V, Figure 28. This is my 21st motif.
Here's the original photo from the DMC Library - Tatting of Plate V, Figure 28. This is my 21st motif. Here's the tatted version with DMC Special cordonnet in size 20. It's done in two parts, the center 4 rings and then the chain surrounding the rings with Josphine rings thrown off the chains.
Here's the tatted version with DMC Special cordonnet in size 20. It's done in two parts, the center 4 rings and then the chain surrounding the rings with Josphine rings thrown off the chains. This is the center four rings which are exactly the same - well...try to make the picot length the same! There are 4 long picots and 3 shorter or regular size picots. No measurements were given for picot length so I guesstimated. I didn't use a picot gauge but if you have trouble eyeballing the length, it would be good to use one. I still get off just a hair when I use one so I try to estimate carefully. I was less careful in this early sample and more careful in the blue bookmark below.
This is the center four rings which are exactly the same - well...try to make the picot length the same! There are 4 long picots and 3 shorter or regular size picots. No measurements were given for picot length so I guesstimated. I didn't use a picot gauge but if you have trouble eyeballing the length, it would be good to use one. I still get off just a hair when I use one so I try to estimate carefully. I was less careful in this early sample and more careful in the blue bookmark below. These are the numbers according to the directions. If you are making one, it's precise. If you are joining, then you need to adapt. I found that you can leave a space for a picot in a Josephine ring and it will still look like a Josephine ring. But it took awhile for me to figure that out.
These are the numbers according to the directions. If you are making one, it's precise. If you are joining, then you need to adapt. I found that you can leave a space for a picot in a Josephine ring and it will still look like a Josephine ring. But it took awhile for me to figure that out. I started out making 2-2 rings at the corners to join into. When I got the second square joined, I didn't like the way the JR's flopped in the center, so that's when I tried making JR's with a picot (third square). It worked - and I do like the 1st half of the stitch best for JR's. They just line up more neatly for me but the white sample was done with the 2nd half stitch instead.
I started out making 2-2 rings at the corners to join into. When I got the second square joined, I didn't like the way the JR's flopped in the center, so that's when I tried making JR's with a picot (third square). It worked - and I do like the 1st half of the stitch best for JR's. They just line up more neatly for me but the white sample was done with the 2nd half stitch instead. I went back to the first two squares and sewed the middle JR's together with a piece of thread, going through several stitches before and after so that it blended nicely. If you look closely at the enlarged version, you can tell that I changed from 2-2 rings (still 8 legs of thread) to the 8 st JR.
I went back to the first two squares and sewed the middle JR's together with a piece of thread, going through several stitches before and after so that it blended nicely. If you look closely at the enlarged version, you can tell that I changed from 2-2 rings (still 8 legs of thread) to the 8 st JR. This motif wasn't put on net so I didn't have that aspect to consider. This is motif #20 in the 25 Motif Challenge which is based on the vintage publication DMC Library - Tatting - Editions Th. de Dillmont. This is Plate 5, Figure 27.
This motif wasn't put on net so I didn't have that aspect to consider. This is motif #20 in the 25 Motif Challenge which is based on the vintage publication DMC Library - Tatting - Editions Th. de Dillmont. This is Plate 5, Figure 27. I tatted the original in DMC Special Cordonnet in size 20, as I have all the ones before. The instructions designated the difference between rings and chains by saying use one shuttle (rings) or two shuttles (chains). When the outer rings were tatted, which actually used the "ball" shuttle, it said to use the left hand shuttle. The large inner rings were tatted 5, long picot, 5, long picot, 5. No measurements were given for the length but the next small inner ring as well as the next large inner ring were joined into the same long picot. You can see it had to be long enough to accommodate a triangle shape. I learned the hard way that when you got to the last large ring, you didn't make another long picot - instead, you join into the existing long picot of the 1st large inner ring. I did so on the other samples but have circled the problem on this one if you make another long picot. Once you've joined to the existing long picot, then you have a space to join the last small ring and it works out nicely. It's just tricky to watch for.
I tatted the original in DMC Special Cordonnet in size 20, as I have all the ones before. The instructions designated the difference between rings and chains by saying use one shuttle (rings) or two shuttles (chains). When the outer rings were tatted, which actually used the "ball" shuttle, it said to use the left hand shuttle. The large inner rings were tatted 5, long picot, 5, long picot, 5. No measurements were given for the length but the next small inner ring as well as the next large inner ring were joined into the same long picot. You can see it had to be long enough to accommodate a triangle shape. I learned the hard way that when you got to the last large ring, you didn't make another long picot - instead, you join into the existing long picot of the 1st large inner ring. I did so on the other samples but have circled the problem on this one if you make another long picot. Once you've joined to the existing long picot, then you have a space to join the last small ring and it works out nicely. It's just tricky to watch for. The original instructions started with a chain and then moved on to the large outer ring/large inner ring. I found it awkward to make the final join and especially when I went to two colors - I had an extra end to hide because I don't like to tat over two tails at the same time. I think it makes it noticeably fatter. So in the two color version, I started with the large rings and was able to hide all my ends at the beginning and only had the two tails at the end to sew in.
The original instructions started with a chain and then moved on to the large outer ring/large inner ring. I found it awkward to make the final join and especially when I went to two colors - I had an extra end to hide because I don't like to tat over two tails at the same time. I think it makes it noticeably fatter. So in the two color version, I started with the large rings and was able to hide all my ends at the beginning and only had the two tails at the end to sew in. You can see on the two color version that I made that last large inner ring join correctly to the long picot on the first inner ring. It makes a nice little triangle when all the rings are joined.
You can see on the two color version that I made that last large inner ring join correctly to the long picot on the first inner ring. It makes a nice little triangle when all the rings are joined. These are tatted in Omega size 30 which I think seems more like size 40. It's noticeably smaller than size 20. I tried using Josephine Rings on one of the motifs. Can you tell which one? Hint - they are much smaller than the regular ring of 6 ds. I used 10 half stitches but it was still really tiny so I went back to the regular rings. This would make a very pretty delicate looking open mat. Or a nice small photo frame. You might even be able to join a large decorative button through the tiny outer rings in the center and come up with a large-ish pendant since this thread is so tiny.
These are tatted in Omega size 30 which I think seems more like size 40. It's noticeably smaller than size 20. I tried using Josephine Rings on one of the motifs. Can you tell which one? Hint - they are much smaller than the regular ring of 6 ds. I used 10 half stitches but it was still really tiny so I went back to the regular rings. This would make a very pretty delicate looking open mat. Or a nice small photo frame. You might even be able to join a large decorative button through the tiny outer rings in the center and come up with a large-ish pendant since this thread is so tiny.