


%2B(650x228).jpg)


This is the original photo in the printout.

I tatted it in the usual size 20 DMC special cordonnet. As I pondered how to climb out of this medallion to another, I realized that it was not going to be helpful in the long term. Sure, I could do a split chain to end and it is possible to start a chain for the next medallion at that point but you end up at the same point when you complete the second medallion and there's no where to go after that. You are back at your starting point. Besides, starting with a chain like that, while doable, is very fiddly and I'm not sure it's worth the effort.
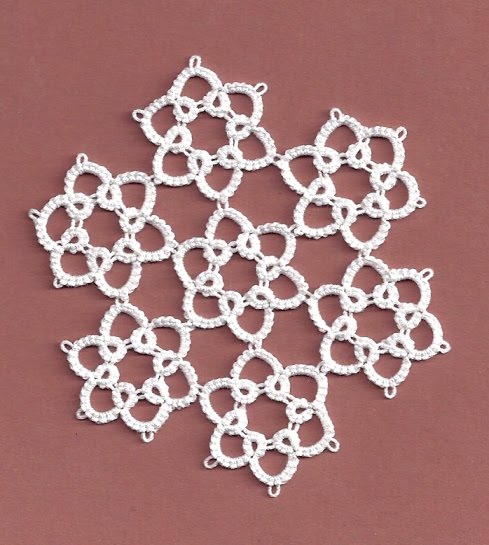 So I hid my ends after each medallion and started over new with each one. It took 25 turns around the post of my shuttle for each motif. I started out with 40 turns, then 30, and finally settled on 25. I ended up with 8-10 inches of thread on the shuttle after cutting the tails.
 I decided not to do anything with colors or beads on this one. Probably every snowflake you've tatted is a variation of this basic shape and I think everyone is familiar with what can be done.
I wanted to talk a little about the original instructions for this one. I scanned and cropped the original and downloaded "large" but it isn't showing as big as I hoped. I think it will enlarge when you click on it though.
 Note that the instructions tell you to tat the ring with one shuttle. Actually, it doesn't even say "ring" until you close the ring. THEN, after you turn the work, suddenly it says "with two shuttles". It doesn't say to chain or how to add the second shuttle. No wonder we are confused with the instructions. It may have been a common understanding at the time but over a century later, the terminology has lost its meaning.
I said in an earlier post that they often didn't mention picot length, differentiating between joining picots and decorative picots, but I was wrong. The picots in this piece are all designated as "short picots" and all are joining picots by modern standards. If they aren't for joins, they usually just say "picot" and if it's meant for something else, they will say "long picot", sometimes giving a measurement. But even with picots, I think a lot was left out assuming a common understanding of how big a picot should be.
Now, I'm not done with this medallion grouping yet! I said I wasn't going to do anything with color or beads. I do want you to see a little something that was often added to tatting back then.
 First, I lightly couched the group to plastic covered fabric. This is what I use for Romanian Point Lace and needlelace. I have a couple of layers of fabric and stick clear plastic on the top but not to the edges. I stitch with a long stitch or zigzag stitch through all layers to keep them from sliding around. Then I couch the item on top of that.
I used size 70 or 80 tatting thread to stitch some needle lace in the negative space. The label is gone so I'm not sure which size it is. I used two different techniques for a needle lace spider, alternating them. My needle lace skills are not always the best and especially after a long period of non-use so ignore that part but don't you think it adds some zing? Delicate zing.
 I often see a bit of needlelace like this in the center of motifs and sometimes in the space connecting them. Add to the needle lace some colored thread and a few beads and I think you might have an outstanding motif that originated from a very simple medallion!
This is the end of the "Grounds". I'm going to go back to the beginning and tat from there. That section is full of edgings, insertions and galoons. So many, in fact, that I moved further in the printout to start off because I didn't want my entire challenge taken up with those. They are pretty though and I'm anxious to get started on them.
If you go read Fox's post today, you'll see she has tatted an edging further on in the publication. That circle insert in the DMC photo is what first attracted me to this printout. I think there are four of them, edges matching or the edging used for the insert, but I fell in love with them and have been determined to tat them. Not just tat them but use them in inserts as shown. Fox's red insert and edging are perfect!
And that reminds me, I kept out my Valentine fabrics while cleaning. Must do something with them!


.JPG)


Very interesting to see how your thought process works! The needlelace between the motifs is a beautiful touch and adds a lot of interest!
ReplyDeleteThat looks so awesome! :)
ReplyDeleteAs usual, a well crafted post - excellent photos and detailed explanation. Then you took this very basic vintage design one step further by adding the needlelace, elevating the design to another level.
ReplyDeleteIt's amazing to me that tatting took so long to be written in an easier way. And the really old patterns certainly have a 'language' all their own! Also, to save space (even in modern times) they ran the text with no breaks. Nothing new there - knitting and crochet patterns did the same, and drove me crazy! I need diagrams and charts, or at least separate lines of text for each row/round.
It seems that the number/dash system began around 1980 (Marion Leyds' aptly titled "Tatting for Today").
In 1985 Rebecca Jones used mostly diagrams and amazingly, very little written text - Revolutionary! And Mary Konior in 1992 (Visual Patterns) used two colors in her diagrams, which I loved! If I had to take 30 years to learn how to tat, I came aboard at just the right time, in 1989!
So my hat is off to the modern pattern writers who broke through all the barriers!
It's amazing that the added needlelace adds so much to that ground. Now if I only knew how to do that...
ReplyDeleteI'm with Wanda, if I only knew how to do that! The combination of tatting and needlelace is LOVELY! I have noticed that they did often combine tatting with other fiber arts in vintage patterns. I like the idea of taking that practice and giving it a modern twist.
ReplyDelete:) Ann
Beautiful! I love this motif.
ReplyDeleteBeautiful blog and how wonderful you have explained your thinking as you tat the motif. This is the first time I have visited your blog and I have been so interested how you wrote this post. I took fox's link and very pleased I did, I will be back again and again.
ReplyDeleteMargaret
Just goes to show that sometimes you have to use the KISS method! No need for the fancy techniques. Sometimes they just don't work. Love the finished motif and the needle weaving. Many antique patterns use that along with tatting :) Nice job!
ReplyDeleteBonjour Gina
ReplyDeletevery interesting ! and so elegant too : congratulations, with a little motif you make a delicate creation !
ancolie (France)
WOW I Really like the way you have filled the gaps with the needle weaving it looks fantastic......Bravo for work well done
ReplyDeleteHuggles
Joy in OZ