Sunday, January 16, 2011

I've been going through boxes and storage cubes again. My goal is to make enough room on the other side of the basement to move my treadmill to. It's currently on my son's side and I am uncomfortable going in and moving things around just so I can exercise. I feel like I'm invading his space.

Aren't these lucious? They're velvets that I've collected over the years. Many many years ago...we won't say how many...I got interested in quilting and really wanted to make a crazy quilt. That was long before the kind of crazy quilting of today. All I was going to do was embroider pretty stitches along the seam lines. I had no money back then so my acquisition of "fancy" fabrics was done in bits and pieces. A velvet dress at a garage sale, a bit of brocade at the clearance bin, more bargains at garage sales and second-hand stores. So over time, I've amassed enough elegant fabrics for probably half a dozen quilts! It happens that one of the storage cubes I went through today had those velvets as well as several "satins" and taffetas and other shiny sparkly fibers.

I spent some time taking clothing apart and reclaiming the fabric, zippers and lace. I decided to wash the velvets as I couldn't remember ever doing that. They turned out gorgeous! I know I have more elsewhere. I particularly remember a piece of gold velvet.

Miss Chewie had to check it out. I've been pushing her off my chair where she sits on the arm while I bobbinlace because she gets in my way. So of course, she takes every opportunity to try to get close to me now.

I also went through a bunch of "wood". I used to do a lot of decorative painting and would still love to if I had time. I collected wood pieces at all of the aforementioned boutiques too. I probably got rid of about half of it. Much of what I kept is doll furniture big enough for a little girl to play with. (like my baby granddaughter will be doing as the years fly by!) I'd forgotten I had a miniature ironing board. There is a stepstool and a chair, both perfect for toddlers. I hope to get my garage going in the next two months and by Springtime, I can be in it, painting and refinishing these lovely pieces. I haven't been able to do any of that with my old garage as the mud and dirt fly in everywhere and would mess up my work.

I was going through another bin of fabric and found a lot of evenweave stuff that I can be practicing my hardanger and drawn thread work on. I felt a bit overwhelmed at that point so I'll go through it again later and get rid of some things.

Saturday, January 15, 2011

Woe begone to cracked fingertips!
They are the scourge of wintertime creativity!
Always a pointer or a thumb
The digital rest are left undone


Okay, very very bad poetry but you get the idea. I have water boiling on the stove which is beginning to fog up the windows in there,have slathered my hands with a very good lotion, taken a vitamin, and plan to drink lots of water today to rehydrate my system. The corner of my mouth is cracking again and all this irritation just won't do! I have too many ideas to be waylaid by cracked fingertips!

Now,compared to my dear tatting friends in Queensland, Australia, my complaints are miniscule. I have many fond memories of my trip to Brisbane in 2005, riding the length of the river on the Citycat with my friend Garryck, attending that FABULOUS craft fair with Maureen, meeting Judith Connors and Brenda Rewhorn, shopping in downtown Brisbane, going to a movie, shopping with Maureen at all the wonderful suppliers of thread and stitching goodies...it really saddens me to see THIS which is so similar to the New Orleans disaster. Further information is HERE.

I'm noticing a lot of Australian Esty shops are donating proceeds towards the relief effort so if you've been thinking of buying something from one of these sellers, now would be a good time to do so. Some are from other areas too so check your favorite sellers and see if they are contributing.

I hate not having any pictures but I can barely tat. So I've opted to show you my last bobbin lace bookmark. I've been putting them on the lace & embroidery blog but a little eyecandy here is better than none!

I've actually been working on the diagramming. I guess I need to read the manual. LOL! When all else fails, read the instructions! I do sort of remember Sharon telling us what we needed to do to make sure the drawings were visible but I'd forgotten there was actually something I needed to do. I can't even print out my diagrams and scan them because they won't show up. So, as I get that sorted out, I thought I would leave you with some written instructions.

I've already said for the triangle that the stitch count is 3-6-6-3 for the large rings and 3-3-3 for the small ones. The directions start with a small ring and end with the last large ring. To move from one motif to another, I made the last ring a split ring, 3-6/3-6. Then the next motif starts with the same large split ring.

This means you start the second motif in a different place from the first one which started with a small ring so how do you get the small ring in there when you get all the way around and are tatting the last large split ring? When I got to that point, I turned my work over and used the other shuttle to make a small ring, attaching it to the first large split ring. I started with the 2nd half of the ds so that it's all frontside when you are done. Then I turn it back over and make the last large split ring, joining to the small rings on either side in the process. This puts you in the position of starting the next motif and repeating this same sequence for the length you want.

Hmmm...forgot to mention that you do need two shuttles for this. A single motif only needs one shuttle but if you are tatting a string of them, you need two shuttles for the split rings.

Kathy N. pointed out that another tatter has used this motif in an entirely different way. Sue, from God's Kid, joined them from point to point and came up with some really intriguing designs. You can also see what it looks like in a variegated thread, a beautifully colored one at that!

Thursday, January 13, 2011

Wishing for Spring!

I used my software and made the diagrams for both the single triangle motif in Ground #2 and the diagram for moving to a second motif but.....I think it could look much better so I will tackle it again with fresh brain and last night's experience.

In the meantime, I've been tatting something different. I was going through some bobbin lace printouts I've had for ages and found a printout from I.O.L.I. (International Old Lacers, Inc.), The Charter Pattern Book 2002. My lace guild is chartered through I.O.L.I. so that's how I have this copy. As I went through each page, I was delighted to find this one! I don't remember seeing it before but I'm sure I did and just forgot.

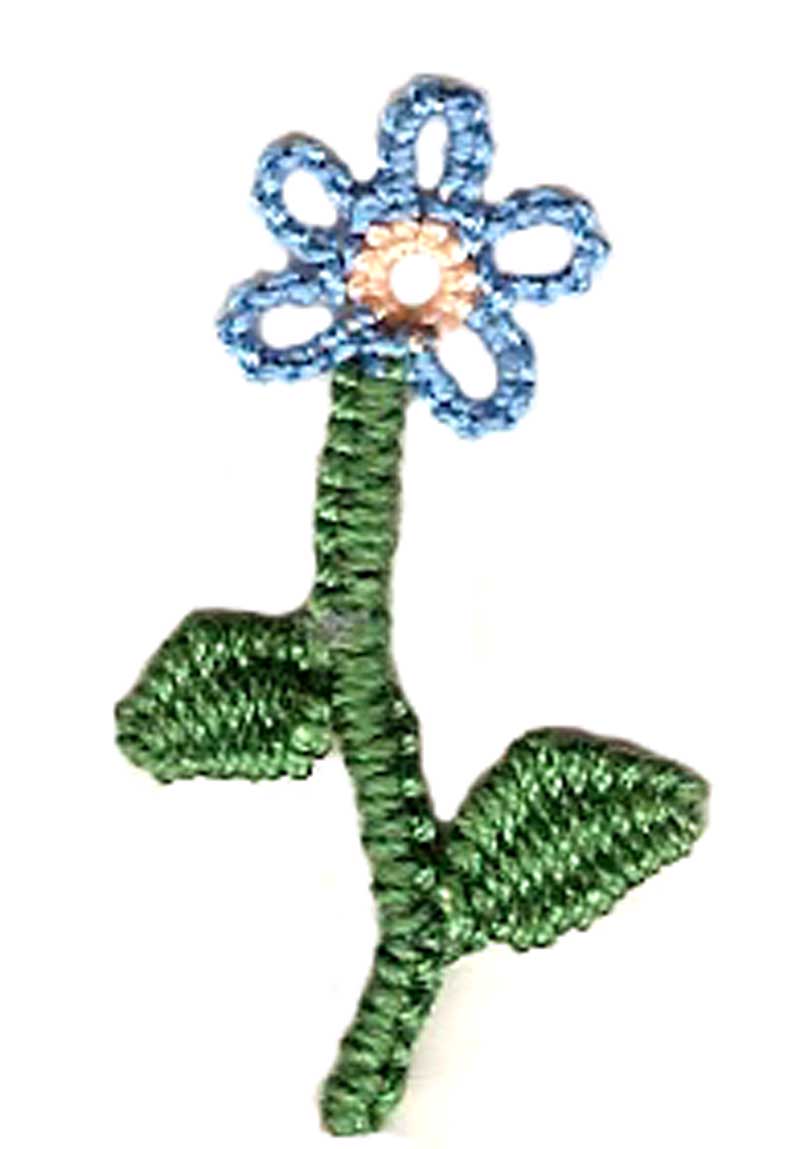
The basket is a pattern by Faith Dunn of Fremont, NE. I haven't received the most recent I.O.L.I. membership book and I'm not sure where the old one is, so I couldn't look her up. I just LOVE this basket! It measures about 4" x 4" in size 20 thread. Faith had paired it with some tatted flowers and leaves from Rosemarie Peel's patterns and there was a butterfly too, by someone else.

I grabbed a handful of motifs I have stashed on my computer desk and did a quick scan to see how it would look full of flowers. Isn't it great? It even sort of hides my poor spacing of the mignonette stitch on the left side! Faith also had a ribbon threaded through the split rings on the top edge of the basket tied in a bow in the center. She had another version tatted in which the handle was the interwoven split rings which looks like a chain.

I will probably be tatting more of these. What a lovely May Day or Mother's Day or First Day of Spring motif! Sorry I cannot pass the pattern on but I will try to find Faith's email and see if she is open to inquiries.

Update: My Member Handbook was in the mail tonight! It does have Faith's email address but it is not a good one. My message was returned. I may try a snail mail address but that will take some time.

Sunday, January 09, 2011

#2 in 25 Motif Challenge

As a refresher and if you're new to here, I'm taking part in the 25 Motif Challenge using vintage motifs from Theresé de Dillmont's Tatting which can be found in the Antique Pattern Library. I'm still working on Plate IV, Grounds.

This is the second ground. It's a very simple triangle and is shown here from the original publication.

This is the motif on its own. The large rings are 3-6-6-3 and the small rings are 3-3-3. It probably wouldn't matter where you started but the directions start with a small ring.

As before, I tatted in size 20, DMC Special Cordonnet. I was going to make about three rows like the original photo but decided to go with the triangle. I figured out how to continue in the same row without cutting and tying. I probably could have even climbed to another row but it was getting fiddly just going from one to the next. I'll show in my next post how I did it and have a diagram. It involves split rings and some reverse tatting.

The triangular shapes lends itself to many options. The Christmas tree is obvious but it could be a giant arrow or the point of a big star too. You could simply make row after row and have a nice mat or runner. You could make each row a different color. I did try a sample with a picot in the center of the small ring but it changed it entirely so I didn't go further with it.

It could also become a modesty insert for V-necked sweaters or tops, like this pretty purple one I got for Christmas.

The center of a single one is too small to fit over a Christmas ball but if you attach three together in a triangle, it would fit. Then you could add beads to the point for even more embellishment.

If you're really ambitious, you could tat more than one of these large triangles, stiffen them and attach together to make a pyramid box. Poke little flowers (even tatted ones) through the openings.

Sigh...wish I had time to follow up on all my ideas!

Saturday, January 08, 2011

Multimedia today

I've been playing in a lot of other areas this week besides tatting so I didn't post about them. Mostly bobbinlace. A friend and I are meeting to work on our skills which I think I might have mentioned. Anyway, sometimes I'm like a dog with a bone when I'm trying to learn something. I had one teensy issue with this lace that I think I finally figured out today. You can see what I've been working on there on my other lace blog.

I've tatted a little more on this. I'm going to use it on a rock and I'm getting to the place where I may need to shape it. I started another square at lace guild today but didn't have the rock with me to ponder with. (PONDER, not pound with!) Maybe later this evening.

I got my Eborall Family shuttle! This is the holly wood one. It's not just the decal on it, it's real holly wood. (Not Hollywood though they're stars in my book) It reminds me of ivory. I love it!

The ends are nice and tight so don't be fooled by my fat fingers covering that one edge. The post is high so it will hold a ton of thread! Many thanks to the clever and creative bunch across the pond who are making these lovely shuttles! I think I read from Sally or Jane that a few more will be listed soon.

Today my lace guild had Spinning on the agenda and I've wanted to learn for ages and ages. I was so tired I could barely pull myself out of bed this morning but I could hear that spindle calling my name. Kelli, Knitter Bunny, and Dagmar, our German member, gave us lots of good information and showed us how its done. Lots of good experience between the two. I was starting to get the hang of it but noticed my shoulder was starting to hurt (from too much bobbinlacing originally) so once I felt somewhat comfortable and thought I'd probably not forget at least that much of what I'd done, I put it away. I can see where it could be addictive.

I also remembered that I had not shown my finished cowl here.

It went to my granddaughter so don't have it any more but I do intend to make something similar for myself. Eventually.

And now for a friendly rant:

I was checking out bobbin lace on Etsy, just to see what was there and really was looking more for bobbins than anything. Misidentification of lace is just as rampant on Etsy as it is on Ebay. (yeah...I can hear the groans) I contacted several to tell them their "bobbinlace" was actually needlelace, filet crochet, or something else.

I didn't bother to contact this seller. It's listed as bobbinlace but it's actually machine made embroidery to look like tatting. And it's not even identified as tatting! LOL! You might not be able to tell it on this photo but at the store, you can clearly see the threads from machine embroidery.

Now a friend of mine recently showed me some machine embroidered "tatting" that she had done and it was exquisite. Yeah, I know it was machine embroidery but the thread spacing was perfect, no overlapping or loose threads and it was made into an ornament. Extremely well finished. This lace is not even that.

I also saw some well-made bobbinlace bookmarks being sold for $5.00. Last night I made a "bookmark" sample and it took me 4 hours. How can anyone sell something even better for so little? I don't get it. Why would you put hours into making something and basically sell it at garage sale prices? If you're doing that, STOP IT!

Happy Weekend Everyone!

Wednesday, January 05, 2011

Open Canvas

A motif is like a fresh new canvas to me. It's in black and white on paper. The vintage ones are always black and white since they didn't use color ink or color photography all that much. It allows me to imagine more fully, in color, with embellishments, accessories, and little changes that sometimes have a huge impact.

I wanted to try a few more things with the Ground #1 motif before I moved on.

I added some beads to this one but in the end, they felt a bit overwhelming or out of balance in the places I put them. I should have used only 1 bead or smaller beads. These are size 11, I think, maybe size 10. Overall, I think I prefer it without beads. It is ornate enough on its own. I also forgot the stitch count on the first ring, inadvertantly tatting the first ring 6-6-6-6 so I continued with the same mistake all around and then in the second round, I had to make the chains a few stitches longer to accommodate the larger ring.

On this one, I used two colors. I also changed the outer small ring to a "puff picot" that I learned from Bina Madden's article in The Bulletin. I need to find a current email for her to ask if I can do an online tutorial for it. Again, I felt it distracted from the original ornateness so I probably would not tat it this way again. That little blip of navy blue in the center is because I started out with the two colors knotted together but realized I didn't need the second color until the next round and it would get all fiddly with the split ring if I kept it. I even considered doing a SSSR but it wasn't necessary and why make something harder than it is? I had already closed the ring so I just cut the blue off.

It's a sample piece, an experiment. If I were going further with it, I would tat it right. (smile)

So now it's back to the little squares I was working on and next week I'll do the next motif in the DMC Ground series.

Monday, January 03, 2011

More on Ground #1

One of the things I love about vintage patterns is the potential. The first thing I do is compare the written text with the picture and hope they match up. I look for places to climb out and continue without disrupting the flow of the pattern. And I look for ways to improve the pattern or extend its life into something else. I also look for the ways tatting was done differently and how that affects the overall pattern.

I noticed my tatting of Ground #1 was more compact than what I saw in the printout. Also directions sometimes refer to the size of the picot, but they didn't use a smaller joining picot compared to a regular sized picot. Most of the drawings and photos show quite visible picots in the joins. I wasn't sure if it was for clarity or if they meant to have them that long. My own habit is to make joining picots very small but I noticed that seems to compact or crowd the stitches in this pattern so I studied the picture and decided to try longer picots at the joins.

This is the center group of rings with the longer picots. It opens the piece up and it lays flat more easily. It will leave a bit more space too, when I tat the second round. This happens to be size 70 thread which I mistakenly loaded thinking it was size 40. As soon as I tatted the first stitch I knew better but since it was on the shuttles, I went ahead and tatted it. Thinner threads tend to open up space too so I can't be certain the longer picots made that much difference. I did need to use a mock picot to match the other longer picots.

This is another motif tatted in size 40 DMC and paired with my first three motifs in size 20. I tatted the small rings with chains instead of rings. As in the original instructions, I chained 3-1--1-3 and joined right back in the picot I started with. I had't blocked any of the motifs at this point but it seemed like the small rings tended to lean towards the left. They look better now, but I still think throwing a ring off the chain works better.

So keep in mind when you use older patterns how the original was tatted in relation to picot size. Chains that were tatted for mock rings often look better when they are a true ring. Look for ways to bridge from one segment to another. Sometimes you have to tat the whole piece according to instructions to find the best path. In my first attempt at Ground #1, I made the split ring split at the last join since that was where the JK would be but it was awkward and worked much better to split at the top of the center ring and make the regular small ring to start the next round.

I love the overall look of this Ground so I tatted a small grouping which is about the size of a coaster in size 40 thread. The center is Chocolate Sauce by Tatskool and the outside motifs are from some variegated I had dyed. I'm not willing to tat on another round but if I did, you would see the triangle pattern that emerges better in the negative space. This stops at a hexagon but I like it. After tatting this many motifs, I know it takes me about a half hour for each one, including winding the shuttles, tatting, and hiding the ends. This one is small and delicate looking. I really want to find a way to showcase this piece now. I also have to admit that comparing this to the original print of the pattern makes me envious of the tatter who made the original. The spacing and tension is perfect on that one.

Sunday, January 02, 2011

#1 in 25 Motif Challenge

This is my first motif for the 25 Motif Challenge involving vintage patterns. I am currently using the DMC Library - Tatting - Editions TH. de Dillmont. I've already tatted some motifs that I haven't shown and probably won't for awhile. I've skipped to Plate IV, which is "Grounds". There's really not an explanation of what grounds are in tatting, other than motifs joined together. I always think of "grounds" being the background of a piece or the less detailed stitch work that fills in space behind the featured motifs. From what I can see, however, the motifs are simply joined together. This could be a way to bridge larger elements together in a tablecloth or shawl. The tatting is simple for the most part. Only three examples are shown in Plate IV, but the shapes vary so you get the idea.

This is Ground #1, figure 22. It's the more elaborate of the three. I've tatted it in size 20 DMC Special Cordonnet. I will be tatting all of the motifs in DMC white. They may very well go in the dye pot later but for now, I wanted a common thread throughout. I will also try this motif in size 30 and 50 thread to compare how they look but I won't count them as motifs in the challenge.

This is with the second motif attached. I reworked the pattern so that I could climb out of the first round without a cut and tie. I still have to cut and tie when the motif is done but it's still only the tails to hide rather than 4 threads.

I made the motifs slightly differently by ending my split ring in the first round at different places. I think the second version was easier to execute and will give directions for that. I changed the way I did the josephine knot between the 2nd and 3rd motif (below) but I'm not sure it really made a difference. You can make a JK (josephine knot) by continuously tatting either the first half of the double stitch or the second half. I generally tat the second half as it seems easier and faster than the first half, but in my third motif, I tatted the first half and it seemed to lay better. That may be a result of it being my 3rd tatting in a row of the motif where I'm comfortable with the rhythm of tatting.

The original instructions had you tat the center with a shuttle only and fasten off. Then you used two shuttles and attached the thread to the motif to tat the second round. In the second round, you made a false ring with the chain but I changed it to a ring thrown off the chain. I think it lays nicer but I should tat one with the chain just to see what the difference is.

Please excuse my crude diagram. It took me over an hour to come up with something acceptable and then my scanner wouldn't work. I had to reconfigure the wireless connection.

I used size 20 thread, 2 shuttles wound CTM (continuous thread method) and put 1 1/2 yards on each shuttle. It was a close call on the second motif so you might want to add another foot to that estimate.


1st round:
R 6 - 3 - 3 - 6, clr
right next to the last ring,
[R 6 + last p prev r, 3 - 3 - 6, clr] 4 X
last ring is a split ring
SR 6 + last p prev r, 3/6 + 1st p on 1st r, 3, clr

2nd round:
I didn't bother to make a mock picot but you want to leave a tiny space as you'll be ending in this spot.
Using the chain shuttle, *R 3-1--1-3, clr
SS and Ch 4, + (join) in the join between rings
SS and using the chain shuttle, make josephine knot of 8 stitches, your choice if it's first half or second half.
SS & chain 4, + p on next R
SS & repeat from * around, ending last ch 4 in base of 1st small ring.

You're using the chain shuttle for the chains and rings both and I indicate that by SS which means switch working shuttle.

The original directions say to make that middle picot on the small ring a longer picot and that's where you join to other motifs.

Once you get into the swing of it, it's fairly quick to tat. You could tat a small mat or doily in an evening.

Saturday, January 01, 2011

1/1/11


I have to post something today! I love the date. Multiples of numbers, especially #1 or #2, in numerology, indicate powerful energy. They are called "master numbers". Everything is stronger, cleaner, with greater impact. One is the number of new beginnings. It's a new year, a new month, a new day. What more could you ask for than a new start?

I used to do some numerology in the mid 80's which is really strange since I don't really care to work with numbers. I don't have a problem with numbers - it's just not fun! (says she who is constantly counting stiches and half-stitches).

I did tat last night. In fact, it was nearly 1:00 a.m. or later when I finished, but I can't show it just now.

I've run my errands and settled in for the evening so I'll go tat some more and maybe I'll even add it to this post later!

update:


Explanation tomorrow.

Friday, December 31, 2010

No tatting so far but I plan to end 2010 with a shuttle in hand....or asleep. LOL!

I was up and off this morning to lunch with a friend in Greenfield. The drive is a little over an hour but rain was light and temperatures good. I actually didn't see rain again until I was on my way home and that was light and intermittent too.

I made a quick stop at the Zig Zag (Tatting) Corner and picked up these shuttles. I knew they had them but didn't want to pay shipping since I knew I'd be there at some point. I've had some unexpected prosperity in the past few days so I treated myself to TWO packs, some white DMC special cordonnet and a yard of fabric. The only thing that kept me from buying more was my lunch date with my friend, thankfully!

We had a great lunch at Applebee's and then visited a few "thrift" stores in the area. I love going to the first one especially. I ended up buying some very nice work clothes and a coat. Everything fits except the slacks which are the right size but have a fitted waist which I can never wear. But since I'm heading back to the gym and then a yoga class later in the month, I'm pretty sure I'll be wearing them soon. I really love the coat - long, wool and black with a Victorian style trim around the collar, a "galoon" as I've come to learn this type of trim is called. I have one long wool coat but this one is quite dressy which I needed. I also bought a shelf that will fit perfectly (already tested the space) between the vanity and the mirror in the bathroom. The vanity is on the small side and with my son living there, it's getting cluttered with his stuff and my stuff. This will help open up the sink top. Will probably involve some paint though. Automatically I started thinking of painting the whole bathroom. (Later.)

I got these spoons at the Goodwill there. I've wanted to paint on spoons for a long time and these are nice big bowls. Painting is not in my 2011 goals yet. I'll re-evaluate mid year and see if I can fit it in.

Speaking of goals...I asked readers what their goals were for the coming year. I actually meant stitching goals, which is only a part of our lives, right? It was interesting that most responses were about life in general. I personally decided not to go there (life goals), for this blog anyway. I can only focus on one area at a time!

So here are my stitching goals:

I decided to join the 25 motif challenge again. This time I will focus on vintage motifs, interpreting them and updating them in the process. There is a DMC publication I'm in love with and I think that is where I will start. Look for something this coming week.

I have 7 printouts sitting here by my computer and those are recent printouts!

I think I need a list and something to keep me on track. That's one reason I'm doing the 25 motif challenge again. I have a secondary goal in mind with the vintage motifs and the challenge will keep me on track.

So...deep breath...here goes

1. Finish the tatting and diagramming of Ruth Ann's Praying Cowboy.
2. Relearn the software for diagramming.
3. Review and diagram all my prior designs.
4. Polish up my bobbin lace skills. (already have plans to meet with a fellow lacer weekly for that precise reason.)
5. Make a plan to use dye in more productive manner.
6. Teach more this year.
7. Travel more.
8. Teach Irish Crochet with my local lace group.
9. Finish T.A.T. Master course IN 2011.
10. Finish Tatting Proficiency course with HLG.
11. More embroidery.
12. Follow through with designs that are on paper only.
13. Pursue exhibiting work in local galleries and gift shops.

Okay...that's a Baker's Dozen! General enough in many cases to accomplish to some degree but specific in a few to help me focus.

And of course, I'll be reading every one's blogs for inspiration and pleasure!

Wishing you all a prosperous, healthy and joyful year in 2011!

Wednesday, December 29, 2010

Last night was great! My family got together at a local pizza establishment and celebrated Familiness and Christmas and all things great and good.

So today was the first day that I had plenty of time to myself. I had to leave for some personal business late afternoon and then ran errands so didn't get home until 8:00 p.m. or so.

One of the projects I was working on today was this "sewing roll" which I saved some time ago from All People Quilt.com My ultimate purpose is not a sewing roll but this one might end up being that.

It's a practice piece and took me forever to figure out. A simple sewing project! I know some people think my directions are redundant and lengthy but I'd rather give too much information than not enough. It doesn't tell how to put all the pieces together. Step by step or at least a few layouts would have helped, but I did finally get it sorted out. Made up a bit on my own too. LOL! I don't know if it will have tatting on it or not. There are some applique flowers and embroidery involved. That threw me a bit too. Only because I didn't read the directions on the flowers all that well. So...it's a WIP.

Here's another project I've been working on periodically the past few days. Remember the single little square I posted about on Christmas Eve?

I'm fitting this to a rock and I SO HOPE it's not all in vain. There are so many ways to arrange a square......in a line like this, or as diamonds, point to point, as a single square made up of four square, and so on. I measured and timed myself this afternoon to get an idea of how much time I'm going to be investing in this. One square take about 1 1/2 yard of size 50 thread. I fine-tuned that this evening to 35 turns on the shuttle. It took me 22 minutes to tat but that didn't include filling the shuttle or sewing in the ends so it probably consumes about 30 minutes give or take.

I only do that with something I'm doing over and over (which isn't too often!) so that I can conserve on thread and plan my time better. I'm not going to show you how it fits on the rock yet. I keep changing my mind about where I'm going with it!

Thursday is a busy day planned. I'm taking the tree down, making trips to Goodwill, getting my hair cut, possible lunch with my sister, going TV shopping, and hopefully I will get to work a little of this in too! I'm also trying to put together a plan for what I want to accomplish in 2011 because it just feels so humongous making a "tatting bucket list". There are certain goals I definitely want to reach and the only way it will happen is with planning, planning, planning!

SO WHAT DO YOU PLAN TO DO IN THE NEW YEAR????????

Tuesday, December 28, 2010

Last night I tatted. I finally finished the hooded cowl in the late afternoon so the evening was mine for tatting. I found a pattern designed by JoAnn Stearnes for the Heartland Lace Guild. I can't pass on the pattern but you can always join the Heartland Lace Guild yourself and find it along with lots of other patterns, in tatting and bobbinlace and other laces. Membership is only $12/year so it's very affordable to support them.

Now I haven't tatted in a few days but it's not like you forget how after 12 or 13 years. For some reason, my tatting went hyperbolic on me. I was using Tatskool's Rainbow Bright HDT. Hmmmmmm....I haven't paid much attention to Cormac lately. Do you suppose.....?

Looks really sad, doesn't it, when you know it's supposed to lay down flat!


Water and lots of pins were in order.


There's Mr. Mischievous watching me and smirking.

Yes, you are smirking! I know a magic spell when I see one. No way could I have tatted that curlicue on my own!

Ah, but all's well that ends well, right? Sweet-Talk by Jo Ann Stearnes. I like the Rainbow Bright best on a black background. Those colors pop anyway but it really lives up to its name on black. I'll probably need to go around and even out those picots. Next time I'll use my crochet hook shaft to keep them even.

Well...another busy day ahead!

Sunday, December 26, 2010

I was blog-surfing and from a link on Button Floozies, I found this sweet mitten tutorial at The Feathered Nest. Okay..it was her use of tatting that really caught my eye but I do think I'd like to make the mittens next year. This would be a great way to use the tatting I do at period events where the thread is white or ecru and I only tat the simplest of edgings so that I don't mess up too badly. But what do you do with those bits and bobs of "demo" tatting? Here's one solution. Go look at the tutorial though...she also adds aging (tea dye) and sparkles.

I've spent a good part of the day the last two days with family and when I was home, I was knitting. I'm almost done with the cowl and anxious to finish as I'm so bored with it. Knitting was one of the first needlecrafts I taught myself at age 12 or so. I get the hankering to do it now and then but I get bored with large projects and don't go back to it until the urge strikes me again. I really wanted to do something for my granddaughter but I guess it will wait until Spring now when the notion fires me up again.

So, tomorrow is slated for knitting and cleaning and scheduling the remainder of the week. I know it sounds like I'm always cleaning but I'm doing major organizing as I go along so this will likely go on for awhile. Some of it is a very slow process too, but I'm getting better at it.

I'll be very happy when the snow is gone too. It takes twice as long to do anything between bundling up, warming the car and carefully hauling things in and out.

I'm sure everyone had a wonderful Christmas and is happily sailing towards the new year!

Saturday, December 25, 2010

Christmas Day!

It was a good evening, indeed!


I crocheted the white flower in size 50 DMC special cordonnet. I really liked the way the two flowers looked together so I went ahead and made it into a rock cozy.

I tatted around the crocheted flower for about three rounds but switched to crochet again at that point. It's easier to make the rounds smaller quickly with crochet than with tatting...and also much easier to tear it out when it doesn't work out! I had a couple of false starts before I figured it out.

I wasn't going to do the needle lace at the end but I couldn't help myself. Otherwise it seems there is a big blank space that somehow needs filling.

Here it is with the rest of the collection. The three newest will be finding new homes soon though.

I think the tatted square I made in the last post will look better on one of the flatter rocks I have. I've been pondering on the flat ones.

Christmas Day. I will be seeing some of my family later in the day and my middle son & I have already exchanged gifts. Our get-together is Tuesday night and it is the get-together, being with family, that means the most to me on Christmas. It's the time of year that we focus on the best in each other. It's not the only time in the year, of course, but it's the time when EVERYONE does at the same time. And it's one of the (becoming more and more) rare occasions when we can all get together.

I wish for everyone to put aside their differences this day and love each and every person around them to the fullest.

Friday, December 24, 2010

Christmas Eve!

I got up early (for a day off) and went into town to finish my Christmas shopping. It was pretty quiet around 9:00 a.m.!!!! I thought I was going to make two stops and head home. After the first one, I accomplished what I thought would take two stops, but lo and behold....I'd made six more stops before I got home! I didn't plan to get the car washed but that was on the way. The other stops were ...on the way....

So, I was home by 12:30 p.m. and caught up on my email and then planned to nap before finishing my gift wrapping. Right about then, my son got home from work. I haven't seen him a lot lately so figured I better get up if I wanted to catch up with him. It wasn't much later that HE was off to nap and I was wrapping gifts. I'm all done except for one I can't find that I bought in early July. It's amazing I even remember I bought it but it's for someone in particular and I specifically moved it to be with other gifts that I planned to give. I've looked through every box in that group and I don't know where it is. I also need to make a fabric gift bag for one that is too big for the small bags and too small for the big ones.

And that reminded me....what happened to that notion of sewing all my gift bags this year? Being green and thrifty and creative and all that? I mean I picked up some cool fabric just a few weeks ago for that very reason!

With the best of intentions.....there I go again. Well, there's always next year.

Last night I tatted this square motif from Easy Tatting by Rozella Linden (aka Ruth Perry). A larger version makes a snowflake and an even larger one makes a mat. Originally I was trying to make something small enough to go in some ornament frames. (Another project that is destined for "next year".) I don't think it's very Christmasy on its own though so it might go on the next rock cozy. My first scan showed a cat hair, plain as day. I don't typically have cat hair in my tatting but this year has been different. My kitties are getting old and don't groom themselves all that well. I'm sweeping every few days just to keep up with them.

Here's another notion for a rock cozy. Remember I said I had another little tatted rose (Jeanne Lugert earring pattern) but hadn't pulled the thread that makes it into a rose? I did that last night and the crocheted rose was just laying there on the table, begging for some company! Now the colors don't really complement each other but I'm off now to crochet a white rose for the tatted one. I'm not sure I'll use them together but I want to see what it looks like.

So with Santa's blessing, I think I'll be having a glass of wine along with a chocolate covered graham cookie and tat til I hear the clip-clop of reindeer feet upon the rooftop!

Merry Christmas to All and to All a Good Night!!!!

Thursday, December 23, 2010

My place of work likes to claim that 30% of our salary is in benefits. I don't quite agree since most of those benefits are not something I have any reason to use. But I do like that we get 2 days off at Christmas and 2 days off for the New year. It just happens that this year, we get the 2 days BEFORE Christmas since it falls on Saturday so that means I'm off today. I'm also taking vacation for the 3 days in between holidays so I will be off 11 days in a row! Anyway, I was stressed earlier in the week as I learned that the appraisers needed to come out and take more photos. (I'm taking advantage of lower interest rates) That meant more last minute intense cleaning when I could have been finishing up my Christmas purchases and I didn't understand why they needed photos they had already taken. Well...just before leaving yesterday, I emailed to try to pin them down to a time and that's when I got the good news that they had everything they needed and wouldn't be coming out. Yay!


That means I slept in this morning and have been more or less relaxing all morning. I did put towels away and fed the cats but that's it. It's not noon yet. I'll move into gear after noon. Really, I will.

I decided last night to try a photo and see if the hooded cowl will look the way I think it will. Once it's washed and blocked, the edge won't curl but it fits around the face the way I thought it would. I'm a little over halfway now.

Last night I also crocheted a little Irish Rose. I'd been surfing recently and found myself inspired by Lily's Ms. Crochet. There was one flower in particular that I want to learn to do but .... wouldn't you know it....the Antique Pattern Library is in the process of moving to http://www.newmediaarts.org and isn't functional yet. I have several printouts already on Irish Crochet and even have a book somewhere that I'm not willing to hunt for this close to the holiday. So I guess it will wait until next week but in the meantime, I needed a little IC fix.

The scanner tends to flatten the motif and part of the charm of Irish Crochet is it's 3D character. So I tried photographing with the macro lens and it works okay but seems dark so I tried shining a flashlight and got this quirky kind of photo.

It's NOT NOON YET! I'm having fun. I intend to continue having fun. (smile)

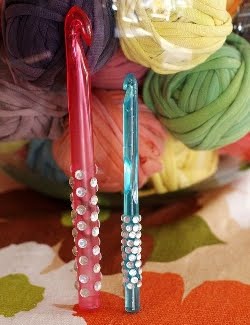
You know how tatters like to bling their tatting shuttles, scissors, picot gauges, and just about every tool they own?

Twinkie Chan blings her crochet hooks! You can find the tutorial on A Beautiful Mess!

The size 14-16 crochet hooks I use in tatting are probably too skinny to take on bling but...hmmmmm...if I had one of those plastic "ergonomic" softies on the shaft, that could work! Not that I have any of those softies, but it's an idea!

Okay,okay....I'll go wrap some gifties!