Sunday, October 23, 2011

#19 in 25 Motif Challenge

Plate V, Figure 26
Finally, here's #19 in the challenge which is based on the vintage publication D.M.C. Tatting by Thse. Dillmont which you can download FREE HERE.

This is the center part which is all rings. They instruct you to go back and forth with "turn" and they do say to when to use short picots and when to use long ones but give no measurement so I was guesstimating. As you can see in the next segment, I think I could tighten it up a bit, slightly smaller picots, and it will look better.

Oops! Didn't realize I got my font smaller on this diagram but if you click on the photo, I think they show up bigger. This part takes 2 shuttles and the directions were confusing because they would refer to left hand shuttle, right hand ring, 2 shuttles, etc. Basically they were throwing Josephine rings off of chains. At one time, I thought I'd began again wrong and went back and frogged and Josephine ring OKAY....only to find out I didn't need to! I think the directions are off one stitch coming down one side but I corrected it in the diagram.

I do think slightly smaller joining picots and bare space threads would have been helpful although it did turn out better than I though it would for the first draft. A smaller thread tends to tat a bit nicer too. You can see where the tails come out which is also the beginning, that I forgot to join the picots together there because I didn't catch it in the original pic or read to the very end where it tells you to join.

Again, I don't know how to net so won't be doing that part. This would make a nice cross, or pendant, or one of a series of motifs in a small piece.

What will you do with it?

Thursday, October 20, 2011

No pics today but brief update on what's coming up. This is a very busy week for me so not much tatting. However, I've been printing out a few exciting patterns - a fish by Nami, the cute owl from Nancy Tracy's Be-Stitched newsletter, and working on the next segment of my 25 motif challenge. No time to provide the links just now but just making a presence in tat-land!

Monday, October 17, 2011

Extra Winners

I found three more Old Time Crochet Magazines to pass on so I drew three more winners: #3, Marie, #20 Sharon, and #35 John. This is fun!

*~*~*~*~*~*~*~*


I think this is incredible! A friend sent it to me.


Here's the video showing the making of it:


Wouldn't it be cool to see one with tatting?

Sunday, October 16, 2011

Winter Butterfly

I finally got the Winter Butterfly done after several aborted starts. I tried doing the body in white, size 30 and the wings in pale gray, size 30, along with a silver blending filament, but it simply looked like mismatched whites, so I took the body off (which I'd done twice already because I forgot the antennae and then added the upper wing wrong three times!) and made a new one in the pale gray. The silver shows up much better with the gray but you can't see it in the first scan.

It seems awfully washed out compared to the other flutters, but I wanted that sparkle of a fresh snow. I'm wondering now if I can find tiny glass beads to put in the center of the bodies, like Mill Hill used to make. I thought a snowflake would be good for the Winter one.

The second photo is from my camera. If I take a photo at just the right angle, you can see the sparkle of the silver thread but you may have to click on it to enlarge it.

Now I just have to figure out what kind of background to frame them against. There are a couple of framers in town who are skilled about framed archival quality lace as well as other items. I plan to take Wendy's hanky to the same place.

Friday, October 14, 2011

Winner!


The winner of the Old Time Crochet Giveaway is Betty Yount, #33 in the comments. Betty's email doesn't show as she had to send me a private email to comment and I did not add it when I transferred the email.

Congratulations to Betty!

Tuesday, October 11, 2011

Here is the Canopy Bookmark from Martha Ess's new book, Playing With Picots.

It turned out to be a quick tat, good practice for split rings and using a picot gauge. It takes about 8 yards total plus extra for the tassle if you use a tassle tail. I do have some beads for the tassle that are a perfect match in color but I hesitate to use them since I bought them in Ireland years ago and have found since then that when wet, they lose their brilliant color like so many blue and purple beads do. I've already blocked it so it's unlikely I will need to wet it again unless it gets really dirty for some reason so I may tie some on anyway.

Don't forget to sign up for the magazine giveaway if you haven't already! You have to comment on THAT POST and be sure there is a way to contact you within the comment.

Monday, October 10, 2011

Giveaway!

****Please note! I've already rejected one comment that did not link back to a profile or ANY identification that would allow me to contact that person.

Have you ever wondered what happened to the tatters in those old publications? What about the names you never heard of before or since you saw it attached to a pattern? Was that their 5 Minutes of Fame? Now some online names may be entirely different from the tatter's published work name but still....wouldn't we still know them as a designer?

Well, my giveaway today features some unknown people to me but maybe someone out there in TatLand is familiar with them.

Here is a centerpiece by Mrs. J. C. Spencer. I thought this name sounded familiar but I wasn't sure where from. It seems Rebecca Hollenbaugh from PA wrote a column in Old Time Crochet and she picked this pattern from a February 1925 Needlecraft issue. Ah....I DO remember seeing Mrs. Spencer's name on a number of Needlecraft patterns.

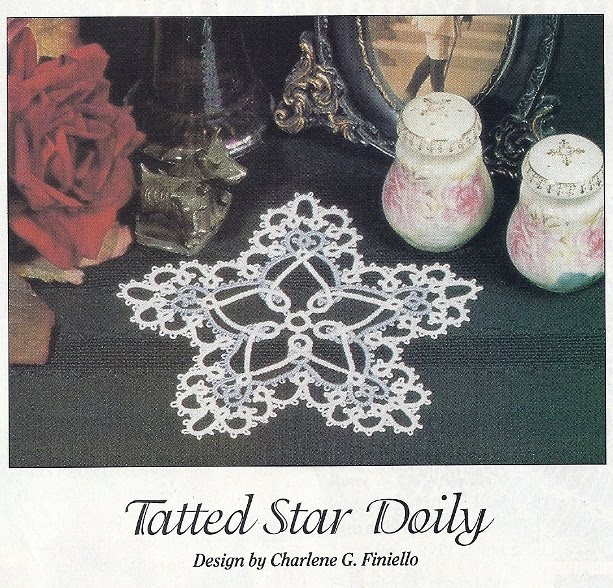
Here is a Tatted Star Doily by Charlene G. Finiello. Nothing is mentioned about what state she lives in and I don't remember seeing her name before or even since. I think it's an intriguing design but I'm not likely to tat it.

And this pattern, Ice Crystals, is by Florence Anthony. I seem to vaguely recall that name from somewhere, but I don't know where. How many doilies are named Ice Crystals? Does anyone know?

Here is the magazine that contains all the patterns as well as an article about Tatting Techniques by Rebecca Hollenbaugh.

Comment on this post before next Friday, October 14th, at 5:00 p.m. ET. I'll pick a random winner before the night is over. No requirements other than a way to contact you because I won't have time to search. If leaving a comment is a problem, email me privately and I will add it to the comments myself. My email link is under my photo and on my profile. I will be out most of Monday so don't worry if your comment does not show up right away. Just check the next day.

GOOD LUCK!

Sunday, October 09, 2011

I saw Umi n Tsuru's post today about Martha's new book, Playing with Picots, and realized I had been remiss in not posting about it myself! I was fortunate enough to be a test tatter for Martha but the surprise and delight came when I saw the book and the patterns I did NOT test tat!
So I set out to tat the first bookmark that caught my eye, loading up shuttles with Marilee's HDT, Purple Glory, which was gifted to me by the very generous Sue Anna. (If you have not visited any of these links, you should - what a treat!)

I try not to beat myself up too much for mistakes but sometimes it really is called for. I misread Martha's directions and made 3 LP at the bottom of each ring instead of 3 ds, 1 LP. I realized my mistake on about the 3rd ring. It's not like I didn't know something was wrong. I kept looking at the diagram and wondering why she only showed ONE LP coming out of the bottom of each ring when I had THREE. What makes our brains stubborn like that? And I know better than to use a special thread for the first tat of anything. So what to do? Keep going and see if I could salvage it? Keep using 3 LP or switch back to see how it actually looked? I decided to switch back. While I do like the multiple LP's, I would need to add additional stitches to the top half of the ring to balance it out and then I would probably need to change the stitch count of the side chains. I really love the original design, delicate and airy - reminiscent of Asian trees whose names I don't know.

So maybe I'll find a way to turn this into a hair ornament or bag it up with other "modifications" destined for someone's crazy quilting someday.

I'm so tempted to add beads to this but I do not use beads in my bookmarks unless it is in the tail part that hangs out of the book. I'll have to use the thread in something were I can use beads...maybe some earrings????

And I WILL use it to make this beautiful bookmark the right way.

Friday, October 07, 2011

No new tatting but I did finish stitching this down on the pillowcase. I do think I'll make a hen & chick edging for the edge. In fact, since that is such an easy on-the-go project, it will be perfect for my frequent comings and goings right now. It will probably use up this particular ball of Lizbeth thread too. I hope I don't need more as it won't match, I'm sure.

I now have a section of electric overhead lines underground now. They eliminated the overhead wires in a heavily wooded section leading to the house. Unlike overseas, you have to request and pay for underground relocation of overhead electric wires here. The final inspection revealed I need to upgrade the electric panel in the house. It's something I've wanted to do anyway for a long time, but the timing sucks. I don't have a choice as to when. It must be done by the 20th now. So I'll be scrambling this next week to get that arranged.

Last night I repaired a tie for my son. It was one I bought him for Christmas for way too much money for the little bit of fabric involved.....and now a loose thread that ran up and down the whole thing? This is the kind of annoyance I've always had with ready-made clothing. Buttons and zippers and hems always seem to need repairs in a very short time. When I put on a button - it's NOT coming off. Hems don't pull out and I avoid clothing with zipper. You could say this 60+ body finds elasticized clothing easier to wear but more than anything, I hate replacing a broken zipper. Give me elastic, pretty ties or hidden pockets anyday!

Sigh....I just filled a shuttle with that thread. Fortunately, it was just full as about 8" out there was a knot. I can cut it at the knot and not be concerned. 'Nuff said!

Tuesday, October 04, 2011

I've actually been doing more crochet and embroidery on quilt blocks than tatting but I did want to show what I'm working on.

This is an edging from a Norma Benopath booklet. I got it while I was in Australia in 2005. As you can see, it looks a little rough and that's because it's done so danged oddly! I will do one more of the big flowers and then see how it looks at the bottom of the bag. The most votes were for option #3, at the bottom, but many also suggested something at the top too and I agree. If only one or the other has tatting, it seems a bit unbalanced. I might use a pink edging for the top. I'm not sure this one by Norma will be right for it. I may have to tat it again to make it look it better. You tat a center ring on the big flower with picots and then work rings around it......which means an alligator join and some....mmmmmm....precise engineering. There is probably a better way and it will come to me, no doubt, once I finish this tat!

Friday, September 30, 2011

Need Input

I finally got to the point where I felt comfortable enough with my new sewing machine that I thought I could finish this piece of embroidery into something. It decided it wanted to be a pouch, a pouch that seems to look a lot like a glasses case! I should probably line it with felt if I use it for glasses - or it could just hold balls of thread, etc. I wanted to add a little lace to it too, so I've been tatting a baby edging in size 30 Presencia. So now ....where do I put the lace (not done yet) where it will look the nicest?

Should it be on the top row below the edge, like this?


Or along the top edge, like this option?


Or maybe just a short curved section centered under the embroidery, but placed better than this short sample?


I sort of like the 3rd option, but wouldn't want the lace any longer than what it is. So I'd stop, block it, and then stitch it in a bit of a curve here. What do you think? Maybe a combination of some kind? I also intend to stitch some loops between the sides to run ribbon through so I could tie it up if I wanted.

Wednesday, September 28, 2011

Whoo Hoo!

Fnally, FINAlly, FINALLY!!! I managed to finish it!

I had left off okay. I thought I was untatting but if I was, I didn't need to. I did have to untat one ring at nearly the end when I joined one ring too soon. Then I added a little chain loop at the end for a tassel. So HERE we are!!!

It's been disconcerting to see how much we can lose in a short time. Otherwise preoccupied, I've had very little time for tatting in September and it shows. I still had to finger shape it a bit after the scan for my liking but I'm happy with it now. I've usually seen it in brighter colors and I do like the brighter colors. Using size 30 Cebelia was a spur of the moment decision. Maybe another time I'll make a size 20 brighter version.

Thank you Jon for a challenging pattern!

Tuesday, September 27, 2011

I'm making progress on the Chinese Coin bookmark but again, was too busy watching TV and kept having to retro-tat. Stopped after my 3rd error. Maybe tonight!

I'm also crocheting a hat from this red nubby yarn although neither the scan or photo showed the true red. Because it is so nubby, it's hard to follow but I think I'm making progress!

Thursday, September 22, 2011

Yay! Finally I made a second attempt at the Chinese Coin bookmark. I'm ready to make the turn and start up the other side. I will probably wait until tomorrow to finish it off.

I am so behind in my tatting or any lace, for that matter. Palmettos is this weekend and I'll be watching for news from attendees. Also the gang at Fringe Element which is also this weekend. The Feast of the Hunter's Moon is also this weekend locally. I won't be attending any of them. I was originally going on vacation but had to make some changes in my plans. It will be better to go at a later date.

I've been reading the blogs even though I don't comment on all. Time has been at a premium lately but I'm liking what I see. So much beautiful Autumn colors in thread and projects! Autumn is my favorite season.

I've been enjoying the season's premiers this week. I mostly watch the comedys - The Big Bang Theory was the main attraction tonight! Person of Interest is on now which doesn't particularly appeal to me. CSIC is about as much drama as I can handle!

Friday, September 16, 2011

My Lace Guild has a new blog, Lafayette Lacemakers, thanks to one of our newest members!

Lelia, over at Stitches of Life II, is the creator of the blog. What a wonderful job she has done too!

Tuesday, September 13, 2011

I did start the Winter Butterfly but haven't been happy with it so it's just laying there waiting on me. I'll finish it but I don't think it will go with the others. I don't want to make a final decision until it is complete though. It might look entirely different.

One of the problems is that the colors are not as pale as I thought when tatted up. That may still be okay...it might just be a matter of perception viewing it pretty much bare and naked.

The other problem is that I added a silver thread to the white because I wanted a little bit of sparkle like real snowflakes or snow have - unless it's overcast and the snow has been around long enough to get gray and dingy. But it adds just enough thickness to the thread that it is noticeably bigger than the wing thread or the bodies on the other butterflies. So...when it is done, if I decide I like the wings this color after all, I'll make another one and use a smaller white thread to compensate. The silver thread itself is fine already. Or I could cut the body away and make the new one and attach in the same place. I actually had to do that with the last one after I decided to change colors for the body so I know it can be done, as long as it's done early. Like NOW, before I go any further! I just remembered that option.

See...too many irons in the fire.

I have not attempted to work more on the Chinese Coin bookmark. I will make an entirely new one - maybe even in a different color. I also haven't worked on any more vintage motifs for the challenge. Too many irons in the fire right now, as I just mentioned, but I will eventually get back to them both.

Saturday, September 10, 2011

Sheer Frustration!

I sort of understand what it feels like to be Fox.

This is the second time I've tried to tat Jon's Chinese Coin bookmark. The first time was a few years ago and the thread was way too fine for a first try. I abandoned it planning to try again later, not this much later, but later.

I started this earlier in the week and was quite proud of myself for getting one whole side done. Then other things got in the way and it sat on my table, patiently waiting for me to get back to it. Tonight was the night.

I had just completed the second segment from the bottom and was pleased with how it was going....until I realized I was one ring short to join to on the left side.


How did that happen? I kept studying it and couldn't figure out the exact error except I was short one ring! I finally got that I had not made the second ring between segments. The only way to fix it is to cut out the whole segment. I couldn't ignore it and go on at this point. It's now glaring at me!

I had numbered the order of the top segment of rings to help me keep it straight. Jon colored coded the split rings according to where they were split but I still had to draw a line at the split to know where easily. I should have numbered them all the way down and possibly would not have missed that ring.

So maybe I'll tackle it again on another day. It's not that hard, really! You just have to keep track of the order of rings and chains. It was tatted in size 30 Cebelia.

Monday, September 05, 2011


Summer!

Tatted with Marilee's HDT Garden Afternoon and Lizbeth Leaf Green Medium, size 20 for both.

Kind of reminds me of Monet's Garden.

Sunday, September 04, 2011

I got an unexpected gift from Anika - two more of her hand dyed skeins! I have one wound onto a floss holder and tatted a tiny bit already.

Otherwise, I really have no tatting to show. We had another heat record-breaking week and after trudging across campus several times each day, I literally dropped for a nap every day when I got home. When I woke up, I really didn't feel like doing anything. It's pretty bad when I can't even rouse myself to tat!

Yesterday I spent a few hours demonstrating lace at Global Fest. Since another tatter was going to be there during the same shift, I took a Romanian Point Lace project with me. I didn't make much progress and may snip out what I did do. It's hard to focus when people are continually asking questions and telling their stories. Enjoyable but not conducive to good lace work. It wasn't bad in spite of the lack of AC but I was glad to go home and cool off. Kelli may have some photos to post later but I didn't take any.

It did cool off last night as a cold front came through and it looks like the remainder of the weekend will be comfortable, if cloudy and overcast.

May all of you who labor on a regular basis enjoy the holiday on Monday!

Thursday, September 01, 2011

#18 in 25 Motif Challenge

Plate V, figure 25

I started on the motif last night. It's a simple 4 ring motif. 6-6-6-6 with joins at the side picots. At first, I miscounted the picots and had a 6-6-6 ring but then I saw there was no way to join at the corners for the 9 square center so I carefully counted again and found my mistake. I'd already made 2 rings. I didn't want to cut them off and have a knot and ends to deal with because I planned on split rings later so I de-tatted and started over. Not really much of a bother.

So then I went from one little motif to another and was not pleased with how the rings bunched up. I kept looking at the picture over and over...what was I doing wrong? And what was that teensy little center there? Was that the stitching from embroidering it on the net?

And then a little light went on. I remembered seeing something about 10 stitches but nothing in the ring was the equivelant of 10 stitches so back to carefully reading the pattern I went! Oh my! After the 4 rings are tatted, you tat a tiny ring of 10 stitches. This folds down on the center. That's what that little nubbin' in the center is!

So here is the real motif!

To get the tiny ring on the topside so all the stitches looked the same, I unwound the shuttle, pulled the thread up through the center, tatted the ring and then pulled the thread back down again. Then I caught a stitch in the tiny ring at the top with my fine crochet hook and brought that thread up through it and then down again, tying to the other thread in the back.

The only way to get that center effect is to tat each motif separately. You can't climb out with a split ring. I suppose technically you could, by tatting the tiny rings after all the motifs are done but I can see that tatting them separately won't result in the bunched up rings like the first incorrect sample.

Now to begin with, I have no idea how to embroider net. I'm not even sure what net is. The only "net" I know of is the nylon variety used to make scrubbies for the kitchen and bathroom or scratchy crinoline slips to make the skirt poof out. Or the NET, the internet variety. When I thought I could zip through the 9 center motifs and the outside 24 motifs by using split rings, I was going to try putting it on a linen piece as the center insert and outer edging. Now that I know I'm going to have to tat 33 individual motifs and hide the ends in every one of them, I'm just not willing to do that at the moment. Life is a little busy and with holidays soon coming up, my time can be better spent elsewhere, but I may use it as a long term side project.

There are 3 more motifs in this Plate V and I will do them. One other is also on net and we'll see how much tatting is involved in that before I commit to it on linen!