Once again, I'm having trouble getting the scan to show up. I'll try again tomorrow. :-)
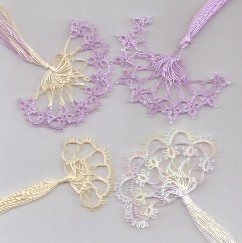
(GGG) Okay, when they are here...... The yellow one was the 1st and same as the one in Georgia's online class - forget now who did it. ahhhh.....Eliz' ??? For some reason, hers looked bigger - maybe cause it has a very short tassel. You can see it here.
2nd one is the purple and yellow - used clovers to attach to the loops.
3rd is all purple (really lavender) and I reversed the clovers and chains and used beads, So far, everything is in size 30 cebelia.
4th one - size 20 here......used a single ring for attaching and the single row of chains looked kinda plain after the clovers on the others, so I added a second row of chains - also have yellow blending filament, which is so sparkly - really doesn't show that much on the scan.
These are the quickie directions -
Make a length of hairpin lace with the specified number of loops on each side. If you need help learning hairpin lace...go here.
Before I took the loops off the loom, I encased each side in a large safety pin - helps keep them from getting tangled and lost in each other. I also hid my ends so I wouldn't have to do that later.
21 is a good number of loops. I used 25 on the ones with clovers, experimenting - just attached 2 loops on each outside edge - think 3 looks better - so the number of loops does need to be in multiples - keeping in mind the more there are, the wider the spread. Both fans with clovers ended up with 9 places to attach and I don't think you would want it any wider than that - almost a complete semi-circle. So for 9 attachments in multiples of 3, you would need 27 loops. If you wanted to use 4 loops with each attachment, it would be 36 loops - it's your call - whatever you want to try.
clovers were:
R 3 p sep by 3 ds, 3ds;
R 3ds, j to prev r, 5 ds, j to 3 loops, 5 ds, p, 3 ds;
R 3 ds, j to prev r, 3 ds, 2 p sep by 3 ds
chains with the clovers were 2 ds, 5 p sep by 2 ds, 2 ds
When chains were attaching to the loops, I used ch 3, p, ch 5, attach to 3 loops, ch 5, p, ch 3
Clovers were same as before except you aren't joining to the loops with the big ring
The ring and double chain: Rings were 2 ds, p, 2ds, p, 2 ds, j to loops, 2 ds, p, 2 ds, p, 2 ds
1st row of chains were 5 p sep by 2 ds
2nd row was 9 p sep by 2 ds, j at base of ring below
This is fun playing! Once the blank is made - the toppings are endless and not very time consuming. Clovers and chains were done in one pass and there are numerous variations on that. You could add several rows if you want to get more complex. Use your favorite edging. Add beads, blending filament, charms..........the time invested is small compared to most tatting projects, so go for it! There was one I started and didn't like the way it was going.....snip, snip.....off came the offending rings and I still had the blank for another go at it. Play with color combinations. Use up small bits of thread - too much for butterflys but too little for a bookmark. Make up your blanks ahead and then add toppings when you're bored with a big project - save them for card stuffers, little gifts, momentos.......
I put a tassel on all of mine. Most I slipped through the loops. On the all-lavender one, I made a short chain in set stitch (3 of the first half of ds, 3 of 2nd half of ds, repeat for length) and threaded it through the loops, joining and then leaving the ends long enough to match the other threads I looped through that for the tassel. A ribbon would work just as well.
I got my new threads today. Gorgeous colors but it isn't the size 12 perle I'm used to seeing. Looks more like size 20 and coarser than I expected. But I got a complimentary ball with my order! :-) Very fast. Hmmmm, holding it against the size 20 and the size 30 I just tatted with, it's in between. Larger than 30 but smaller than 20. This could be interesting. I'm thinking I might just try this on a rocking horse pattern from Kate's Kritters that I'm reviewing. It's an older publication, but our group doesn't have a review on it yet. This color Jewels will look nice in that. I'll show ya later. :-)


.png)


%2B(650x228).jpg)


.JPG)


0 comments:
Post a Comment
Emails and comments both are welcome and always read.